background image

English


_11

!

  CONNECTING WITH OTHER DEVICE

connecting with other device

THINGS TO CHECK BEFORE CONNECTION

Check before connecting


J


`

When connecting, refer to the instruction manual of the product to be connected. The number and position of external 
devices may differ depending on the product.


`

Do not connect the power until all connections are complete. Connecting the power supply during connection may damage 
the product.


`

Check the type of terminal behind the product you want to connect.

CONNECTING WITH EXTERNAL DEVICES


~

Connect the power cable after all cables have been connected. 
Disconnect the power cable before connecting external devices.


~

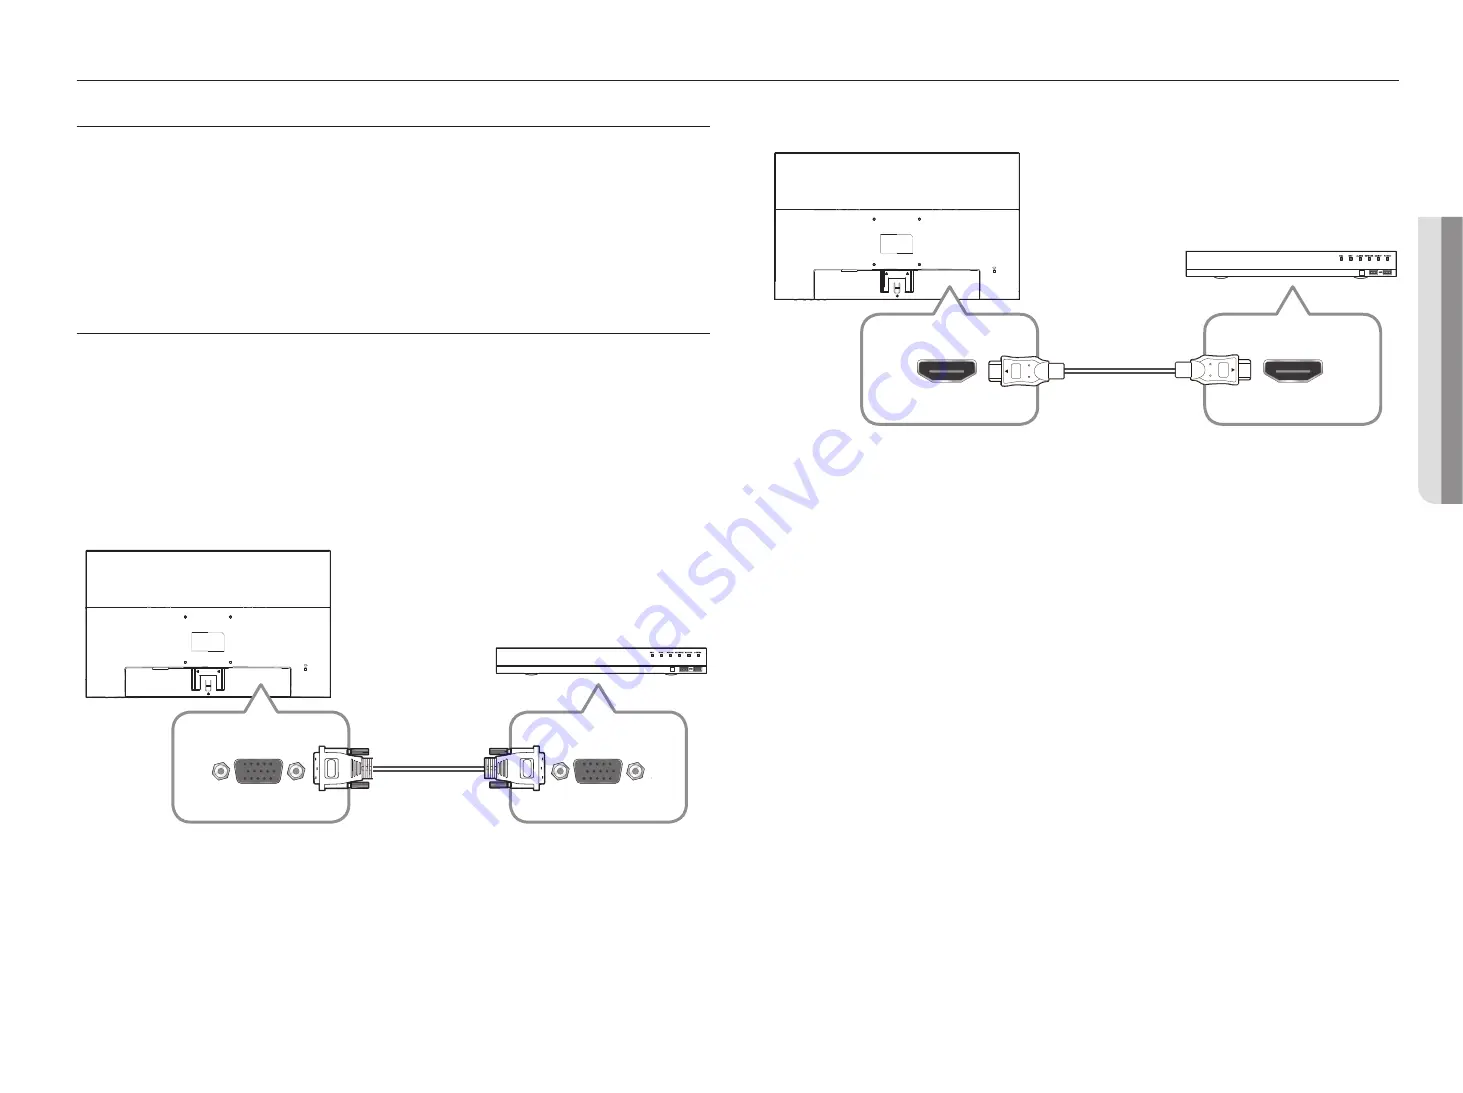
You can connect the product to external devices in various ways. 
Select the correct connection method for your external devices.

VGA (D-SUB) cable connection method

VGA

HDMI cable connection method

HDMI

Summary of Contents for SMT-2431

Page 1: ...SMT 2431 SECURITY LED MONITOR User Manual ...

Page 2: ...e reproduced distributed or changed partially or wholly without formal authorization Disclaimer Hanwha Techwin makes the best to verify the integrity and correctness of the contents in this document but no formal guarantee shall be provided Use of this document and the subsequent results shall be entirely on the user s own responsibility Hanwha Techwin reserves the right to change the contents of ...

Page 3: ...torms or when unused for long periods of time 14 Refer all servicing to qualified service personnel Servicing is required when the apparatus has been damaged in any way such as power supply cord or plug is damaged liquid has been spilled or objects have fallen into the apparatus the apparatus has been exposed to rain or moisture does not operate normally or has been dropped Standards Approvals J A...

Page 4: ...Keep heating appliances as far away from the power cord or the product as possible Otherwise this may result in electric shock or fire Do not install it in a badly ventilated location such as a bookcase or closet Otherwise this may result in fire due to an increase in the internal temperature When putting the product down make sure to put it down softly Otherwise this may result in damage to the s...

Page 5: ...r If you are not going to use the product for an extended period of time set it to sleep mode To avoid eyestrain do not sit too close to the product Do not install it in an unstable location such as an unstable rack or uneven surface or a location exposed to vibrations Otherwise it may fall and cause personal injury and or damage the product If you use the product in a location exposed to vibratio...

Page 6: ...9 9 Before Installing the Product 9 Assembling the stand 10 Installing Wall Mount Parts CONNECTING WITH OTHER DEVICE 11 11 Things to check before connection 11 Connecting with external devices MENU SETTINGS 12 12 Screen OSD menu settings 12 Brightness 12 Image Setup 12 Color Setup 13 Osd Setup 13 Reset 13 Additional functions APPENDIX 14 14 Product Overview 15 Troubleshooting ...

Page 7: ...n the menu screen appears Press the AUTO button to exit the screen adjustment menu Press the button while the menu screen is displayed to move the menu or adjust the value If you press the button while the menu screen is not displayed the Brightness menu appears Press the button while the menu screen is displayed to move the menu or adjust the value If you press the button while the menu screen is...

Page 8: ...wing images are for reference only Real life applications may differ To lock an anti theft locking device 1 Fix the cable of your anti theft locking device to a heavy object such as a desk 2 Put one end of the cable through the loop on the other end 3 Insert the locking device into the anti theft lock slot at the back of the product 4 Lock the locking device An anti theft locking device can be pur...

Page 9: ...poorly ventilated area it might be damaged due to the temperature rising inside the product Ensure there is enough space around the product before installation Vertical wall mount condition A Minimum 40 mm B Ambient temperature Measuring point 35 C 10cm 10cm 10cm 10cm Installation conditions for standing monitors 10cm 10cm 10cm 10cm ASSEMBLING THE STAND Before assembling the product make sure that...

Page 10: ...ssembly Do not use screws that are longer than the standard dimensions or that do not conform to the VESA standard screw specifications Using screws that are too long may damage the inside of the product For wall mount parts that do not conform to the VESA standard screw specifications the screw length may vary depending on the wall mount specifications Do not over tighten the screws The product m...

Page 11: ...l all connections are complete Connecting the power supply during connection may damage the product Check the type of terminal behind the product you want to connect CONNECTING WITH EXTERNAL DEVICES Connect the power cable after all cables have been connected Disconnect the power cable before connecting external devices You can connect the product to external devices in various ways Select the cor...

Page 12: ...vironment DCR Dynamic Contrast Ratio Sets whether or not to adjust the contrast ratio OD Over Drive The liquid crystal s reaction time can be reduced by running it at a higher voltage over a shorter time IMAGE SETUP The screen s size and position can be adjusted 1 Press the MENU button to enter the main menu 2 Press the _ button to select icon and then press the MENU button H Position 50 V Positio...

Page 13: ...en language The initial value is set to English OSD H Pos Moves the screen of the menu to the left or right OSD V Pos Moves the screen position of the menu up or down OSD Timer The menu screen disappears if the screen does not change for a certain period of time Transparency Sets the transparency of the menu screen RESET Resets the monitor settings to default Reset ADDITIONAL FUNCTIONS You can sel...

Page 14: ...14_ appendix appendix PRODUCT OVERVIEW unit mm appendix ...

Page 15: ...e Cellular phones within a 1 meter radius may cause interference with analog digital products The brightness and color are strange Adjust the screen option from the brightness settings Reset the screen with the default screen settings I can see a dotted line on the edge of the screen If the screen is the original size try changing it to 16 9 I can see lines red green blue on the screen This occurs...

Page 16: ...ronic accessories should not be mixed with other commercial wastes for disposal Correct disposal of batteries in this product Applicable in the European Union and other European countries with separate battery return systems This marking on the battery manual or packaging indicates that the batteries in this product should not be disposed of with other household waste at the end of their working l...

Page 17: ......

Reviews: