background image

USER'S MANUAL

- 6 -

Rear & Left Side View

USER'S MANUAL

USER'S MANUAL

Rear View 

POWER 

AC power input.

VIDEO-A  IN 

Composite signal input for VIDEO A.

VIDEO-A  OUT

Video looping output for VIDEO A.

VIDEO-B  IN

Composite signal input for VIDEO B.

VIDEO-B  OUT

 Video looping output for VIDEO B.

HDMI IN

 HDMI signal input.

VGA

VGA signal input

Left Side View

AUDIO-B

Audio-B input : Right (RED), Left (White)

AUDIO-A

Audio-A  input : Right (RED), Left (White)

Rear View 

Left Side View 

Note

When you don’t use video looping output ,please unplug video looping output cable or connect a 75     terminal 

Ω

resistance at the video looping output jack .Otherwise,it will cause the signal scope oversized which bring about 

brightness distortion.

/

/

/

/

/

/

The colour and the appearance may differ depending on the product

 .

- 7 -

USER'S MANUAL

USER'S MANUAL

Press to select a pre-defined Picture Mode of the 


monitor or to change the picture atmosphere as 

required. When you press this button, current mode  


is displayed on the lower center of the screen. 

The monitor has three auto matic picture settings that  


circle through available reconfigured modes.

( Dynamic, Standard, Movie)

/

 buttons

Moves from one menu item to another horizontally, vertically or adjusts selected menu values.


are preset at the factory. Then push button

 again to  

  PIP (Available in VGA/HDMI Mode)/A-SWITCH


Push the PIP button to turn PIP screen On/Off. (PIP is not available for SMT-1935/SMT-2233

/SMT-1931/

  SMT-2731).

After pressing A-Switch button, monitor will automatically switch input signal, Video-A ->

Video-B -> VGA -> HDMI according to the interval set in the menu.

Displays the entire video signal on the screen.

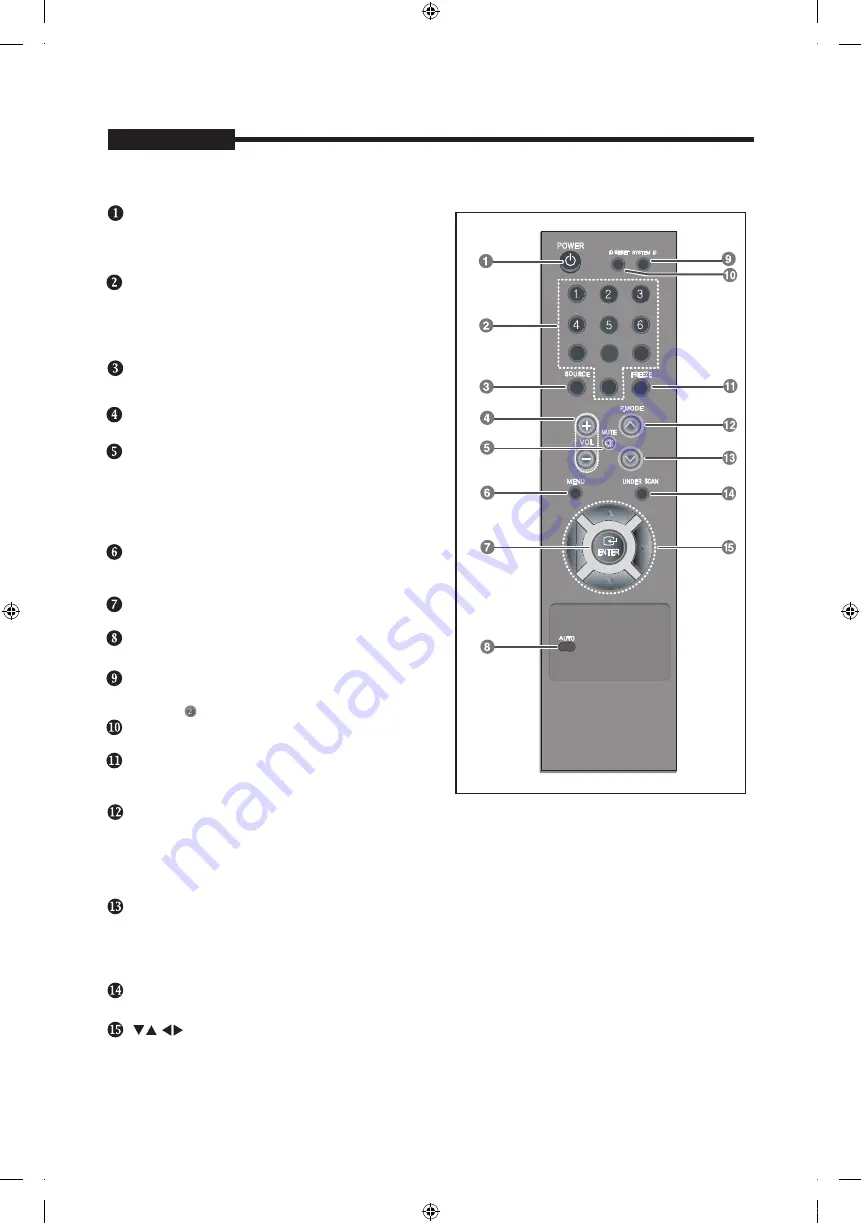
Remote Controller

POWER

Turns the Power On or Off.

There will be a few seconds delay before display 

appears.

  Number button

Changes the SYSTEM ID for remote controller.

With the SYSTEM ID button pressed, entered the  

desired NUMBER by pressing the corresponding  

button(0~9) to set up the Remote Controller ID

  ,  -

Adjusts the audio volume.

  MUTE

Press to mute the sound temporarily.

Displayed on the bottom left of the screen.

Press the MUTE button again to cancel the Mute    

function. Alternatively press the - or + button to cancel  

the Mute function.

  MENU

Open the on-screen menu and exit from the menu  

screen or close screen adjustment menu.

  ENTER

Activates a highlighted menu item.

  SYSTEM ID

Setting the SYSTEM ID of remote controller.

Refer to      Number button.

  FREEZE - Available in Video A/B,HDMI Mode

  AUTO - Available In VGA mode Only

Adjusts the screen display automatically.

  SOURCE

Press the 'SOURCE' button to change the input signal 

source.

  ID RESET

Press the button once to freeze the screen. Press it

 again to unfreeze.

Resets 1(default value) for the remote control ID.

P.MODE 

  UNDER SCAN - Available in Video A/B,HDMI Mode

PIP/A-SWITCH

7

8

9

0

PT01-004287A(S03)-SMT-1935,2233,1931,2731-manual-ENG_GU.indd   7

2018-02-08   오후 1:57:38

Summary of Contents for CT-SMT-1935

Page 1: ...SMT 2233 SMT 1935 SMT 1931 SMT 2731 security LED MONITOR User manual PT01 004287A S03 SMT 1935 2233 1931 2731 manual ENG_GU indd 1 2018 02 08 오후 1 57 33 ...

Page 2: ...wha Techwin or sold with the monitor Any mounting of the monitor should follow Hanwha Techwin s instructions and should use a mounting accessory recommended by Hanwha Techwin Slots and openings in the cabinet are provided for ventilation and to ensure reliable operation of the monitor and to protect it from overheating and these openings should never be blocked by placing the monitor on a bed sofa...

Page 3: ...ompliance could void the user s authority to operate the equipment NOTE This equipment has been tested and found tocomply with the limits for a Class A digital device pursuant to Part 15 of the FCC Rules These limits are designed to provide reasonable protection against harmful interference when the equipment is operated in a commercial environment This equipment generates uses and can radiate rad...

Page 4: ... Remote Controller 7 Connecting to External Devices 8 OSD Menu Configurations 10 No Signal Display 10 OSD Menu Selection 10 Picture Menu 10 Sound Menu 13 Setup Menu 14 Input Menu 18 Contents Specifications 19 CorrectDisposal 25 Dimensions 21 PT01 004287A S03 SMT 1935 2233 1931 2731 manual ENG_GU indd 4 2018 02 08 오후 1 57 35 ...

Page 5: ...PT01 004287A S03 SMT 1935 2233 1931 2731 manual ENG_GU indd 5 2018 02 08 오후 1 57 36 ...

Page 6: ... Left Side View AUDIO B Audio B input Right RED Left White AUDIO A Audio A input Right RED Left White Rear View Left Side View Note When you don t use video looping output please unplug video looping output cable or connect a 75 terminal Ω resistance at the video looping output jack Otherwise it will cause the signal scope oversized which bring about brightness distortion The colour and the appear...

Page 7: ...ay before display appears Number button Changes the SYSTEM ID for remote controller With the SYSTEM ID button pressed entered the desired NUMBER by pressing the corresponding button 0 9 to set up the Remote Controller ID VOLUME Adjusts the audio volume MUTE Press to mute the sound temporarily Displayed on the bottom left of the screen Press the MUTE button again to cancel the Mute function Alterna...

Page 8: ...pward as shown 2 Install two aaa size batteries Make sure to match the and ends of the batteries with the diagram inside the compartment 3 Replace the cover Assuming typical TV usage the batteries last for about one year NOTE x Use the remote control within 23 feet from Monitor x Bright light may affect the performance of the remote control Avoid using nearby special fluorescent light or neon sign...

Page 9: ...using a stand or wall mount use parts provided by Hanwha Techwin only If you use parts provided by another manufacturer it may result in a problem with the product or an injury due to the product falling The appearance may differ depending on the product Be careful when you contact the monitor because some parts can be somewhat hot Installation with a stand Installation with a wall mount 10 cm 10 ...

Page 10: ... Press the ENTER button OSD Menu Configurations USER S MANUAL No Signal Display OSD Menu Selection NOTE1 Press the button to return to the previous screen Press the MENU button to exit NOTE2 The OSD display will be disapear after 1 minutes if there is no button input NOTE3 The displayed image may differ depending on the model No Signal Video mode Picture Menu Check signal cable VGA HDMI mode Pictu...

Page 11: ...mage Lock Coarse and Fine Tuning of the Image The purpose of picture quality adjustment is to remove or reduce picture noise If the noise is not removed by Fine tuning alone then adjust the frequency as best as possible coarse and Fine tune again After the noise has been reduced re adjust the picture so that it is aligned on the center of screen 1 Preset Press the SOURCE button to select VGA mode ...

Page 12: ...ER or Press the setting value and save of the Gamma menu 5 Select the White Balance menu and then press the ENTER or button 6 It includes R Offset G Offset B Offset R Gain G Gain B Gain and Reset 7 Press the ENTER or 8 Press the and the ENTER setting value and save and ENTER button to select the button to adjust the Select these menus in turn by pressing button Press Reset menu the menu R Offset G...

Page 13: ...can Zoom 4 3 button to select thePicture 2 Press the ENTER or button 3 Press the and ENTER button to select the Picture Options menu 4 There are 4 sub menu Colour Tone Size Digital NR HDMI Black Level 5 Press the ENTER or button Select the mode of Colour Tone Cool Normal Warm1 Warm2 by pressing button and 6 Select the Size menu you can adjust picture in turn by 16 9 Zoom 4 3 Under Scan 1 Press the...

Page 14: ...urn Setup Language Blue Screen Melody Auto Switch System ID No Signal OSD Move Enter Return 5 Press the Melody Off Off ECO Saving Off ECO Saving Reset Selecting the Reset function after setting the equalizer resets the equalizer setting to the factory defaults 1 Press the MENU and button to select the Sound menu 2 Press the ENTER or button 3 Press the and ENTER button to select the Reset 4 Press t...

Page 15: ...aving Auto Switch System ID 1 No Signal OSD On Screen Burn Protection 75 50 Melody Blue Screen Off 75 Change the monitor power consum 50 Change the monitor power consum Off Deactivate the Eco Saving function ption to 75 of the default level ption to 50 of the default level Off Screen Burn Protection Setup Language English Blue Screen Off Auto Switch System ID 1 No Signal OSD On Move Enter Return M...

Page 16: ...SA DMT VESA DMT VESA GTF VESA CVT VESA 1280x960 60 000 60 000 VESA 63 979 60 000 VESA 1600x1200 75 000 60 000 VESA 1920x1080 67 432 59 94 VESA 1024 768 1280 720 1280x1024 79 972 75 024 81 25 65 000 87 500 70 000 70 60 67 72 75 70 60 60 72 75 75 60 70 75 60 70 75 75 60 60 60 60 75 65 70 Hz Display Mode Refresh Rate Horizontal Frequency Vertical Frequency 2 When the control panel window appears clic...

Page 17: ...rmally if a non standard video format is selected Separate and Composite modes are supported SOG is not supported System ID 1 Press the MENU and button to select the Setup menu 2 Press the ENTER or button 3 Press the button to select the System ID 4 Press the and ENTER button to select the setting you want 0 9 5 Press the MENU button to exit Setup Move Enter Return Language English ECO Saving Auto...

Page 18: ...deo B VGA HDMI Move Enter Return Source List Input Menu Input Source List Video A Edit Name Move Enter Return 1 Press the MENU and button to select the Setup menu 2 Press the ENTER or button 3 4 Press the and ENTER button to select the setting you want 5 Press the MENU button to exit Press the button to select Screen Burn Protection Interval You can set the interval for Screen Burn Protection The ...

Page 19: ... Comb Filter Noise Reduction Auto Switch Freeze Under Scan Yes Yes Yes Yes Yes Video Composite 2CH input 1 0Vp p 75Ωterminal Loop Through out BNC Type HDMI 1CH input VGA 1CH input Audio OSD language 2 Channel input 2W Stereo RCA Type 16 languages Eng Fre Ger Spa Ita Por Dut Swe Rus Tha Ara Tur Dan Kor Jpn Chi Simple Stand Tilt 2 22 Dimensions WxDxH Net 515mm x 217 4mm x 391 8mm with stand 515mm x ...

Page 20: ...L 4 43 4 3 16 9 3D Comb Filter Noise Reduction Auto Switch Freeze Under Scan Yes Yes Yes Yes Yes Video Composite 2CH input 1 0Vp p 75Ωterminal Loop Through out BNC Type HDMI 1CH input VGA 1CH input Audio OSD language 2 Channel input 2W Stereo RCA Type 16 languages Eng Fre Ger Spa Ita Por Dut Swe Rus Tha Ara Tur Dan Kor Jpn Chi Simple Stand Tilt 2 22 Dimensions WxDxH Net 648mm x 479 1mm x 212mm wit...

Page 21: ...PT01 004287A S03 SMT 1935 2233 1931 2731 manual ENG_GU indd 21 2018 02 08 오후 1 57 50 ...

Page 22: ...PT01 004287A S03 SMT 1935 2233 1931 2731 manual ENG_GU indd 22 2018 02 08 오후 1 57 53 ...

Page 23: ...PT01 004287A S03 SMT 1935 2233 1931 2731 manual ENG_GU indd 23 2018 02 08 오후 1 57 54 ...

Page 24: ...PT01 004287A S03 SMT 1935 2233 1931 2731 manual ENG_GU indd 24 2018 02 08 오후 1 57 55 ...

Page 25: ... health from uncontrolled waste disposal please separate these items from other types of waste and recycle them responsibly to promote the sustainable reuse of material resources Household users should contact either the retailer where they purchased this product or their local government office for details of where and how they can take these items for environmentally safe recycling Business user...

Page 26: ...rica 500 Frank W Burr Blvd Suite 43 Teaneck NJ 07666 Toll Free 1 877 213 1222 Direct 1 201 325 6920 Fax 1 201 373 0124 www hanwha security com Hanwha Techwin Europe Heriot House Heriot Road Chertsey Surrey KT16 9DT United Kingdom Tel 44 1932 57 8100 Fax 44 1932 57 8101 www hanwha security eu PT01 004287A S03 SMT 1935 2233 1931 2731 manual ENG_GU indd 26 2018 02 08 오후 1 57 56 ...

Reviews: