20
from the ignition electrode by gently pulling at the
cables.
4. Unscrew the four nuts that connect the burner unit
to the air inlet.
5. Remove the burner unit from the air heater.
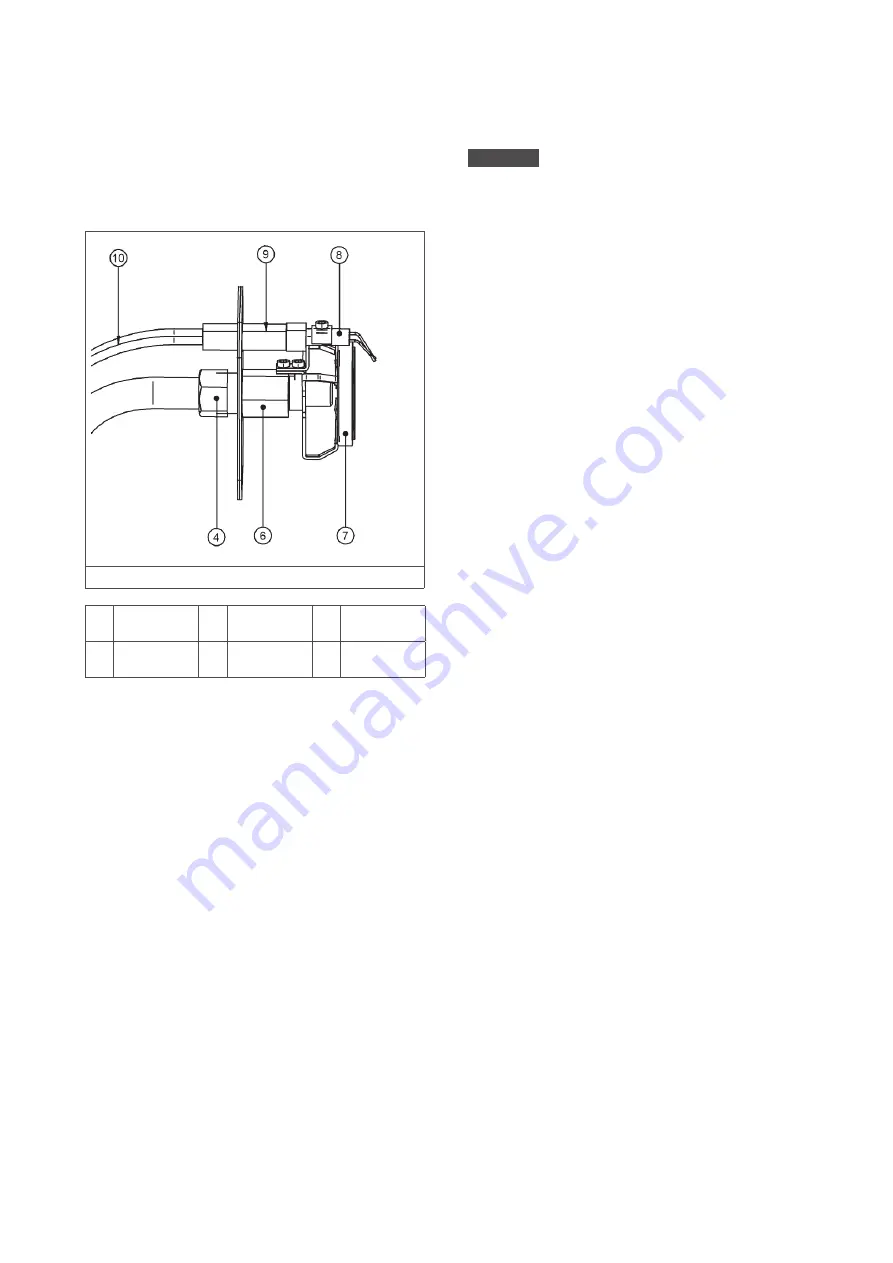
The burner consists of the following parts (figure 16):
Figure 16 - Parts of the burner unit
4
Compression
fitting (22 mm)
7
Flame stabilizer
9
Connection boot
(x2)
6
Injector
8
Ignition electrode
10
Ignition cable
(x2)
To clean the burner unit, do the following:
1. Clean the various parts with a soft brush, a cloth or
compressed air.
2. Pay extra attention to dirt building up on the stabi-
lizer and the ignition electrode.
10.4 Extensive maintenance in
poultry sheds
WARNING!
Do not use a pressure washer to clean parts
that contain electronics, such as the electric motor or the
machine cover.
1. Use compressed air or a soft brush to clean the
remaining parts from the air heater. Focus on the
following parts:
a. The inside and outside of the body.
b. The fan blades and motor.
c. The temperature sensor.
d. The vane switch.
2. Remove all dust from the motor. Accumulated
dust acts as insulation and can cause the motor to
overheat.
3. Use a brush to remove any baked on dust.
4. Clean the burner unit (see §10).
5. Open the gas valve.
6. Check if the gas supply line does not leak.
7. If the heater has been moved, check if the supply
lines are connected properly.
8. Check if the wiring is secured properly.
9. Switch on the air heater and let it heat for a while.
This burns off any remaining dust particles.
10. Stop the heating process.
11. Cover the air heater when it is fully cooled off. This
protects it from dirt or dust.
12. Make sure the air heater is electrically isolated.
13. Disinfect the poultry shed and spread the sawdust.
14. Remove the cover from the air heater. The heater is
ready to be used.
Summary of Contents for DXA100
Page 1: ...DXA en v2 0 12 2019 INSTALLATION MANUAL AIR HEATER TYPE DXA ...
Page 24: ......


