background image

-10-

BASIC CONNECTION

Ensure that the power switch of this unit and
other equipment to be connected is turned off
before commencing connection

Read through the instructions before connect-
ing other equipment

Ensure that you observe the color-coding
when connecting audio and video cords

Please use only one kind of connection with
TV set for the unit and choose correct video
output setting, otherwise there may be image
distortion.

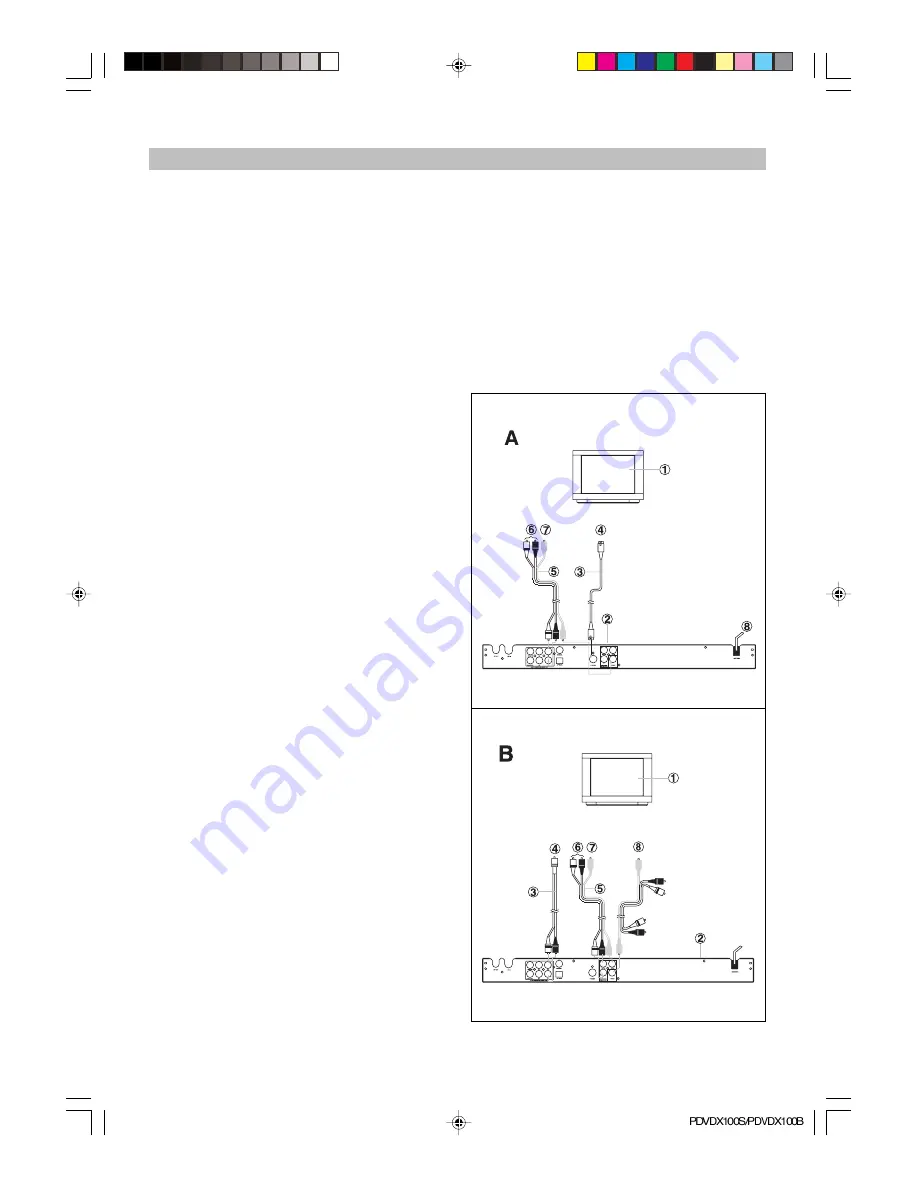
DVD player part Connection

A: Connecting to TV set w/AV input jack

1.

TV set (optional)

2.

DVD/DVB-T Combo player

3.4.

S-Video cord (optional), to S-Video input
connector

5.6.7. Video/Audio cord (optional), to TV video/

audio input connector

8.

Power cord

B: Connecting to a stereo TV set

1.

TV set (optional)

2.

DVD/DVB-T Combo player

3.4.

Audio cord, to TV audio input connector

5. 6.7. To the corresponding Y Pb/Cb Pr/Cr VIDEO

IN jack on the TV. (green, blue, red).

8.

Video cord, To TV video input connector

To get better viewing quality, you are advised
using S-video cord to connect the TV set with
CVBS input meanwhile changing the TV set to S-
video input format. The TV set with Y, Cb, Cr input
can get more clear picture and realistic image
when it connects to Y, Cb, Cr output jacks of this
player. The Video out setting must be set as YUV
if you use Y, Cb, Cr output.
If your TV has “Y Pb Pr” function (progressive
scan function), you can use this unit’s progres-
sive scan output by using Y Pb Pr output jacks &
setting the player’s VIDEO OUT as Y Pb Pr.

Note:

1. Choose below speaker size setting in the set-

ting “Audio” menu if you use the TV speakers:
Front: Large, Center/Rear/Subwoofer: Off. At
this setting situation which is Stereo effect,
the signal from Audio output L, R is the same
as the FL & FR output, also same as the audio
signal from Scart jack.

2. Only one kind of connection to TV set can be

made. If your TV set doesn’t support “Y Pb Pr”
function, don’t switch the VIDEO OUT to Y Pb
Pr of the unit, otherwise there will be no pic-

ture output.

3. Consumers should note that not all high defini-

tion television sets are fully compatible with
this product and may cause artefacts to be
displayed in the picture. In case of 525 or 625
progressive scan picture problems, it is rec-
ommended that the user switch the connec-
tion to the ‘standard definition’ output.

Relative Setup

When using 2ch output to connect TV or audio
equipment, please set submenu of Analog Out
under the menu of Audio Setup as 2 channels.

PDVDX100S-100B-im.p65

06-5-16, 11:30

10

Summary of Contents for PDVDX100B

Page 1: ...DVD DVB T COMBO PLAYER PDVDX100S PDVDX100B INSTRUCTION BOOK Please read this IB carefully to get the best performance from this player PDVDX100S 100B im p65 06 5 16 11 30 1...

Page 2: ...9 10 button 14 MUTE 14 VOL VOL 15 DISPLAY 15 ZOOM 15 A B REPEAT 15 MODE 15 ANGLE 15 AUDIO 15 PROGRAM 15 MARK 15 VIDEO OUT 15 SEARCH 15 TITLE For DVD Disc 16 MENU 16 SUBTITLE 16 CLR 16 DVD DVB 16 SETU...

Page 3: ...E RADIOACTIVE DANGER MAY BE CAUSED IF YOU DO NOT FOLLOW THE METHOD STIPULATED HEREFORTHEOPERATION ADJUSTMENTORCONTROL PLEASECONSIGNTHEMAINTENANCETOTHEPROFESSIONALTECHNICIAN Warning To reduce the risk...

Page 4: ...s speak ers near the unit Stacking Place the unit in a horizontal position and do not place anything heavy on it Do not place the unit on amplifiers or other equipment which may become hot Minimum dis...

Page 5: ...ayer as AUTO in the video setup Compatible with CD and DVD This player could play various discs such as DVD CD 8cm 12cm discs This player can play DIVX format movies such as DivX3 11 DivX4 DivX5 Note...

Page 6: ...CLOSEbutton 7 SKIP CH button 8 DVD DVB switch button 9 PLAY PAUSE button 10 STOP button 11 SKIP CH button Front panel reference Remote control one piece Instruction Book one piece Batteries two pieces...

Page 7: ...only for DVD player 9 Chromatic aberration signal Cb Pb output jack only for DVD player 10 Coaxial output jack 11 5 1CH FL output jack 12 5 1CH SL output jack 13 5 1CH CENTER output jack 14 RFIN 15 R...

Page 8: ...utton 22 MODE button 23 MARK button 24 LAST PROGRAM button 25 PG button 26 TV R MENU button 27 PG button 28 TTX TITLE button 29 Favorite Function button BLUE 30 Favorite Function button YELLOW 31 SETU...

Page 9: ...4 Shows MP3 when playing MP3 5 Shows second 6 Shows minute 7 Shows hour 8 Shows chapter track number 9 Shows pause symbol when pausing the playback 10 Shows playback symbol 11 Shows rotating playback...

Page 10: ...r picture and realistic image when it connects to Y Cb Cr output jacks of this player The Video out setting must be set as YUV if you use Y Cb Cr output If your TV has Y Pb Pr function progressive sca...

Page 11: ...at you connect any of point 3 4 5 When using 5 1ch analog to connect the audio system please set the submenu of analog out under the menu of audio setup as 5 1 channel Coaxial Digital Output Notice Do...

Page 12: ...Audio cords to TV FL FR audio input 6 DVD DVB Combo Player optional 7 Power cord A Connection to TV and antenna 1 TV Set optional 2 Power cord 3 Video cable optional 4 5 Audio cords to TV FL FR audio...

Page 13: ...t mix old and new batteries If the remote control is not going to be used for a long time remove the batteries Otherwise electrolyte may leak and lead to malfunctioning or even burns by electrolyte Wi...

Page 14: ...playing When play back is stopped the unit records the point where STOP was pressed RESUME function Press PLAY again and play will resume from this point Press STOP button twice RESUME function will...

Page 15: ...ram playback screen appears on the TV set 12 tracks CD or chapters DVD can be programmed Use NUMBER button to input your preferred track CD or chapter DVD when the blue cursor flashes on the position1...

Page 16: ...haracters of folder file names may not be displayed normally 1 Playback Menu Main root Use direction button to select the submenu and press OK button to enter the file you prefer In the submenu press...

Page 17: ...l Off Audio Subwoofer On Off Large means full frequency speaker SMALL means medium high frequency speaker which can not perform ultra low frequency Please choose the right setting as per your speaker...

Page 18: ...nel Right channel MUTE Press this button turn on or off mute STANDBY Press this button to enter to STANDBY status press again to return to working status Press SEARCH button can select the channels in...

Page 19: ...s green color button and input the correct PIN CODE using the digit button press OK button to confirm The icon is appeared on the corresponding channel if you want to cancel the Lock press green butto...

Page 20: ...Setup Password Setup LCN Setup Factory Restore Booking List Version 4 1 AV Setup There are following submenus under the AV setup TV Shape 4 3 Letter Box 4 3 Pan Scan 4 3 FullFrame 16 9 Audio Track St...

Page 21: ...ist Play time Event time Press number button can remove the selected booking program 4 8 Version Choose version press OK button and show the software version press OK to exit 5 Electronic Program Guid...

Page 22: ...Full Frame Stereo Stereo Left Left track AV Setup Audio Track Right Right track English English Fran ais French Language Setup Menu Espa ol Spanish Time Zone GMT 11 GMT 11 Time Zone No Sleep No Sleep...

Page 23: ...hot from a num ber of different angles i e the same scene is shot from the front left side and right side etc With such discs the ANGLE button can be used to view the scene from different angles CHAPT...

Page 24: ...k ohm Output level 1 8 0 2 0 8Vrms 1KHz 0dB Harmonic distortion 65dB JIS A 1KHz typical Dynamic range 80dB JIS A 1KHz typical S N ratio 90dB JIS A 1KHz typical Digital audio output Coaxial output Opti...

Page 25: ...tery incorrectly Insert the battery correctly Battery exhausted Change the battery The operating distance is too far or the operating angle is too large Operate within a permit range The RCU is not wo...

Reviews: