25
RECORDING
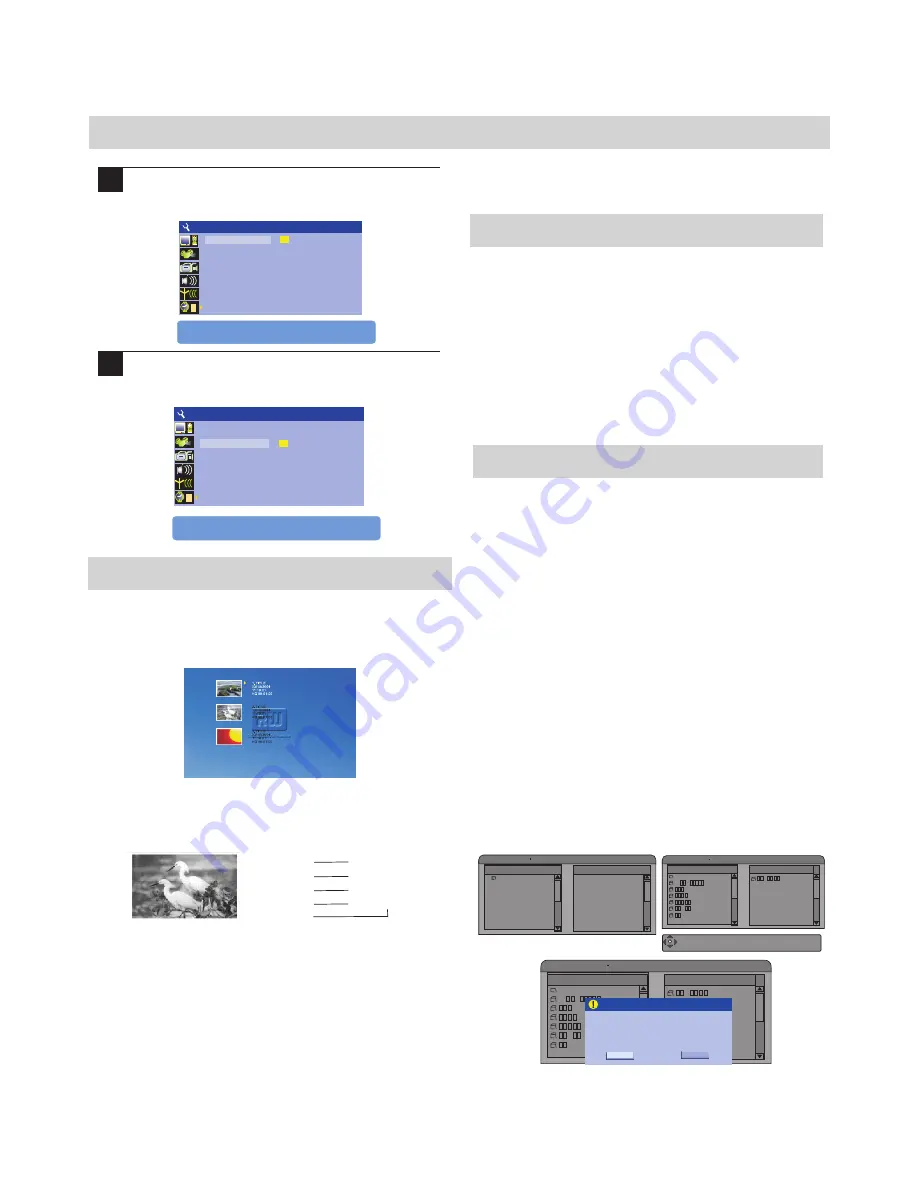
2
Highlight Date (mm/dd/yy), press SELECT and input
the local date using the NUMBER KEY, press SELECT
again to confirm.
3
Highlight time (hh:mm:ss), press SELECT and input
the local time by NUMBER KEY press SELECT again
to confirm it.
The Title Screen
When you insert a DVD RW or DVD R disc, the title
screen will appear. The title screen displays thumbnail
images and information for each title (recording) on the
disc.
±
±
1. THUMBNAIL IMAGE -
An image taken from the first
frame of the recording, the thumbnail image provides a
visual cue to help you identify the titles on the disc.
Types of Recordings
There are two recording methods you can use:
LIVE RECORDING
- You can start a live recording
by simply pressing the
REC
button while viewing
video from an input source, such as the TV tuner or AV
inputs. A live recording will end automatically if the
disc is full.
TIMER RECORDING
- You can also schedule a
recording to automatically begin at a particular date
and time by using the DVD recorder's built-in TIMER
function. Recording can be scheduled to record once a
week or daily.
Making a Live Recording
Selecting the Input Source
After a DVD RW or DVD R disc is inserted in the DVD
recorder, you must select the input source that will be
recorded. You may choose from the following input sources:
TUNER
- The DVD recorder's built-in TV tuner allows you
to record your favorite TV programs.
FRONT CVBS
- Composite video input located on the front.
FRONT S-Video
-S-Video input located on the front.
DV IN
- Digital video input.
REAR CVBS
-The Composite video input located at the back
of the unit .Used for any video device with composite video
output
±
±
1
1.TITLE
2
01/01/00
3
12:03:47
4
SP 00:00:20
5
1.The name of the pre-recorded. The default is TITLE.
2.The date of the record. 3.The time of the record.
4.The quality
5.Length of the record.
3. NEXT INDICATOR -
The ARROW SYMBOL appears
above or below the 3 titles, indicating that a previous page
of titles exists.
2. TITLE INFORMATION -
Displays information about
the recording, including the date and time that the recording
was made, the total length of the recording and the record
quality.
Record from USB to optical disc-
Enter the USB
Playback state, press REC button to archive mode. In this
mode, press ADD/CLEAR button to select the files you desire
to copy to DVD in the same file list. Then press REC to start
archiving. The archiving will take place in a unique directory
created by the product.
Note: You may only archive to a blank DVD, or a DVD that
was previously used only for archiving from USB. You may
not archive to a DVD that has already been used for video
recording.
1. USBA-12 9M -C hips
File Play- STOP 0:00:00/0:00:00
FILES &DIRECTORY FAVORITE/PROGRAM
Add/Clear: Add or Remove Selected File.
REC: Archiving Selected File(s) to disc.
USB to DVD Archiving
Select Source File
Selected File List
../
../
-
.Mp3
.Mp3
.Mp3
.Mp3
.Mp3
-
.Mp3
-
.Mp3
USB to DVD Archiving
Select Source File
Selected File List
../
../
-
.Mp3
.Mp3
.Mp3
.Mp3
.Mp3
-
.Mp3
-
.Mp3
Archive Confirm
OK
Cancel
Are you sure to copy selected
files to optical disc?
Press RETURN to exit edit mode,
UP/DOWN or 0~9 to edit.
Press
SYSTEM SETUP-CLOCK
1
Date(mm/dd/yy)
01/01/01
Time(hh:mm:ss) 21:45:23
Press RETURN to exit edit mode,
UP/DOWN or 0~9 to edit.
Press
SYSTEM SETUP-CLOCK
1
Date(mm/dd/yy) 01/01/01
21:45:23
Time(hh:mm:ss)
Summary of Contents for DVDR-X40
Page 20: ......


