background image


Windy Plus Box PC


User Manual   


  Windy Plus


3.7 Docking Out Wake up 

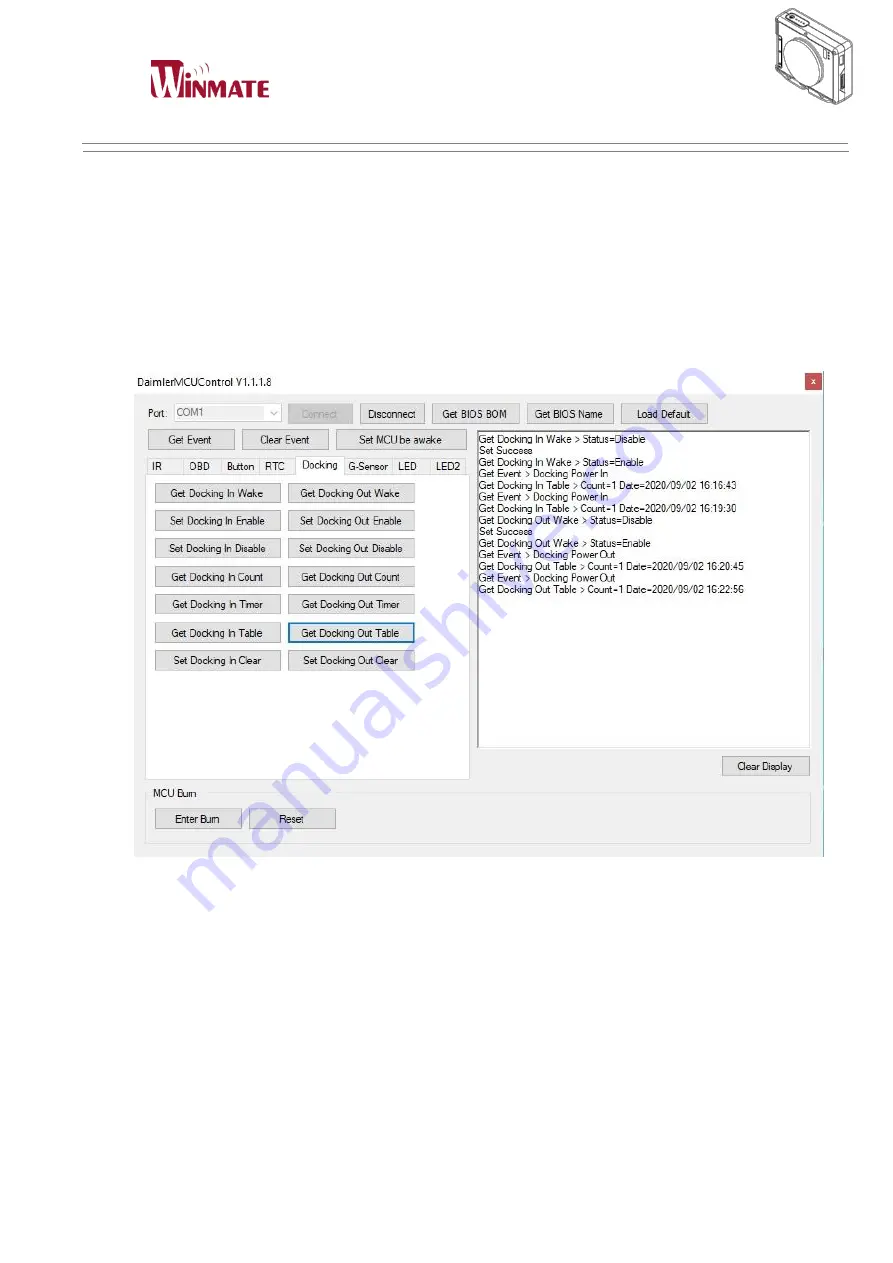
a. Implement Daimler MCU Control and perform COM Port connect to COM1 then set   
    Docking Out enable. 
b. Click Get Docking Out Wake and make sure Docking Out Wake Status=Enable. 
c. Allow the system to enter the Sleep / Hibernate / Shut down Mode and unplug the   
    power adapter to wake up the Windy Plus. Click get Event to confirm whether wake   
    up by DC Power Out. 
d. Click Get Docking Out Table and make sure whether the count and time information 

are correct. 


3.8 G-Sensor Wake up 

a. Implement Daimler MCU Control and perform COM Port connect to COM1 then set 
G-Sensor enable. 
b. Click Get G-Sensor Wake and make sure G-Sensor Status =Enable


c. Click on the G-Sensor lnt to adjust the sensitivity of G-Sensor (10 to 0). 
d. Allow the system to enter the Sleep / Hibernate / Shut down Mode and motion the   
    Windy Plus to wake up it. Click get Event to confirm whether wake up by G-Sensor. 
e. 

Click Get G-Sensor Table and make sure whether the count and time information are   

    correct.


Summary of Contents for Windy Plus

Page 1: ... Plus Box PC for Vehicle Producing Examination USER MANUAL Version 1 0 Attention This product is designed for vehicle producing examination only It should be used in vehicle production line and required to be away from operator 30cm when operating ...

Page 2: ...WINDY BY TX BOX 10 PRODUCTOVERVIEW 11 INSTRUCTION OF OSD LED STATUS INDICATION 13 PRODUCT SPECIFICATION 15 CHAPTER 3 USEFUL INFORMATION 17 1 THE PROCEDURE TO TEST CONNECTING WITH OBD BOX 18 2 THE PROCEDURE TO UPDATE BIOS OF MCU 20 3 THE PROCEDURE TO TEST ALL THE WAKE UP FUNCTION 23 3 1 IR Wake up 23 3 2 OBD In Wake up 24 3 3 OBD Out Wake up 25 3 4 Button Wake up 26 3 5 RTC Wake up 27 3 6 DC In Wak...

Page 3: ...Windy Plus Box PC User Manual Windy Plus CHAPTER 1 Read Me First ...

Page 4: ...solete outlet For AC version only Do not defeat the purpose of the grounding type plug Do not allow anything to rest on the power cord Do not locate this product where persons will walk on the cord Never push objects of any kind into this product through cabinet slots as they may touch dangerous voltage points or short out parts that could result in a risk of fire or electric shock Never spill liq...

Page 5: ...rk right infringement unless otherwise specified Applications that are described in this manual are for illustration purposes only Winmate Communication Inc makes no representation or warranty that such application will be suitable for the specified use without further testing or modification Warranty Winmate warrants that each of its products will be free from material and workmanship defects for...

Page 6: ...cific information on the installation and operation of any of our products Please do not hesitate to call or e mail us Notice 1 Do not use abrasive cleaners waxes or solvents for cleaning use only a dry or damp soft cloth 2 Use only with a high quality safety approved AC DC power adapter Safety Precautions Warning Always completely disconnect the power cord from your chassis whenever you work with...

Page 7: ...Windy Plus Box PC User Manual Windy Plus CHAPTER 2 Getting started ...

Page 8: ...lectrical outlet first and then from the box PC When unplugging the connector always hold the plug head Never pull on the cord 1 Make sure that the box PC has been shut down 2 Rotate the box PC on the proper side and take off the battery cover then put battery pack into the battery slot with cover 4 Open the IO protect cover then plug the DC cord of the AC adapter to the power connector of the box...

Page 9: ... sure that the Windy is either connected to AC power or the battery pack with power 3 Press the power button by 3 4 seconds to boot it up Shut down the Windy To turn off the Windy power click the Shut Down command of your operating system Caution If you have to boot up the Box PC again immediately after shut it down wait for at least five seconds Turning the Box PC off and on rapidly may damage it...

Page 10: ... Take out the TX box and connect it to power source 5V DC in 3 Aim the IR receiver either of three on Windy with TX box From distant location 10m please push the button on top of TX box The red cross laser should be helpful for alignment 4 To avoid the repeat signal interference Windy is designed to ignore same wake up signal from TX box in 30sec It s recommended to adjust the DIP switch on the bo...

Page 11: ...Windy Plus Box PC User Manual Windy Plus Product Overview DIP switch ...

Page 12: ...front view Diagram of Side view Diagram of Rear view Suction cup LED Indicator Defined Controlled by customer I O protect cover LED Indicator Defined Controlled by customer Battery cover IR receiver OBD connector VGA type Handle Microphone Epaper Didplay ...

Page 13: ...m LED Indicator Indicator Status Description Power mode Green light Power On No light Power Off Battery Status No light Charge completely or Normal using 10 Orange Light Under charging Red Light Blinking Low Battery 10 Storage Status Green light Storage operating VGA output RJ45 USB 3 0 19V DC in Power button LED Status Indication IR receiver ...

Page 14: ...Windy Plus Box PC User Manual Windy Plus Wi Fi Status Green light Wi Fi operating No light Wi Fi suspend ...

Page 15: ... Power Jack 1x 19V DC in I O side USB 1x USB 3 0 2 0 I O side VGA 1x VGA I O side Docking connector OBD type Internal I O Buttons SSD Wi Fi M 2 x4 2 for SSD 1 for Wi Fi 1 for WWAN LAN Wafer for e COM CAN BUS LED panel GPIO PWM x3 Wireless Communication Wi Fi BT 802 11 ac a b g n Wi Fi M 2 card Wake up sensors G sensor 3D acceleration sensor up to 10g Drop detection and motion wake up Controlled by...

Page 16: ... Temperature 10 50 Operating Humidity 10 to 95 non condensing Mounting Suction cup with handle Shock MIL STD 810G M516 6 By request Vibration MIL STD 810G M514 6 By request Drop 4 ft Free to concrete Certifications CE CE Wi Fi FCC CCC Power Management Power Input 19V DC in Battery Li Ion battery 3000mAh 7 4V Adapter 100 240V 50 60Hz 19VDC ...

Page 17: ...Windy Plus Box PC User Manual Windy Plus CHAPTER 3 Useful Information ...

Page 18: ...cess of function test or BIOS update you have to use VGA connector to show the Windy s output to a display Resolution will be adjusted automatically 1 The procedure to test connecting with OBD BOX 1 1 After running the program please select the P Module VBat Test ...

Page 19: ...Windy Plus Box PC User Manual Windy Plus 1 2 Click all the testing Item sequentially It will show green when it Pass but red when Fail 1 3 After all the test has been done please click the EXIT icon ...

Page 20: ...nual Windy Plus 2 The procedure to update bios of MCU 2 1 Open MCU AP folder and run SerialBootloaderDataSource exe 2 2 a Click Select Hex File s b Click hex file c Click Open d Run the Hex file successfully as follow IBWD_PWC ...

Page 21: ...Windy Plus Box PC User Manual Windy Plus 2 3 a Click COM Port b Click Open COM Port Please do not close the whole program window 2 4 Run DaimlerMCUControl exe 2 5 Click Enter Burn ...

Page 22: ...ram shows the notice Click the Update Application Firmware button to continue please click Update Application Firmware 2 7 When the message Bootload process completed successfully appears in the columm it means update boot loader process was fully completed ...

Page 23: ...d perform COM Port Connect to COM3 then set IR Enable b Click Get IR Wake and make sure IR Wake Status Enable c Let the system to Sleep Hibernate Shout down Mode then use the TX BOX to wake Windy up and get event to confirm which IR worked d Click Get IR Table and make sure if it has count the information of time and ID need to be correct ...

Page 24: ...en set OBD In Enable b Click Get OBD In and make sure OBD In Wake Status Enable c Allow the system to enter the Sleep Hibernate Shout down Mode and plug in the OBD cable to wake up the Porty G3 S Click get Event to confirm whether wake up by OBD In d Click OBD In Setting make sure whether the count and time information are correct ...

Page 25: ...et OBD out enable b Click Get OBD Out and make sure OBD Out Wake Status Enable c Allow the system to enter the Sleep Hibernate Shut down Mode and un plug the OBD cable to wake up the Porty G3 S Click get Event to confirm whether wake up by OBD Out d Click OBD Out settings and make sure whether the count and time information are correct ...

Page 26: ...Button out enable b Click Get Button settings and make sure Button Wake Status Enable c Allow the system to enter the Sleep Hibernate Shut down Mode and press the power button to wake up the Porty G3 S Click get Event to confirm whether wake up by Button d Click OBD Out setting make sure whether the count and time information are correct ...

Page 27: ...able c Click on the Time Sync and allow time synchronization d Click Get Time confirm the time is synchronized e Set Alarm Time in order to set the wake up time f Allow the system to enter the Sleep Hibernate Shut down Mode and after a specified time to wake up Windy Plus Click get Event to confirm whether wake up by RTC g Click Get RTC Table and make sure whether the count and time information ar...

Page 28: ... Port connect to COM1 then set DC In enable b Click Get Docking In Wake and make sure Docking in Wake Status Enable c Allow the system to enter the Sleep Hibernate Shut down Mode and plug in the power adapter to wake up the Windy Plus Click get Event to confirm whether wake up by DC Power In d Click Get Docking In Table and make sure whether the count and time information are correct ...

Page 29: ...ower Out d Click Get Docking Out Table and make sure whether the count and time information are correct 3 8 G Sensor Wake up a Implement Daimler MCU Control and perform COM Port connect to COM1 then set G Sensor enable b Click Get G Sensor Wake and make sure G Sensor Status Enable c Click on the G Sensor lnt to adjust the sensitivity of G Sensor 10 to 0 d Allow the system to enter the Sleep Hibern...

Page 30: ...Windy Plus Box PC User Manual Windy Plus ...

Page 31: ...Windy Plus Box PC User Manual Windy Plus CHAPTER 4 Troubleshooting ...

Page 32: ... as microwave ovens cordless phones Move the Windy away from objects causing interference Can t connect to other wireless LAN device Make sure that function of wireless LAN has been turned on Make sure that the SSID setting is the same for every wireless LAN device in the network Restart the Windy Make sure the IP address or subnet mask setting is correct Can t connect to other device with Bluetoo...

Page 33: ...Windy Plus Box PC User Manual Windy Plus Winmate INC 9F No 111 6 Shing De Rd San Chung District New Taipei City 241 Taiwan R O C Web Site http www winmate com tw ...

Page 34: ...cy energy and if not installed and used in accordance with the instructions may cause harmful interference to radio communications However there is no guarantee that interference will not occur in a particular installation If this equipment does cause harmful interference to radio or television reception which can be determined by turning the equipment off and on the user is encouraged to try to c...

Reviews: