background image

MONTEREY TOP VENT GAS WALL HEATER  

7

The following steps are needed for proper installation and 

safe operation of your furnace. If you have any doubts as to 

any requirements, obtain professional help. Remember to 

ALWAYS consult your local heating or plumbing inspector, 

building department or gas utility company regarding 

regulations, codes, or ordinances which apply to the 

installation and location of a vented wall furnace.

IMPORTANT

For satisfactory and trouble-free operation, be sure to:

1.  Locate the furnace properly within the space to be  


 heated.
2.   Install the furnace in accordance with local codes or  


ordinances and instructions provided. In the absence of  


local codes or ordinances, install the furnace to conform  


with the current edition of the National Fuel Gas Code,   


NFPA 54, ANSI Z223.1/Canadian Installation Code, CAN/   


CGA B149.

3.   Maintain minimum clearances: Floor 2½-inches, ceiling  


16- inches, side wall 1-inch.

4.   Provide enough combustion and ventilation air.

LOCATING WALL FURNACE & THERMOSTAT 

(NOT INCLUDED)

The furnace is installed between 2 x 4 inch wall studs spaced 

on 16-inch centers or a stud space that can be framed in to 

16-inches. 
Consider the following points before attempting  

to install the furnace: 

CAUTION:

 Do not make cutouts in the wall or ceiling 

before checking in the attic for ceiling joist locations and 

proposed venting.

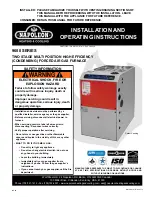
FIGURE 1 – MINIMUM SPACING

1.   Locate the furnace near the center of the space to be    


heated for good air circulation. Do not put it behind a 


door or draperies. Do not install the furnace where it  


could be isolated by closing doors to the heated space.  


Do not locate the furnace where a door could swing over  


the front panel or where circulation could be retarded by  


furniture or cabinets.

2.   Check the minimum spacing needs as shown in 

Figure 1

.

3.   The top of the furnace must be at least 16-inches from  


the ceiling.

4.   When the furnace is properly installed with legs resting  


on the floor plate, it sets the dimension from the face  


panel to the bare floor. (Approximately 2½-inches  


depending on the thickness of floor plate).

5.   A protective barrier (metal or wood), cut to match the  


width and depth of the furnace, should be used to cover  


over any floor coverings such as carpet or vinyl under the  


furnace. At no time should the dimension from the  


bottom of the face panel to the protective barrier be less  


than 1½- inches.

6.   In the space to be heated, the side of the furnace may  


be as close as 1-inch to an intersecting wall. The recessed  


portion may have 0-inches clearance to combustible  

 material.
7.   Select a location that will provide adequate accessibility  


clearance for servicing and proper operation.

8.   After picking a location, inspect the wall, floor, attic and  


roof areas. Make sure there are no pipes, wiring, bracing,  


etc., that will interfere with furnace or vent installation. If  


required, move them or pick a new installation location.

9.   Be sure that gas piping and electrical wiring can be  


brought to the location. Electrical wiring is required for  


optional blower accessory.

10.   If installing the thermostat 

(not included) 

on the wall,    


locate the thermostat approximately 5-feet above the    


floor on an inside wall where it will sense the average  


room temperature.

The thermostat 

(not included)

 should be sensing average 

room temperature; avoid the following:


HOT SPOTS:


Concealed pipes or ducts

 Fireplaces
 Registers
 

TV sets

 Radios
 Lamps
 

Direct sunlight

 Kitchen

COLD SPOTS:

Concealed pipes or ducts
Stairwell - drafts
Door - drafts
Unheated rooms on 

other side of wall

DEAD SPOTS:

Behind doors
Corners and alcoves

7ʹ MIN.

BARE 

FLOOR

1ʺ MIN. TO 

CLOSEST 

SIDE WALL

WALL

FURNACE

WALL

APPROX. 2½ʺ

CEILING

16ʺ MIN.

INSTALLING YOUR FURNACE

Summary of Contents for 2509621A

Page 1: ...cluding epichlorohydrin which is known to the State of California to cause cancer and birth defects and or other reproductive harm For information go to www p65warnings ca gov WARNING Improper install...

Page 2: ...ECIAL OR CONTINGENT DAMAGES OR EXPENSES ARISING DIRECTLY OR INDIRECTLY FROM ANY DEFECT IN THE PRODUCT OR ANY COMPONENT OR FROM THE USE THEREOF THE REMEDIES SET FORTH HEREIN ARE THE EXCLUSIVE REMEDIES...

Page 3: ...MOTORIZED REAR OUTLET PART NUMBERS FOR THE 250 350 MODELS CONTROL ASSEMBLY REPLACEMENT PARTS PART NUMBERS FOR THE 500 MODELS CONTROL ASSEMBLY REPLACEMENT PARTS 500 MODELS BLOWER ACCESSORY MODEL 2901...

Page 4: ...e appliance to avoid property damage bodily injury or death 8 Vent the furnace directly to the outdoors so that harmful gases will not collect inside the building Follow the venting instructions for y...

Page 5: ...nt of any installed system 1 Seal any unused openings in the venting system 2 Inspect the venting system for proper size and horizontal pitch as required in the National Fuel Gas Code ANSI Z223 1 NFPA...

Page 6: ...New York NY 10018 In Canada CAN CGA B149 Optional Accessories Blower Accessories 2901 2907 May be used on all models and mounts on top of a furnace This blower increases circulation of warm air throug...

Page 7: ...abinets 2 Check the minimum spacing needs as shown in Figure 1 3 The top of the furnace must be at least 16 inches from the ceiling 4 When the furnace is properly installed with legs resting on the fl...

Page 8: ...mined that each appliance connected to the venting system properly vents when tested as outlined above return doors windows exhaust fans fireplace dampers and any other gashed burning appliance to the...

Page 9: ...a fire and wait until flames are burning vigorously 2 Turn on all exhausting devices i e kitchen and bathroom exhaust fans water heaters gas and electric 3 Turn on all vented gas appliances i e heati...

Page 10: ...provided from outdoors or spaces open to the outdoors such as an attic or crawl spaces Openings for inlet or outlet air should NOT be made into an attic area if the attic is equipped with a thermostat...

Page 11: ...al rear outlet register may be installed when the CHIMNEY OR GAS VENT VENTILATED ATTIC OUTLET AIR OUTLET AIR INLET AIR INLET AIR VENTILATED CRAWL SPACE 10 CRAWL SPACE WALL FURN TO ATTIC 12 OPTIONAL IN...

Page 12: ...this distance Figure 5 Place the header plate between the studs with the lower edges even with marks on the studs Make sure header plate is level Locate rear edge of nailing tabs at back of the heade...

Page 13: ...the side rails using four 4 8 screws Flanges of the header plate go against the wall Figure A 3 Install extension side rails as shown in Figure A by telescoping them inside the lower side rails Adjust...

Page 14: ...VENT INSTALLED FRONT PANEL INSTALLED STUD WALL CENTERED 14 3 1 2 STUD WALL GAS STUB LOCATIONS STUD WALL STUD WALL 16 4 7 16 A PLUMBERS TAPE B W VENT PIPING CEILING PLATE SPACER VENT HOLD DOWN PLATE HE...

Page 15: ...P STORM COLLAR ROOF FLASHING HEIGHT FROM HEADER PLATE TO THE VENT CAP TOP MUST BE 6 FEET MINIMUM 1 INCH MIN CLEARANCE TO COMBUSTIBLES LISTED 4 ROUND B VENT OVAL TO ROUND ADAPTER OVAL B W VENT DOUBLE W...

Page 16: ...vent piping In some areas the building code requires the use of an attic shield The B W vent must extend through the ceiling and roof terminating at least 12 feet above the finished floor on which the...

Page 17: ...ine screws furnished FIGURE 12 MOUNTING REAR OUTLET REGISTER Gas Supply and Piping The gas control valve in the furnace is shipped with a seal over the gas inlet tapping Do not remove the seal until r...

Page 18: ...nd debris that are approved by local codes Metal chips and debris can damage the valve FIGURE 13 PIPE CAPACITY PIPE CAPACITY BTU hr WITH FITTINGS NATURAL GAS LENGTH OF PIPE FEET PIPE SIZE 1 2 3 4 1 20...

Page 19: ...ANT THIN ENOUGH TO SHOW THREADS OVER THREADED SEALANT TOO THICK SEALANT PAST TIP DAMAGED THREADS WARNING Danger of property damage bodily injury or death Never use a match or open flame to test for le...

Page 20: ...lation instructions packed in the thermostat carton if you have any doubt about the above procedures WALL MOUNTED THERMOSTAT INSTALLATION 1 To remove the thermostat cover squeeze both sides and lift 2...

Page 21: ...ning is provided in the gas valve to facilitate measuring manifold gas pressure A water column manometer having a scale range from 0 to 12 inches of water column should be used for this measurement Th...

Page 22: ...to nearly invisible approximately 6 inches above ports ABNORMAL APPEARANCE LAZY FLAME Long soft yellow cones moving around in the combustion chamber lifting from ports insufficient air EXTREMELY FAST...

Page 23: ...15 Set thermostat to desired setting TO TURN OFF GAS TO APPLIANCE 1 Set the thermostat to lowest setting 2 Turn off all electric power to the appliance if service is to be performed if applicable 3 Op...

Page 24: ...le actuating the red button or by using a match repeat steps 5 through 10 listed in Lighting the Pilot WARNING The surface of the furnace is hot during operation Keep children clothing furniture and f...

Page 25: ...oint union fitting Figure 24 4 Remove 2 screws securing burner pan assembly to inner liner 5 Pull burner pan assembly forward approximately 1 2 inch and drop down to expose the top of the burner 6 Cle...

Page 26: ...and remove it using a hammer and screwdriver Use caution when handling sharp metal edges 7 Place the blower body on furnace top as shown in Figure B 8 Route 115V wiring into the junction box through...

Page 27: ...MONTEREY TOP VENT GAS WALL HEATER 27 FIGURE C WIRING FOR MODEL 2901 FIGURE D WIRING FOR MODEL 2907...

Page 28: ...ore you cut any wall openings for the register 1 Measure and mark wall for opening as shown in Figure A Check the wall for any electrical wiring present before cutting the opening Reroute existing ele...

Page 29: ...MONTEREY TOP VENT GAS WALL HEATER 29 FIGURE C SURFACED MOUNTED INSTALLATION FIGURE D SURFACED MOUNTED INSTALLATION FIGURE E SURFACE MOUNTED INSTALLATION FIGURE F WIRING...

Page 30: ...Assembly 9C213 9C213 9C213 9C213 9 Header 5902 5902 5902 5902 10 Burner Pan 9B296 9B296 9B296 9B296 11 Manual Spark Igniter P285500 P285500 P285500 P285500 12 Igniter Bracket 7A189 7A189 7A189 7A189...

Page 31: ...MONTEREY TOP VENT GAS WALL HEATER 31 EXPLODED VIEW REPLACEMENT PARTS CHART 1 2 3 4 5 6 7 8 9 10 11 12 13...

Page 32: ...Burner Bracket 9B234 9B234 9B234 9B234 4 Manifold P323660 P323660 P323660 P323660 5 Burner Orifice 2 Required for 500 Series P090543 P090536 P332624 P332635 6 Pilot Generator Assembly P501617 P501617...

Page 33: ...MONTEREY TOP VENT GAS WALL HEATER 33 1 2 3 4 5 6 7 8...

Page 34: ...ed 9C170 9C170 9C170 10 Non Vision Shield 9C157 9C157 9C157 11 Inner Shield Top 2 Required 9C158 9C158 9C158 12 Burner Pan Assembly 9B251 9B251 9B251 13 Blower Heat Deflector 9A440 9A440 9A440 14 Manu...

Page 35: ...MONTEREY TOP VENT GAS WALL HEATER 35 1 2 3 4 5 6 7 8 9 10 11 12 13 14 15 16 1 2 6 EXPLODED VIEW REPLACEMENT PARTS CHART...

Page 36: ...ont Burner Bracket 9B243 9B243 4 Manifold P323661 P323661 5 Burner Orifice 2 Required for 500 Series P332625 P332623 6 Pilot Generator Assembly P322396 P322397 7 Burner 2 Required for 500 Series P3236...

Page 37: ...dle P320912 7 Flat Washer 10 31 2 P127300 8 Machine Nut 8 32 w Washer 2 P041100 9 Blower Body 9C102 10 Motor Mount Grommet 2 P321078 11 Strain Relief Bushing P012900 12 Fan Switch P323097 13 Screw 8 1...

Page 38: ...Blower and Motor P323423 5 Heat Sensor Wire Assemblies P274202 P109600 6 Junction Box Cover 9A483 7 Fan Switch P323080 8 Blower Body 9B249 9 Heat Sensor Switch P323097 MODEL NUMBER 2907 Use only manu...

Page 39: ...Switch P323172 P323172 6 Fan Switch P323080 P323080 7 Motor and Blower P323423 P323423 8 Motor cover 9A435 9A462 9 Motor Housing Back Plate 9B266 9B284 10 Cord and Plug P323081 P323081 11 Bushing P32...

Page 40: ...terminals of the valve with the valve placed in Pilot position Disconnect the thermostat wires The millivolt reading should be 450 millivolts or more d Remove thermostat wires from valve terminals If...

Page 41: ...Furnace section in this manual b Check installation Casing may be distorted by being fastened to an uneven opening or jammed under the header A restricted vent may create expansion noise Refer to Ven...

Page 42: ...mestic hot water equipment where the bottom of the vent terminal and the air intake is installed below four feet above grade the following requirements must be satisfied 1 If there is not one already...

Page 43: ...MONTEREY TOP VENT GAS WALL HEATER 43 SERVICE RECORD DATE MAINTENANCE PERFORMED COMPONENTS REQUIRED...

Page 44: ...P322087_RV 06 21 www williamscomfortprod com 888 444 1212 250 West Laurel Street Colton CA 92324 USA Subject to change without notice 2021 TM...

Reviews: