Williams Sound
®
Helping People Hear
7
Step 1:
Make sure you have a 115 VAC wall
outlet and telephone jack within 6 feet of
the place you’ve chosen to install the tele-
phone. If you have an older 4-prong jack,
you’ll need a modular jack adaptor. These
adaptors are available from electronic,
phone, and other retail stores.
Step 2:
Place the Pulse/Tone Switch, located on
the side of the phone, in either Tone
(Touch-Tone) or Pulse (Rotary Dial
Pulse).
Note:
Make sure you choose the correct dialing
mode. Tone dialing will not work if you
have only dial pulse (rotary) service.
Step 3:
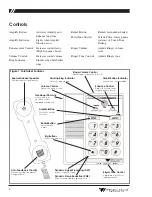
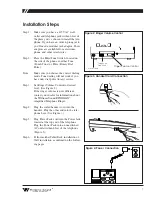
Set Ringer Volume Control to desired
level. (See Figure 2.)
If the ringer volume is not sufficient,
contact your dealer for information about
the Williams Sound RINGMAX
™
Amplified Telephone Ringer.
Step 4:
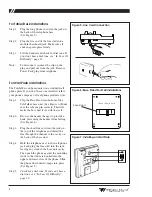
Plug the coiled handset cord into the
handset. Plug the other end into the tele-
phone base. (See Figure 3.)
Step 5:
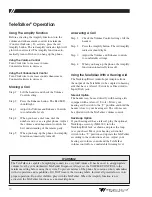
Plug Power Pack cord into the Power Jack
located at the top end of the telephone.
Plug the Power Pack into an unswitched
AC outlet within 6 feet of the telephone
(Figure 5).
Step 6:
Perform either Table/Desk installation or
Wall installation as outlined on the follow-
ing pages.
Installation Steps
Figure 3: Handset Cord Connection
Figure 2: Ringer Volume Control
Ringer Volume Control
Power Jack
Volume
Enhance
Louder
Softer
Less
More
Amplified Telephone
Amplified Telephone
Amplify
Ringer Tone
Lower
Higher
®
Ring
Williams Sound
®
Helping People Hear
REDIAL
AMPLIFY
1
2
5
8
3
6
9
4
7
0
#
*
DEF
ABC
MNO
JKL
GHI
WXY
TUV
OPER
PRS
Figure 4: Power Connection
Telephone
Line Jack


