


6
Mounting of soapstone
Contents:
Soapstone top
Soapstone side, left
Soapstone side, right
Screws M6 x 6
4
Steel pins for side/top
2
Distance plate, metal
Gaskets for distance plate
2
Soapstone plug to close hole in soapstone top
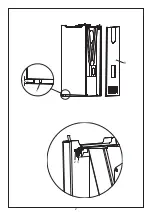
Installing the soapstone sides
Remove the rear plate (8) from the stove by lifting it up and away from the stove. Put it aside.
Insert the screw (2) – 4 pcs. totally - into the soapstone side before attaching it to the stove. The
screw must be screwed in until there is only 3-3.5 mm of space between the soapstone and the
screw head, leaving just enough room for the fitting.
Place the right soapstone side on the guide pins () on the bottom plate of the stove. Lift the
soapstone side about 5 mm and press it against the stove so that the two screws (2) on the
top of the rear side of the soapstone enter the holes (3) on the fitting. When the screws have
been inserted into the holes, lower the side onto the bottom plate. Repeat the process with the
left soapstone side.
Changing the smoke outlet. Only applicable if the stove is to be fitted with a rear
smoke outlet:
4. The stove is supplied as standard with a top outlet. Carry out the following if a flue duct is to be
connected to a rear smoke outlet:
A. Remove the smoke ring on the top of the stove by unscrewing the three screws and lifting
it off.
B. Remove the cover plate on the back of the stove by unscrewing the three screws (Torx Bit
no. 30) and lifting it off.
C. Install the cover plate on top of the stove with the three screws.
D. Place the accompanying distance plate on top of the cover plate. Stick the gaskets to the
distance plate as shown on the sketch.
E. Place the smoke ring in the smoke outlet hole in the back of the stove and secure it with
the three screws.
The following procedure must be followed irrespective of whether the stove has
a rear outlet or a top outlet:
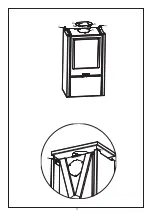
5. Insert a steel pin (7) into the hole in the top of each soapstone side. Make sure the steel pins are
inserted fully into the holes. They serve as a locking mechanism for the soapstone sides and the
soapstone top.
6. When placing the soapstone top on the stove, make sure that the steel pins at the top of the
soapstone sides are inserted into the holes in the soapstone top. The soapstone top must be
positioned in such a way as to touch the soapstone sides, i.e. the steel pins must be pushed into
the holes as far as they can go. Adjust the position of the soapstone top so that its sides are flush
with the soapstone sides.
7. Place the rear plate on the guide pins at the back of the bottom plate of the stove and then press
it against the stove. Lift the rear plate and press it gently inwards until it engages.
.
2.
3.
English


