18
•
Ne pas utiliser sur une surface craignant la chaleur ni à proximité d’une plaque de cuisson électrique ou à gaz.
•
Débrancher l‘appareil lorsqu’il n’est pas en fonctionnement ou pour le nettoyer. Toujours veiller à ce
que l’appareil soit en position « o » avant de le débrancher.
•
Veiller à ce que la résistance soit correctement installée sinon l’appareil ne fonctionnera pas.
• Toujours mettre le thermostat en position « o » avant de retirer la résistance de sa base.
•
Veiller à toujours installer la grille avant d’utiliser l’appareil. Ne jamais déposer les aliments
directement sur la résistance.
• Lors de l’utilisation, ne jamais recouvrir la grille avec un plateau, du papier aluminium ou autre.
• Ne pas utiliser de produits inflammables type bois ou charbon de bois pour cuire vos aliments.
LE FABRICANT NE SAURAIT ÊTRE TENU POUR RESPONSABLE DE LA MAUVAISE UTILISATION DE
L’APPAREIL. CONSERVER SOIGNEUSEMENT CE MODE D’EMPLOI.
3
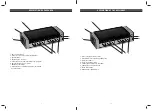
ASSEMBLING OF THE APPLIANCE
Before assembling, carefully remove the components of the electric barbecue and ensure you have all the
parts as noted above.
•
Place base (1) on a clean, flat surface.
•
One end of the base (1) has an opening provided for the drip cup. With the metal spout titled slightly
forward, slide the cooking juice and grease tank (6) into the base (1) and push in until the tab is locked.
•
Insert kebab drawers (5) by sliding the top rim of the back wall of drawer over the small round tabs on
either side of opening.
•
Push drawers (5) back until front is securely in place behind round labs.
•
Push drawers (5) into unit (1), lifting it over the retaining bar to secure.
•
To remove drawers (5), allow to cool for 30 minutes. Remove all skewers (3), then lift drawer up and over
the round tabs, and pull it towards you.
•
The grill side with ribbed surface (2) is intended for grilling meat (steaks, hamburgers, chicken) and sea-
food. The griddle side with smooth surface (2) is perfect for frying bacon, eggs and pancakes.
•
Choose the side you intend to cook on and place the gill/griddle plate (2) on the base (1) with the chosen
side facing up. Locate the drip hole on one end of the grill/griddle plate. Place the grill/griddle plate onto
the base with the drip holes lining up over the metal drip cup spout on the left side of the unit (1).
•
Plug the appliance.
USING OF THE APPLIANCE
•
Turn the temperature control dial (7) to the desired temperature setting.
•
The indicator light on the top of the unit is illuminating to indicate that the unit is operating.
•
It may take 10 to 12 minutes to reach operating temperature.
•
You can vary the setting of the temperature control dial at any time during cooking.
CAUTION: handles will become hot during use. Always use a pot holder when touching any part of the
unit when cooking. The grill/griddle plate should not be removed from the base or flipped over while hot.
Allow unit to cool down for at least 30 minutes before handling.
NOTE: The 1st time you use Arizona Grill, it may have a slight odor and smoke a bit.
•
Turn the temperature control dial (7) to “Arrêt” (OFF) setting.
•
Unplug the appliance.
•
Allow unit to cool down completely (at least 30 minutes).
•
Carefully slide out the cooking juice and grease tank (6) by pressing down on the tab.
•
Pull out the tank (6).
•
Clean up and replace it in base.
•
Thoroughly clean grill/griddle plate (2).
•
Flip the plate over and return to base.
•
Plug another time the appliance.
Using the kebab feature
•
Assemble the unit (1) with the grill/griddle plate (2), kebab drawers (5) and drip tank (6) in their proper
positions.
NOTE: grill/griddle plate (2) must be on unit (1) when using kebab feature.


