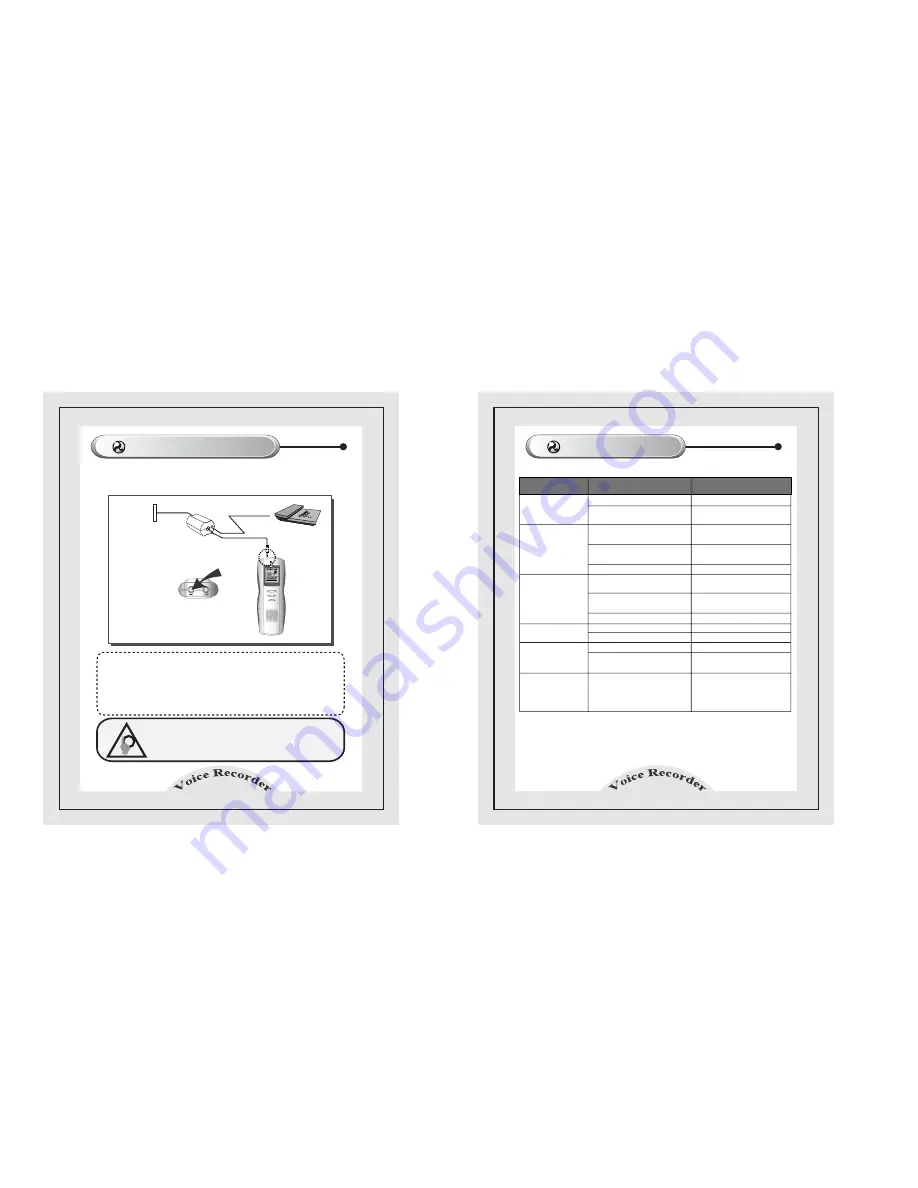
Whistler WVR-165 User Manual Download Page 14

Telephone Recording  

25

¢ˆ

 Connect an adaptor you purchased separately for telephone recording  and the 

cable as shown in the following figure.  Press the REC/STOP button to record 

telephone conversations.     


¢

  Note 

¢—


¢”

 If you record telephone conversations in VOS ON mode, the voice may 

stop temporarily. We recommend to record in VOS OFF mode.        

¢”

 If several telephones are connected to a telephone line, the voice of the 

opposite person may be recorded in low volume. We recommend to connect

a single telephone to a line.      

Caution

¢”

The telephones which does not meet the standard 

of modular jack of the digital telephone available in 

the digital communication are not supported.    

!

Jack on the wall   

Telephone Line Adapter    

Telephone  

Line-in

Output

External MIC Terminal  

Audio Cable     

Troubleshooting 

26

¢ˆ

 When you encounter any problem, check the following items.     

 Check whether the battery runs out.           Replace the battery with a new one.  

 Check whether the polarities are correct.   Make sure that the polarities   

                                                                     are correct.  

 Check whether the HOLD                           Set the HOLD button to OFF.  

 button is set to ON.     

 Check whether the memory is full.              Delete unnecessary recorded sound.  

                                                                     (See page 15 to 17)  

 Check whether the battery runs out.           Replace the battery with a new one.  

 Check whether the HOLD                           Set the HOLD button to OFF.  

 button is set to ON.     

 Check whether your recorder has the        Verify the number of the sound  

 sound recorded.                                          recorded.

 Check whether the battery runs out.           Replace the battery with a new one.  

Check the volume is set to 0.                       Control the volume.  

Check the earphone is connected.              Disconnect the earphone.

Check the volume is set to 0.                      Control the volume.  

 Check whether the earphone is                  Connect the earphone   

 connected firmly and correctly.                   firmly and correctly.  

 Check whether the USB cable                    Format your recorder.  

 is removed during formatting                      (See page 17)

 with connected to a PC.     


Nothing is displayed    
on the LCD screen.    

Cannot not record.  

Cannot playback.   


Cannot hear sound     
through the earphone.       
                                   

       Symptom                          Cause                                 Action  

Cannot hear sound      
from the speaker.    

"ERROR" is                
displayed on the LCD   
screen and all                  
buttons does not 
operate.
       

HQ SPLP VOS

1

A-B

Summary of Contents for WVR-165

Page 1: ...USER S MANUAL WVR 165 REC VOL VOL Digital Recorder HQ Digital Recorder...

Page 2: ...ou can find easily whenever you need Safety Instructions Contents 2 Safety Instructions Precautions Product Features Names of Parts Before Using Inserting Battery Powering On Off Recording Playback Mo...

Page 3: ...s on the product or impact against the product Do not impact against the LCD of the product Precautions for use of the product Percautions Precautions for use of the battery 4 Do not impose heat on it...

Page 4: ...onsumption Recording Mode You can record in HQ or LP mode Long time Recording You can record for a long period of time in LP mode Repair Function Recorded sound can be recovered even if the power is c...

Page 5: ...e battery cover slightly and slide it in the arrow direction 2 Insert two AAA alkaline batteries Make sure that the polarities are correct 3 Close the battery cover 2 1 3 Names of Part 7 Left Top Earp...

Page 6: ...ery if you do not use the product for more than 1 minute When you do not use the product set the HOLD switch to ON to prevent unwanted consumption of the battery due to misuse of the buttons Note LO B...

Page 7: ...e HOLD button to OFF HOLD OFF 2 Turn the power on 3 Press the REC STOP button shortly once to start recording 4 Press the REC STOP button shortly again to stop recording Note If the recording source i...

Page 8: ...down and playback starts from the position you stop 14 Deletes the sound recorded in the recorder When deleting the number 3 file 1 Select the file to delete in stop mode 2 Press the ERASE button once...

Page 9: ...t operate normally for example the buttons do not work format the product as directed above and the product will operate normally Deleting File 15 Deleting all files in a folder Deletes all the record...

Page 10: ...UME button The range is between 0 and 20 Volume Control HQ SPLP VOS 1 A B 1 Press the REC STOP button longer once during playback 2 The Add R message is displayed and the additional recording starts 3...

Page 11: ...o your situation 1 Press the MENU shortly twice in the stop mode 2 Select the HQ or LP using the FF REW button Note The HQ mode has better recording quality than LP mode Recording time means the avail...

Page 12: ...when you supply the power again Note The longer you have recorded previously the longer the REPAIR time is taken The REPAIR message is displayed on the LCD screen while repair is proceeding PC Interf...

Page 13: ...heck the recording status using an earphone You can also record by connecting an external microphone you purchased separately to the microphone terminal of your recorder If you fix an external microph...

Page 14: ...correct Make sure that the polarities are correct Check whether the HOLD Set the HOLD button to OFF button is set to ON Check whether the memory is full Delete unnecessary recorded sound See page 15 t...

Page 15: ...ximum Recording Time LP 504 min Memory 16 MB Voice A B C 3 Folders X 100 Files Data D 1 Folder Earphone Speaker Dynamic 28mm 8 Ohm Dimensions 36 108 17 9 mm W H D Weight About 43g Except battery Stora...

Page 16: ...cause harmful interference to radio communications However there is no guarantee that interference will not occur in a particular installation If this equipment does cause harmful interference to rad...

Reviews: