background image

7

Thermal Expansion Valve Installation

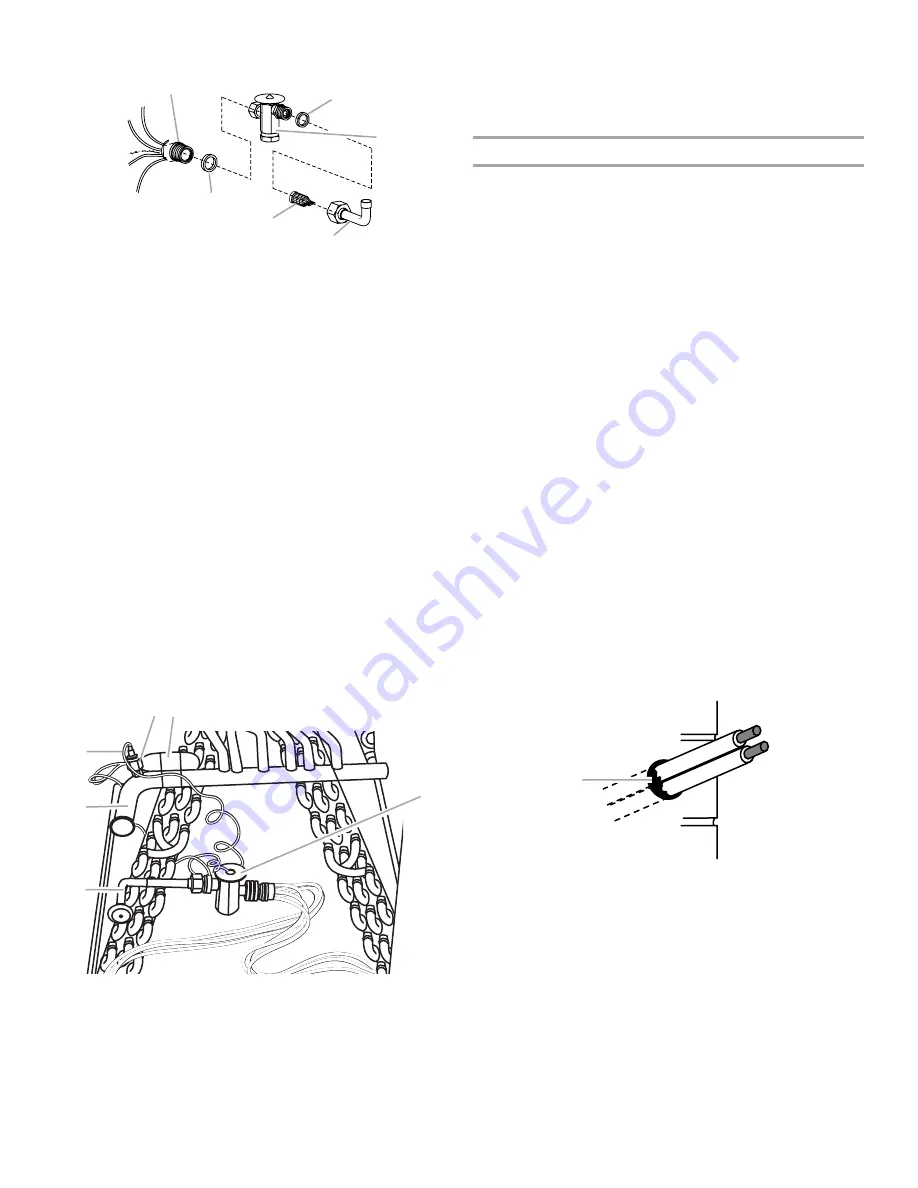
To install the thermal expansion valve:

1. Separate the distributor assembly.

2. If a piston orifice is installed, remove the piston orifice and old 

Teflon

®

 seal and discard.

3. Insert nozzle end of the thermal expansion valve along with a 

new Teflon

®

 seal into the distributor.

4. Tighten to 20 to 30 ft/lbs. Use backup wrench on all wrench 

flats.

NOTE: Overtightening may crush the Teflon

®

 seal and cause 

a leak.

5. Attach liquid line portion of distributor assembly along with 

new Teflon

®

 seal to the inlet of the thermal expansion valve.

6. Tighten to 20 to 30 ft/lbs. Use backup wrench on all wrench 

flats.

NOTE: Overtightening may crush the Teflon

®

 seal and cause 

a leak.

7. Connect the external equalizer line to the equalizer port on 

the suction line.

8. Tighten to 8 ft/lbs.

9. Attach the superheat sensing bulb to the suction header with 

the strap provided with the thermal expansion valve.

NOTE: If installing a thermal expansion valve on an indoor coil 
that previously used a fixed orifice, be sure to remove the existing 
fixed orifice. Failure to remove a fixed orifice when installing a 
thermal expansion valve to the indoor coil may result in improper 
operation and damage to the system.

Connect Liquid and Suction Lines

1. Route the suction and liquid lines from the fittings on the 

indoor coil to the fittings on the heat pump. Run the lines in 
as direct a path as possible, avoiding unnecessary turns and 
bends.

2. For product efficiency, be sure that the suction line is 

insulated over the entire exposed length and that both 
suction and liquid lines are not in direct contact with floors, 
walls, ductwork, floor joists, or other piping.

3. Remove valve cores.

4. Wrap the service valves with a wet rag.

5. Connect the suction and liquid lines, using a brazing 

compound. Braze with an alloy of silver or copper and 
phosphorus with a melting point above 1,100°F (593ºC). 

NOTE: Do not use soft solder.

6. Make sure indoor coil has been put in place according to the 

Installation Instructions and is connected to the refrigerant 
lines.

7. Replace valve cores.

8. Pressurize the lines and indoor coil with a pressure not to 

exceed 20 psig.

9. Leak test the lines with a pressure not to exceed 20 psig.

10. Evacuate the indoor coil and lines to a minimum of 

500 microns to remove contamination and moisture, then 
disconnect the vacuum pump.

11. Open the suction and liquid service valves fully.

12. Insulate the suction line with refrigerant line insulation 

material of 

¹⁄₄

" (6.4 mm) or more wall thickness.

13. Pack insulating material around refrigerant lines where they 

penetrate the structure to protect the lines and to minimize 
vibration transmission.

A. Distributor
B. Teflon

®

 seal

C. Thermal expansion valve

D. Liquid line stub

E. Strainer
F. Teflon

®

 seal

A. Equalizer port
B. Superheat sensing bulb

C. Thermal expansion valve

D. Liquid line

E. Suction line
F. Equalizer line 

A

B

C

D

E

F

®Teflon is a registered trademark of E.I. Dupont de Nemours and 

Company.

E

F

A B

C

D

A. Insulating material around refrigerant lines

A

Summary of Contents for W4GH8

Page 1: ...tallation 12 SEQUENCE OF OPERATION 13 Cooling Cycle 13 Heating Cycle 13 Defrost Cycle 13 Adjust Defrost System 14 Troubleshoot the Defrost System 15 TROUBLESHOOTING 15 System Diagnostic Module 15 SYSTEM MAINTENANCE 17 ASSISTANCE OR SERVICE 17 Accessories 17 WARRANTY 18 Whirlpool Gold Model W4GH8 48656D008 You can be killed or seriously injured if you don t immediately You can be killed or seriousl...

Page 2: ...the system Mineral oil is not compatible with refrigerant Indoor System Thermal Expansion Valve W4GH8 units are designed for use with thermal expansion valve systems only The thermal expansion valve must be ordered separately from the manufacturer LocationRequirements This heat pump is designed to be located outdoors with sufficient clearance for free entrance to the inlet and discharge air openin...

Page 3: ... power supply E House thermostat F To indoor unit G To indoor coil H Seal openings A Metal strapping material around vapor line only B Floor joist or roof rafter C Tape or heavy nylon wire tie D Metal strapping material around vapor line only and tape or heavy nylon wire tie around vapor and liquid lines E Metal sleeve 48 121 9 cm Overhead Clearance Discharge Air D F G 30 76 2 cm Service Access Cl...

Page 4: ...e as ordered 2 Upon receipt of heat pump inspect it for possible shipping damage Examine the heat pump inside the carton if the carton is damaged If damage is found it should be noted on the carrier s freight bill Damage claims should be filed with the carrier immediately Claims of shortages should be filed with the seller within 5 days NOTE If any damages are discovered and reported to the carrie...

Page 5: ... from the existing system according to the manufacturer s instructions provided with the recovery system being used Connect the R 22 gauge set is connected to both sides of the refrigerant system as shown and verify that the entire system is void of refrigerant in accordance with the manufacturer s instructions provided with the recovery system being used 3 Disconnect the liquid and vapor lines fr...

Page 6: ...the R 410A thermal expansion valve specified for this system in the indoor coil NOTE R 410A systems use only thermal expansion valves 19 Pressurize the lines and indoor coil with a pressure not to exceed 20 psig 20 Leak test the lines with a pressure not to exceed 20 psig 21 Open the suction and liquid service valves fully 22 Insulate the suction line with refrigerant line insulation material of 6...

Page 7: ...e avoiding unnecessary turns and bends 2 For product efficiency be sure that the suction line is insulated over the entire exposed length and that both suction and liquid lines are not in direct contact with floors walls ductwork floor joists or other piping 3 Remove valve cores 4 Wrap the service valves with a wet rag 5 Connect the suction and liquid lines using a brazing compound Braze with an a...

Page 8: ...late NOTE If weighing facilities are not available or if the condensing unit is being charged during warm weather follow one of the other charging methods IMPORTANT Refrigerant charge adjustment will be required for line set lengths greater than 15 ft 4 6 m and for non system matched evaporator coils The condensing unit is factory charged with the proper refrigerant charge amount for a matching ev...

Page 9: ...ine temperature to determine the approach temperature _____ Liquid Line Temperature F _____ Outdoor Ambient Temperature F _____ Approach Temperature F 7 Compare the approach value with those shown in the Approach Values for Thermal Expansion Valve Systems chart If the approach values are too high add refrigerant to lower the approach temperature If the approach values are too low recover refrigera...

Page 10: ...5 40 6 397 149 396 146 407 148 424 139 115 46 1 443 150 442 147 450 149 467 140 Heating 1st Stage Low Capacity 40ºF 292 104 303 95 313 92 333 89 50ºF 312 110 320 112 333 108 359 105 Heating 2nd Stage High Capacity 20º 268 55 284 63 281 59 312 58 30ºF 298 73 302 78 287 73 334 71 40ºF 327 91 321 94 307 87 357 85 50ºF 357 109 340 110 328 101 380 98 NOTE Values provided are typical pressures Indoor un...

Page 11: ...n instructions B C common connection between indoor unit and outdoor unit required for proper operation Without Auxiliary Heat With Auxiliary Heat Power Indoor Unit Thermostat 1st Stage Aux Heat Indoor Blower Reversing Valve R W1 G O R C G Outdoor Unit C Y1 R W1 O C Y1 Power Common 1st Stage Aux Heat W1 W2 W3 Y2 Compressor Y2 Y1 Y2 If Applicable Power Indoor Unit Thermostat 1st Stage Aux Heat R R ...

Page 12: ... C L R O Y1 Fan O OUT LO PS DF HI PS Common Y1 OUT Defrost Control Reversing Valve Defrost Thermostat Fan Defrost Control OR Crankcase Thermostat W1 C L R O Y1 Fan O OUT LO PS DF HI PS Common Y1 OUT Defrost Control Thermostat Thermostat Compressor Contactor Defrost Switch L1 BK C R W1 O Y1 Y2 Y1 C L Y2 R L 24V W1 C L R O Y1 Sole Diagnostic Module Y2 Low Pressure Switch High Pressure Switch Diagnos...

Page 13: ...rminates defrost when the liquid line warms up to 70ºF 21 1ºC Defrost Control The defrost control board includes the combined functions of the time temperature defrost control defrost relay diagnostic LEDs and terminal strip for field wiring connections See Defrost Control Board in Adjust Defrost System The defrost control provides automatic switching from normal heating operation to defrost mode ...

Page 14: ...frost Cycles 1 Disconnect power 2 Remove the heater compartment access panel 3 Adjust the time period between defrost cycles by placing the defrost time plug in the proper position See Defrost Control Board For 30 minute intervals between defrost cycles connect the Defrost Time Setting Plug to the pins corresponding to 30 For 60 minute intervals between defrost cycles connect the Defrost Time Sett...

Page 15: ...r and thermostat demand the module can accurately detect the cause of electrical and system related failure without any sensors If a system problem occurs a flashing LED indicator communicates the failure code LED Description Power LED Green indicates voltage is present at the power connection of the module Alert LED Yellow communicates an abnormal system condition through a unique flash code The ...

Page 16: ...Flash Code 4 Locked Rotor Run capacitor has failed Low line voltage contact utility if voltage at disconnect is low Excessive liquid refrigerant in the compressor Compressor bearings are seized Alert Yellow Flash Code 5 Open circuit Outdoor unit power disconnect is open Compressor circuit breaker or fuse s is open Compressor contactor has failed to open High pressure switch is open and requires ma...

Page 17: ... below address with any questions or concerns Whirlpool Home Cooling and Heating 14610 Breakers Drive Jacksonville FL 32258 Please include a daytime phone number in your correspondence Accessories To order accessories contact your Whirlpool Home Cooling and Heating dealer Incorrectly Wired Module Troubleshooting Incorrectly Wired Module Indication Recommended Troubleshooting Action Green LED is no...

Page 18: ...ED COVERAGE Your Whirlpool Home Cooling and Heating limited warranty provides extended coverage on the components outlined below The extended coverage begins with the date of the original unit installation and represents the total warranty period for the specific component Heat Exchangers WFAT WFAR WGFA WGFB W2PG3 Twenty 20 Years Residential Applications WFAT WFAR WGFA WGFB W2PG3 Ten 10 Years Non ...

Page 19: ...utdoor unit and refrigerant control devices which do not match or meet the specifications recommended by Whirlpool Home Cooling and Heating e Operation of furnaces with return air temperatures of less than 60 F 16 C or operation of a furnace field installed downstream from a cooling coil f Use of contaminated or alternate refrigerant 3 The installation of replacement parts under the terms of this ...

Page 20: ...48656D008 2008 All rights reserved Registered Trademark TM Trademark of Whirlpool U S A Manufactured under license by Tradewinds Distributing Company LLC Coconut Grove Florida 5 08 Printed in U S A ...

Reviews: