background image

6-2


n

e

k

a

T


n

o

it

c

A


y

a

l

p

s

i

D


d

e

r

u

s

a

e

M


e

d

o

C

 ,

n

o

i

s

s

e

r

p

e

d


y

e

k


d

e

t

c

e

ff

a

 r

o

e

l

b

i

d

u

a


e

l

b

a

s

i

D


s

s

e

r

p

y

e

K


c

1

c

1

Disable all outputs 

1, 2

Disable lights and timers 

 ,

n

o

i

s

s

e

r

p

e

d


y

e

k

 r

o

e

l

b

i

d

u

a


e

l

b

a

s

i

D


e

u

l

a

v

 r

e

p

o

r

p

m

p

o

o

d

r

a

o

b

y

e

K


c

2

c

1

Disable all outputs 

1

Disable lights and timers 

1c31 

Cancel key improper value 

mssg 1 (active) / mssg 2 (data) 

Disable all outputs for cavity 

1

1c32 

Cancel key improper value 

mssg 1 (active) / mssg 2 (data) 

Disable all outputs for cavity 

1

 )

a

t

a

d

2


g

s

s

m

 /

 )

e

v

it

c

a

1


g

s

s

m


d

il

a

v

n

C

R

C


c

4

c

1

Disable all outputs 

1

1c6c 

No response from EEPROM 

mssg 1 (active) / mssg 2 (data) 

Disable all outputs 

1

1c7c 

Calibration value out of range 

mssg 1 (active) / mssg 2 (data) 

Completely disable oven 

4

 )

a

t

a

d

2


g

s

s

m

 /

 )

e

v

it

c

a

1


g

s

s

m


d

il

a

v

n

C

R

C


1

8

c

1

Disable affected oven function 

1

 )

a

t

a

d

2


g

s

s

m

 /

 )

e

v

it

c

a

1


g

s

s

m


d

il

a

v

n

C

R

C


2

8

c

1

Disable affected oven function 

1

1d11

Sensor resistance >2237 

mssg 1 (active) / mssg 3 (data) 

Disable all cooking functions for cavity 

1d12

Sensor resistance >2237 

mssg 1 (active) / mssg 3 (data) 

Disable all cooking functions for cavity 

1d21

Sensor resistance >2787 

mssg 1 (active) / mssg 3 (data) 

Disable all cooking functions for cavity 

1d22

Sensor resistance >2787 

mssg 1 (active) / mssg 3 (data) 

Disable all cooking functions for cavity 

3d11

Sensor resistance > Infinite 

mssg 1 (active) / mssg 2 (data) 

Disable all cooking functions for cavity 

3d12

Sensor resistance > Infinite 

mssg 1 (active) / mssg 2 (data) 

Disable all cooking functions for cavity 

3d21

Sensor resistance < 0 

mssg 1 (active) / mssg 2 (data) 

Disable all cooking functions for cavity 

3d22

Sensor resistance < 0 

mssg 1 (active) / mssg 2 (data) 

Disable all cooking functions for cavity 

3d41

Probe resistance < 0 

mssg 1 (active) / mssg 2 (data) 

Disable all probe functions 

3d51 

Calibration value out of range 

mssg 2 

Disable all probe functions 

4d11 

Door switch not closed when  

door is locked 

mssg 1 

Disable Clean and lockout functions 

5

4d12 

Door switch not closed when  

door is locked 

mssg 1 

Disable Clean and lockout functions 

5

4d21 

Reverse Airflow Fan rotation  

(no/low RPM) 

mssg 1 (active) / mssg 2 (data) 

Disable all cooking functions for cavity 

4d22 

Reverse Airflow Fan rotation  

(no/low RPM) 

mssg 1 (active) / mssg 2 (data) 

Disable all cooking functions for cavity 

4d31 

Reverse Airflow Fan rotation  

(on when should be off) 


n

o

it

c

a


o

N


e

g

n

a

h

c


o

N

4d32 

Reverse Airflow Fan rotation  

(on when should be off) 


n

o

it

c

a


o

N


e

g

n

a

h

c


o

N

4d41 

Reverse Airflow Fan rotation  

(high RPM) 

mssg 1 (active) / mssg 2 (data) 

Disable all cooking functions for cavity 

4d42 

Reverse Airflow Fan rotation  

(high RPM) 

mssg 1 (active) / mssg 2 (data) 

Disable all cooking functions for cavity 

4d51 

Door switch not open or closed 

mssg 1 (active) / mssg 2 (data) 

Disable Convect, Clean, and lockout functions 

4, 5

Turn off light and disable light from door switch 

4d52 

Door switch not open or closed 

mssg 1 (active) / mssg 2 (data) 

Disable Convect, Clean, and lockout functions

4, 5

Turn off light and disable light from door switch 

9d11 

Lock switch not closed 

mssg 1 (active) / mssg 2 (data) 

Disable Clean and lockout functions 

4

9d12 

Lock switch not closed 

mssg 1 (active) / mssg 2 (data) 

Disable Clean and lockout functions 

4

9d21 

Unlock switch not closed 

mssg 1 (active) / mssg 2 (data) 

Disable Clean and lockout functions 

4

9d22 

Unlock switch not closed 

mssg 1 (active) / mssg 2 (data) 

Disable Clean and lockout functions 

4

9d31 

Lock and unlock switches both closed  mssg 1 (active) / mssg 2 (data) 

Disable Clean and lockout functions 

4

9d32 

Lock and unlock switches both closed  mssg 1 (active) / mssg 2 (data) 

Disable Clean and lockout functions 

4

Message 1: 

Message 2: 

Message 3: 

FAULT DETECTED 

PRESS ENTER 

TO TRY AGAIN 

FEATURE NOT 

AVAILABLE

PRESS HELP 

FAULT DETECTED 

DISABLE POWER 

TO CLEAR 

Summary of Contents for  RY160LXTQ

Page 1: ...CONSUMER SERVICES TECHNICAL EDUCATION GROUP PRESENTS SLIDE IN ELECTRIC RANGE JOB AID Part No 8178710 KR 38 Models RS160LXT RY160LXT ...

Page 2: ...agrams used in this Job Aid are typical and should be used for training purposes only Always use the Wiring Diagram supplied with the product when servicing the Slide in Electric Range GOALS AND OBJECTIVES The goal of this Job Aid is to provide information that will enable the In Home Service Professional to properly diagnose malfunctions and repair the Slide in Electric Range The objectives of th...

Page 3: ... 3 1 Control Lock 3 2 Oven Temperature Control 3 2 COMPONENT ACCESS 4 1 Component Locations 4 1 Removing The EOC Assembly 4 2 Removing An LED and Infinite Switch 4 3 Removing Cooktop and Coil Element Receptacles 4 4 Removing Rear Panel 4 6 Removing A Cooling Fan And Oven Light Socket 4 7 Removing Broil Element 4 8 Removing Bake Element 4 9 Removing The Oven Temperature Sensor 4 10 Removing The Ove...

Page 4: ...t 5 3 6 Inch 8 Inch Coil Elements 5 3 Broil Element 5 4 Cooling Fan Motor 5 4 Door Latch Assembly Switch 5 5 DIAGNOSTICS TROUBLESHOOTING 6 1 Error Codes 6 1 Quick Test Mode for Electronic Range Control 6 4 Hidden Functions 6 5 WIRING DIAGRAMS 7 1 Cooktop Control Circuit 7 2 Oven Control Circuit 7 2 ...

Page 5: ...hat can kill or hurt you and others All safety messages will follow the safety alert symbol and either the word DANGER or WARNING These words mean All safety messages will tell you what the potential hazard is tell you how to reduce the chance of injury and tell you what can happen if the instructions are not followed You can be killed or seriously injured if you don t immediately follow instructi...

Page 6: ...EE STANDING 6 30 SET IN RANGES OVEN TYPE DOES NOT APPLY TO COUNTERTOPS 0 THRU 3 STANDARD PORCELAIN 2 THRU 5 CONTINUOUS CLEAN BEFORE 1996 4 THRU 9 PYROLYTIC SELF CLEAN FEATURE VARIATIONS ELECTRIC 0 1 2 5 7 COIL ELEMENTS DOOR TYPE B SOLID BLACK GLASS 0 METAL OVEN DOOR L LARGE WINDOW P STANDARD WINDOW GLASS FEATURE CODE E ELECTRONIC IGNITION GAS ONLY X NOT DEFINED S STANDING IGNITION GAS ONLY C COLOR...

Page 7: ...ERIAL NUMBER LABEL AND WIRING DIAGRAM LOCATIONS The Model Serial Number label and Wiring Diagram locations are shown below Model Serial Number Label Location Wiring Diagram Location On Back Side Of Storage Drawer ...

Page 8: ...e D o N n o i t c e v n o C s e Y e d o M h t a b b a S s e Y m r a W p e e K s e Y d l o H k o o C l a u n a M m s i n a h c e M k c o L r o o D o N g n i l i o r b r o o d d e s o l C s e Y t n e m e l e l i o r B d e s s e c e R 6 s e s s a P f o r e b m u N t n e m e l E l i o r B o N d e d u l c n I n a P l i o r B l a u n a M t h g i L n e v O Oven light type Incandescent Control Panel 4 s b...

Page 9: ...rage draw er Anti tip brackets must be securely mounted to back wall or floor Thickness of floor may require longer screws to anchor bracket to sub floor Longer screws are avail able from your local hardware store Parts needed If using a power supply cord A UL listed power supply cord kit marked for use with ranges The cord should be rated at 250 volts minimum 40 amps or 50 amps that is marked for...

Page 10: ... Electrical Requirements section IMPORTANT To avoid damage to your cabi nets check with your builder or cabinet supplier to make sure that the materials used will not dis color delaminate or sustain other damage This oven has been designed in accordance with the requirements of UL and CSA International and complies with the maximum allowable wood cabinet temperatures of 194 F 90 C Mobile Home Addi...

Page 11: ... above the range follow the range hood or microwave hood combination instal lation instructions for dimensional clearances above the cooktop surface A 13 33 cm upper cabinet depth B 30 76 2 cm min opening width C For minimum clearance to the top of the cooktop see NOTE D 23 58 1 cm opening depth E 30 76 2 cm min opening width F Junction box 5 5 14 cm min from either cabinet 10 25 4 cm max from flo...

Page 12: ...ic sheathed copper or aluminum cable See Electrical Connection Allow 2 to 3 ft 61 0 cm to 91 4 cm of slack in the line so that the range can be moved if servicing is ever necessary A UL listed conduit connector must be pro vided at each end of the power supply cable at the range and at the junction box Wire sizes and connections must conform with the rating of the range 40 amps The wiring diagram ...

Page 13: ... connecting to a 3 wire system Local codes may permit the use of a UL listed 3 wire 250 volt 40 amp range power supply cord pigtail This cord contains 3 copper con ductors with ring terminals or open end spade terminals with upturned ends terminating in a NEMA Type 10 50P plug on the supply end Connectors on the appliance end must be pro vided at the point the power supply cord enters the applianc...

Page 14: ...ire or electrical shock Power Supply Cord 1 Disconnect power 2 Use Phillips screwdriver to remove the terminal block cover screw located on the back of the range Pull cover down and toward you to remove cover 3 Remove plastic tag holding three 10 32 hex nuts from the middle post of the ter minal block 4 Add strain relief Style 1 Power supply cord strain relief Assemble a UL listed strain relief in...

Page 15: ...n the cord conduit plate on bottom of range Allow enough slack to easily attach the wiring to the terminal block Tighten strain relief screw against the power supply cord Style 2 Direct wire strain relief Use Phillips screwdriver to remove screws from panel on back of range REMOVE TAG USE NUTS WITH POWER CORD QUITE LA ETIQUETA USE LAS TUERCAS PARA CONECTAR EL CORDÓN ELÉCTRICO REMOVE TAG USE NUTS W...

Page 16: ...NECT AR EL CORDÓ N ELÉCTR ICO REMOVE TAG USE NUTS WITH POWER CORD QUITE LA ETIQUET A PARA CONECT AR EL CORDÓ N ELÉCTR ICO Use Phillips screwdriver to remove screws and slide cord conduit plate down and out Position cord conduit plate as shown in the following illustration Replace cord conduit plate and insert screws ...

Page 17: ...rough the strain relief allowing enough slack to easily attach wiring to the terminal block Tighten strain relief screw against the flex ible conduit 5 Replace back panel and screws on rear of range 6 Completeinstallationfollowinginstructions for your type of electrical connection 4 wire recommended 3 wire if 4 wire is not available ...

Page 18: ...method for New branch circuit installations 1996 NEC Mobile homes Recreational vehicles Inanareawherelocalcodesprohibitground ing through the neutral 1 Part of metal ground strap must be cut out and removed A Metal ground strap B Ground link screw A B 2 Use Phillips screwdriver to remove the ground link screw from the back of the range Save the ground link screw 3 Feed the power supply cord throug...

Page 19: ...ing with ring terminals and marked for use with ranges 8 Replace terminal block access cover 3 wire connection Power Supply Cord Use this method only if local codes permit con necting chassis ground conductor to neutral wire of power supply cord A Terminal block B Ground link screw C Cord conduit plate D Power supply cord wires E Strain Relief A B C D E 1 Feed the power supply cord through the ope...

Page 20: ...t breaker box Depending on your electrical supply make the required 3 wire or 4 wire connection 1 Strip outer covering back 3 7 6 cm to expose wires Strip the insulation back 1 2 5 cm from the end of each wire 3 7 6 cm 1 2 5 cm 2 Allow enough slack in the wire to easily attach the wiring terminal block 3 Complete electrical connection according to your type of electrical supply 4 wire or 3 wire co...

Page 21: ...ck B Ground link screw C Cord conduit plate D Line 2 red wire E Neutral white wire F Line 1 black wire G Bare green ground wire H Strain Relief A B C D E F G H 4 Attachterminallugstoline1 black neutral white and line 2 red wires Loosen do notremove thesetscrewonthefrontofthe terminal lug and insert exposed wire end through bottom of terminal lugs Securely tighten set screw to 10 lbs in torque See ...

Page 22: ... other terminal 6 Use 3 8 nut driver to connect the neutral white wire to the center terminal block post with one of the 10 32 hex nuts 3 wire connection Direct Wire Use this method only if local codes permit connecting ground conductor to neutral sup ply wire 1 Pull the conduit through the hole and conduit plate on bottom of range Allow enough slack to easily attach the wiring to the terminal blo...

Page 23: ...lbs in 2 8 N m 6 gauge aluminum 35 lbs in 4 0 N m 3 Use 3 8 nut driver to connect the bare green ground wire to the center termi nal block post with one of the 10 32 hex nuts A 10 32 hex nut B Line 1 black C Ground link screw D Bare green ground wire E Line 2 red F Terminal lug B F A E D C 4 Connectline1 black andline2 red wires totheouterterminalblockpostswith10 32 hex nuts 5 Securely tighten hex...

Page 24: ...tools 3 Dispose of recycle all packaging materi als 4 Check that the range is level See Level Range 5 Use a mild solution of liquid household cleaner and warm water to remove waxy residue caused by protective shipping ma terial Dry thoroughly with a soft cloth For more information read the Range Care section of the Use and Care Guide 6 Read Range Use in the range Use and Care Guide 7 Plug power co...

Page 25: ...ange onto card board or hardboard to avoid damaging the floor covering If removing the range is necessary for cleaning or maintenance For power supply cord connected ranges 1 Unplug the power supply cord 2 Slide range forward to complete cleaning or maintenance 3 Check that anti tip bracket is installed Lookfortheanti tipbracketsecurelyattached to floor or wall Slide range back so rear range foot ...

Page 26: ...2 18 NOTES ...

Page 27: ...e last minute will count down in seconds For settings of 1 hour or more the display will count down hours and minutes CANCEL The CANCEL button stops any function except theClock TimerandControlLock Whenyou press the CANCEL button the display will show the time of day or the time remaining if the TIMER is being used CLOCK The clock can be set to display time in a 12 hour or24 hourformat Theclockiss...

Page 28: ...a guide ADJUSTMENT F ADJUSTMENT C COOKS FOOD 5 to 10 F 3 to 6 C a little more 15 to 20 F 9 to 12 C moderately more 25 to 35 F 15 to 21 C much more 5 to 10 F 3 to 6 C a little less 15 to 20 F 9 to 12 C moderately less 25 F 15 C much less To Adjust Oven Temperature Calibration 1 Press BAKE 2 Enter 550 by pressing the up arrow pad 3 Press and hold BAKE pad for several sec onds or until 0 appears in t...

Page 29: ...ooktop on light C Electronic oven control D Oven light E Right front control knob F Right rear control knob G Left rear control knob H Left front control knob A B F G C D E H Range Components A Oven vent B Surface cooking area C Anti tip bracket D Model and serial number plate behind right side of storage drawer E Removable storage drawer F Electronic oven control G Control panel H Broil element n...

Page 30: ...the left and right end caps Screw b Open the oven door and remove the indicated screws from the bottom of the control panel c Pull out on the bottom of the control panel unclip the top edge from the bracket and rotate the control panel forward and down so you can access the components d Disconnect the wire connectors from the electronic oven control board at P1 P2 P3 and P4 e Remove the four screw...

Page 31: ...ED indicator body c Remove the LED indicator body Electrical Shock Hazard Disconnect power before servicing Replace all parts and panels before operating Failure to do so can result in death or electrical shock LED Indicator Body LED Lens 4 To remove an infinite switch a Remove control knob by pulling it straight off the control shaft b Remove two screws holding infinite switch to control panel Sw...

Page 32: ...erating Failure to do so can result in death or electrical shock b Remove six screws from the left and right cooktop mounting plate c Remove four coil elements by unplug ging coil elements and removing them from cooktop d Remove four drip bowls from cook top e Remove four coil element receptacles by removing four receptacle mounting screws Coil Element Receptacle Screws Cooktop Mounting Screws f R...

Page 33: ...otate it forward seepage4 2 steps2athrough 2c for the procedure b Remove harness retainer screw Coil Element Receptacles Harness Retainer Screw c Unplug two coil element connectors located in control panel Coil Element Connectors d Remove coil element receptacles and harness ...

Page 34: ... operating Failure to do so can result in death or electrical shock 1 Unplug range or disconnect power 2 Pull the range out of it s mounting location so that you access the rear of the unit 3 Remove two screws securing rear panel to unit Rear Cover Screws 4 Lift rear panel off of lower support tabs and remove rear panel from unit ...

Page 35: ...Disconnect power before servicing Replace all parts and panels before operating Failure to do so can result in death or electrical shock Cooling Fan Connector Cooling Fan Screws 5 To remove oven light socket a Open the oven door and remove oven racks from the inside of oven b Unscrew the lens and bulb from the ovenlightsocketassemblyandremove them Oven Light Socket c Disconnect the two wire connec...

Page 36: ...f oven 3 Remove the two front and the two rear broil element support screws Broil Element Rear Screws Front Screws 4 Pull the broil element forward so that the wire connectors are inside the oven cavity 5 Disconnectthetwowiresfromthe element terminals of the broil element NOTE Whenyoudisconnectthewires becare ful not to allow them to pull back behind the access holes where you will not be able to ...

Page 37: ...m the inside of oven Bake Element 3 Remove two bake element support screws Bake Element Support Screws 4 Pull the bake element forward so that the wire connectors are inside the oven cavity 5 Disconnectthetwowiresfromthe element terminals of the bake element NOTE Whenyoudisconnectthewires becare ful not to allow them to pull back behind the access holes where you will not be able to retrieve them ...

Page 38: ...eovendoorandremoveovenracks from the inside of oven Oven Sensor 3 Remove two oven sensor screws Oven Sensor Screws 4 Pull the oven sensor forward so that the wire connectors are inside the oven cavity 5 Disconnect the plug from the oven sensor harness NOTE Whenyoudisconnecttheplug becareful not to allow them to pull back behind the access holes where you will not be able to retrieve them without r...

Page 39: ... you access the rear of the unit 3 Remove rear panel see removing rear panel page 4 6 for procedure 4 Remove cooktop see removing cooktop and coil element receptacles page 4 4 for procedure Burner Box Bottom 5 Remove four screws from burner box at taching it to unit Burner Box Screws 6 Remove burner box bottom from unit Oven TOC 7 Disconnect two wires from oven TOC terminals 8 Remove two screws fr...

Page 40: ...e or disconnect power 2 Pull the range out of it s mounting location so that you access the rear of the unit 3 Remove rear panel see removing rear panel page 4 6 for procedure 4 Remove cooktop see removing cooktop and coil element receptacles page 4 4 for procedure Burner Box Bottom 5 Remove four screws from burner box at taching it to unit Burner Box Screws 6 Remove burner box bottom from unit Do...

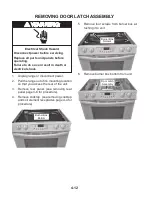
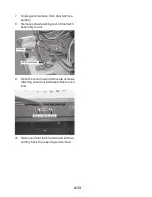
Page 41: ... Remove screw retaining rear of door latch assembly to unit Wire Harness Screw 9 Opentheovendoorandremovetwoscrews retainingovendoorlatchassemblytooven liner Door Latch Screws 10 Slide oven door latch handle and latch as sembly back thru opening and remove ...

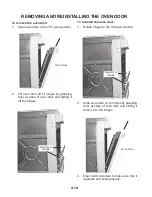
Page 42: ... grasping door at sides of oven door and sliding it off the hinges Oven Door Hinges To reinstall the oven door 1 Rotate hinges to the 1 4 open position Oven Door Hinges 2 Slide oven door on to hinges by grasping door at sides of oven door and sliding it down on to the hinges Oven Door 3 Open and close door to make sure that it operates and seals properly ...

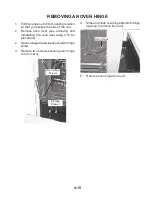
Page 43: ...ove oven door see removing and reinstalling the oven door page 4 14 for procedure 2 Openstoragedrawertoexposelowerhinge screw 3 Remove two screws securing oven hinge to oven cavity Oven Hinge Screws Storage Drawer 4 Slideandrotateovenhingebackthruhinge opening to remove from unit Oven Hinge 5 Remove oven hinge from unit ...

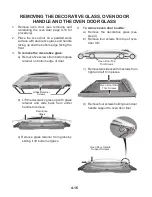
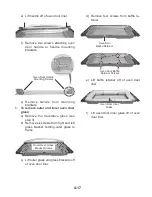
Page 44: ...ainer on bottom edge of door Glass Retainer Screws b Lift the decorative glass up with glass retainer and slide back from under handle to remove Decorative Glass c Remove glass retainer from glass by sliding it off bottom of glass 4 To remove oven door handle a Remove the decorative glass see step 3 b Remove four screws from top of oven door trim c Removetwosideoventrimscrewsfrom right and left tr...

Page 45: ...Remove the decorative glass see step 3 b Remove six screws from right and left glass bracket holding outer glass to frame Outer Oven Glass Bracket Screws c Lift outer glass and glass brackets off of oven door liner d Remove four screws from baffle re tainer Oven Door Baffle Retainer Oven Door Baffle Retainer Screws e Lift baffle retainer off of oven door liner Oven Door Inner Glass f Lift oven doo...

Page 46: ...r seal where it is tucked into inner oven liner pull the oven door seal out of the liner Oven Door Seal 3 Pull the oven door seal clips out of oven door liner Oven Door Seal Clips Reassembly Note After the door seal is installed make sure that it is even along the surface of the door when the door is closed ...

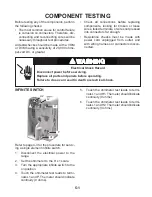
Page 47: ...lacing components looking for broken or loose wires failed terminals or wires not pressed into connectors far enough Resistance checks must be made with power cord unplugged from outlet and with wiring harness or connectors discon nected Refer to page 4 3 for the procedure for servic ing a single element infinite switch 1 Disconnect the electrical power to the range 2 Set the ohmmeter to the R x 1...

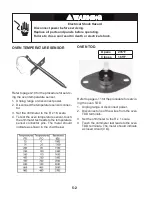
Page 48: ...onnec tor 3 Set the ohmmeter to the R x 1K scale 4 To test the oven temperature sensor touch the ohmmeter test leads to the temperature sensor connector pins The meter should indicate as shown in the chart below OVEN TOD Refer to page 4 11 for the procedure for servic ing the oven TOD 1 Unplug range or disconnect power 2 Disconnect one of the wires from the oven TOD terminals 3 Set the ohmmeter to...

Page 49: ...of the wires from the bake element terminals 3 Set the ohmmeter to the R x 1 scale 4 Touch the ohmmeter test leads to the bake elementterminals Themetershouldindicate between 21 and 33 Ω Refer to page 4 4 for the procedure for servic ing the coil element 1 Unplug range or disconnect power 2 Push and lift the element from the terminal block 3 Set the ohmmeter to the R x 1 scale 4 Touch the ohmmeter...

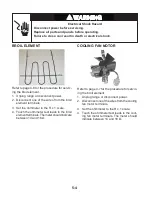
Page 50: ... wires from the broil element terminals 3 Set the ohmmeter to the R x 1 scale 4 Touch the ohmmeter test leads to the broil elementterminals Themetershouldindicate between 14 and 16 Ω COOLING FAN MOTOR Refer to page 4 7 for the procedure for servic ing the broil element 1 Unplug range or disconnect power 2 Disconnectoneofthewiresfromthecooling fan motor terminals 3 Set the ohmmeter to the R x 1 sca...

Page 51: ...NG DOOR LATCH ASSEMBLY SWITCH Refer to page 4 12 for the procedure for ser vicing the door latch assembly switch 1 Unplug range or disconnect power 2 Disconnect the wires from the door latch assembly switch terminals 3 Set the ohmmeter to the R x 1 scale 4 Touch the ohmmeter test leads to the door latch assembly switch terminals The meter should indicate a open circuit ...

Page 52: ...5 6 NOTES ...

Page 53: ...c a n a e l C r o k o o C n e p o e r u l i a f r o s n e s e r u t a r e p m e T 1 1 d 3 c e s 0 2 e v i t c a n a e l C r o k o o C n e p o e r u l i a f r o s n e s e r u t a r e p m e T 2 1 d 3 c e s 0 2 e v i t c a n a e l C r o k o o C t r o h s e r u l i a f r o s n e s e r u t a r e p m e T 1 2 d 3 c e s 0 2 e v i t c a n a e l C r o k o o C t r o h s e r u l i a f r o s n e s e r u t a r ...

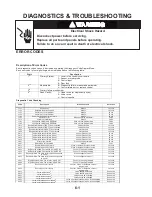
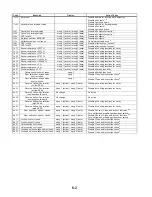
Page 54: ...41 Probe resistance 0 Ω mssg 1 active mssg 2 data Disable all probe functions 3d51 Calibration value out of range mssg 2 Disable all probe functions 4d11 Door switch not closed when door is locked mssg 1 Disable Clean and lockout functions 5 4d12 Door switch not closed when door is locked mssg 1 Disable Clean and lockout functions 5 4d21 Reverse Airflow Fan rotation no low RPM mssg 1 active mssg 2...

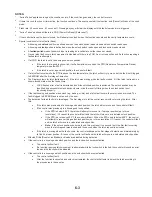
Page 55: ...e or as the result of timing when the unlock switch is not functioning properly If the last known good position was unlock e g baking or idle and a latch fault occurs the motor is never moved The fault is logged to EEPROM and is not seen by the user The detection for latch faults is in two stages The first stage is to let the control recover without moving the latch After this If the latch was pre...

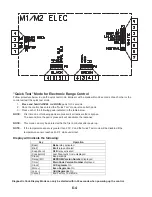
Page 56: ...e the response NOTE This mode can only be entered within the first 5 minutes after power up NOTE If the temperature sensor is greater than 400 F and the Quick Test mode will be disabled if the temperature sensor reaches 400 F while under test Display will indicate the following n o i t a r e p O y e K Bake Bake relay activated Broil Broil relay activated Keep Warm DLB relay activated Cook Hold Las...

Page 57: ... 5 seconds Resets clock to factory settings M1 12 hour shutoff Control automatically cancels cooking operation and removes all relay drives 12 hours after the last pad touch See Sabbath Mode to disable M1 Sabbath mode Hold CLOCK pad for 3 to 5 seconds to activate Sabbath mode Hold CLOCK pad for 3 to 5 seconds to disable Sabbath mode Desired bake function must be initiated before entering Sabbath m...

Page 58: ...6 6 NOTES ...

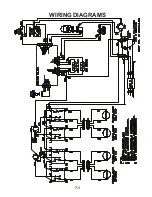
Page 59: ...7 1 WIRING DIAGRAMS ...

Page 60: ...7 2 ...

Page 61: ...E PROFESSIONAL IN CANADA FOR PRODUCT SPECIFICATIONS AND WARRANTY INFORMATION CALL 1 800 461 5681 FOR TECHNICAL ASSISTANCE WHILE AT THE CUSTOMER S HOME CALL THE TECHNICALASSISTANCE LINE 1 800 488 4791 HAVE YOUR STORE NUMBER READY TO IDENTIFY YOU AS AN AUTHORIZED IN HOME SERVICE PROFESSIONAL FOR WHIRLPOOL PRODUCTS 1 800 253 1301 FOR KITCHENAID PRODUCTS 1 800 422 1230 FOR ROPER PRODUCTS 1 800 447 673...

Page 62: ......
Reviews: