


7
3. Pull tube to ensure it is secured.
4. Route copper tubing through undersink cabinet and oven
cabinet cutout.
NOTE: Due to temperatures around oven, copper tubing is
required.
5. Connect the copper water supply tubing to the oven copper
tubing, using a ¼" to ¼" water supply union (not provided).
6. Turn on water supply.
7. Check all connections for leaks.
NOTE: No flushing or conditioning of the water filter is required
prior to use.
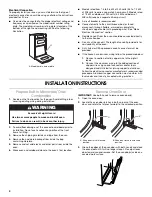
Install Oven
1. Using 2 or more people, lift oven partially into cabinet cutout
using the oven opening as an area to grip.
NOTE: Push against seal area of oven front frame when
pushing oven into cabinet. Do not push against outside
edges.
2. Push against seal area of front frame to push oven into
cabinet.
3. Push oven completely into cabinet and center oven into
cabinet cutout.
4. Securely fasten oven to cabinet using the #8-14 x 1" screws
(2 for single oven, 4 for double oven) provided. Insert the
screws through holes in mounting rails. Do not overtighten
screws.
A. To home water supply
B. Rear of cabinet cutout
C. Copper water supply tubing from home water supply
D. ¼" to ¼" water supply union (not provided)
E. Oven copper tubing
F. Oven front
Water
supply
connection
Shutoff
valve
Copper water supply
tubing to
cold water supply
Yellow
WATER
IN
Copper water supply
tubing to oven
Blue
WATER
OUT
Filter
Sink
B
C
D
A
E
F
A. Mounting rail
B. Insert #8-14 x 1"
screw.
WARNING
Excessive Weight Hazard
Use two or more people to move and install oven.
Failure to do so can result in back or other injury.
A
B


