Whirlpool KEHU309SSS Installation Instructions Manual Download Page 6

6

1. Connect the 2 black wires (C) together using a UL listed wire 

connector.

2. Connect the 2 white wires (D) and the green (or bare) ground 

wire (of the oven cable) using a UL listed wire connector.

3. Connect the 2 red wires (G) together using a UL listed wire 

connector.

4. Install junction box cover.

Install Water Filtration System

Install Water Filter 

1. Install the water filter near the cold water supply pipe under 

the kitchen sink to filter the cold water.

IMPORTANT: Be sure to allow a minimum clearance of 
1½" (3.8 cm) under the filter system for removing the filter 
cartridge.

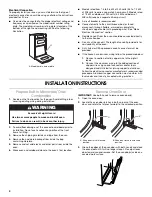
Typical Installation Configuration

NOTE: For unique installations contact a licensed plumber

2. Attach the supplied water filter mounting ring and screw at 

the recommended location.

3. Attach filter to the mounting ring.

Connect to Home Water Supply

1. Make connection to the cold water supply line. 

A leak-tight connection to the ¼" copper tubing must be 
provided. 

Check local codes for type of connection required.

Copper water supply tubing must be cut with a copper tubing 
cutter so the ends are concentric and without burrs.

NOTE: It is recommended that the cold water line be soft water.

Connect to Water Filter Inlet (yellow) 

NOTE: Use the quick connect stem and/or elbow adapter fittings 
in the combination needed for your installation configuration.

1. Attach the supplied 

³⁄₈

" to 

¹⁄₄

" stem or 

³⁄₈

" to 

¹⁄₄

" elbow quick 

connect adapter fitting to the yellow water filter inlet 
connection by pushing the quick connect fitting past the 
o-ring until you hit the backstop. 

2. Connect the copper water supply tubing (not provided) from 

the home cold water supply pipe to the quick connect 
adapter fitting you just installed on the filter inlet (yellow) side 
of the water filter.

3. Pull tube to ensure it is secured.

If you need to release tubing:

Push in collet to release tubing. With collet held in, pull tubing 
straight out.

Connect to Water Filter Outlet (blue)

1. Attach the supplied 

³⁄₈

" to 

¹⁄₄

" stem or 

³⁄₈

" to 

¹⁄₄

" elbow quick 

connect adapter fitting to the blue water filter outlet 
connection by pushing the quick connect fitting past the 
o-ring until you hit the backstop.

2. Connect another piece of copper water supply tubing to the 

quick connect adapter fitting you just installed on the filter 
outlet (blue) side of the water filter.

Filter

Assembly

Cold  water

supply

Hot Cold

Water supply

line to cold

water supply

Water supply

line to oven

Mounting ring and screw

1½" (3.8 cm) clearance

A. Quick connect elbow adapter fitting
B. Quick connect stem adapter fitting

A. ¼" water supply tubing
B. O-ring

C. Backstop

A. Collet

A

B

C

B

A

A

Summary of Contents for KEHU309SSS

Page 1: ...ou can be killed or seriously injured if you don t immediately You can be killed or seriously injured if you don t follow All safety messages will tell you what the potential hazard is tell you how to reduce the chance of injury and tell you what can happen if the instructions are not followed Your safety and the safety of others are very important We have provided many important safety messages i...

Page 2: ...ttached to oven Check local codes Check existing electrical supply See Electrical Requirements It is recommended that all electrical connections be made by a licensed qualified electrical installer Built InMicrowave OvenCombination LocationRequirements Make sure you have everything needed for correct installation IMPORTANT Observe all governing codes and ordinances Cabinet opening dimensions that ...

Page 3: ...ly the water pressure to the reverse osmosis system needs to be a minimum of 40 psi 276 kPa If the water pressure to the reverse osmosis system is less than 40 psi 276 kPa Check to see whether the sediment filter in the reverse osmosis system is blocked Replace the filter if necessary Allow the storage tank on the reverse osmosis system to refill after heavy usage If you have questions about your ...

Page 4: ...using special connectors and or tools designed and UL listed for joining copper to aluminum Follow the electrical connector manufacturer s recommended procedure Aluminum copper connection must conform with local codes and industry accepted wiring practices INSTALLATION INSTRUCTIONS PrepareBuilt InMicrowave Oven Combination 1 Decide on the final location for the oven Avoid drilling into or severing...

Page 5: ...om green or bare ground wire coming from the oven 4 Connect the 2 white wires F together using a UL listed wire connector 5 Connect the green or bare ground wire H from the oven cable to the green or bare ground wire in the junction box using a UL listed wire connector 6 Install junction box cover 3 Wire Cable from Home Power Supply IMPORTANT Use the 3 wire cable from home power supply where local...

Page 6: ...lter Inlet yellow NOTE Use the quick connect stem and or elbow adapter fittings in the combination needed for your installation configuration 1 Attach the supplied to stem or to elbow quick connect adapter fitting to the yellow water filter inlet connection by pushing the quick connect fitting past the o ring until you hit the backstop 2 Connect the copper water supply tubing not provided from the...

Page 7: ...dges 2 Push against seal area of front frame to push oven into cabinet 3 Push oven completely into cabinet and center oven into cabinet cutout 4 Securely fasten oven to cabinet using the 8 14 x 1 screws 2 for single oven 4 for double oven provided Insert the screws through holes in mounting rails Do not overtighten screws A To home water supply B Rear of cabinet cutout C Copper water supply tubing...

Page 8: ...en oven has been on for 10 15 minutes open the oven door look for water vapor escaping and feel for heat If you do not see water vapor or feel heat or if an error code F followed by a number plus E followed by a number appears in the display turn off the oven and contact a qualified technician 7 Touch OFF Check Operation of Microwave Oven 1 Fill a microwave safe container with 1 cup 250 mL of wate...

Reviews: