background image

F

fOrceD AIr

Once the heating process

 has been started 

the temperature can easily be adjusted by 
turning the multifunction knob.

Use this function to

 cook meringues, 

pastry, sponge cakes, soufflés, poultry and 
roast meats.

fOrceD AIr & MIcrOWAVeS

Use this function to

 cook roast meats, 

poultry, and jacket potatoes, frozen 
convenience foods, sponge cakes, pastry, 
fish and puddings.

1. Turn the multifunction knob to the forced 

Air position.

2. Turn the +/- knob to set the temperature.
3. Press the Select button to select cooking 

time.

4. Turn the +/- knob to set the cooking time.
5. Press the Start button.

The default setting

 when selecting forced Air 

is 175°c

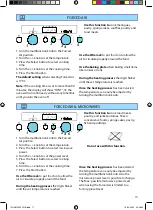
Use the Wire rack

 to put food on to allow the 

air to circulate properly around the food.

Use the baking plate

 when baking small items 

like cookies or rolls.

During the heating process

 the digits flicker 

until the set temperature is reached.

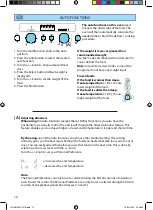
1. Turn the multifunction knob to the forced 

Air position.

2. Turn the +/- knob to set the temperature.
3. Press the Select button to select microwave 

power.

4. Turn the +/- knob to set the power level.
5. Press the Select button to select cooking 

time.

6. Turn the +/- knob to set the cooking time.
7. Press the Start button.

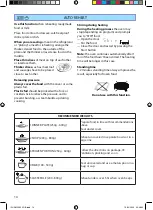
Use the Wire rack

 to put food on to allow the 

air to circulate properly around the food.

Do not use with this function.

F

During the heating process

 the digits flicker 

until the set temperature is reached.

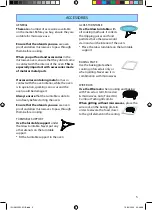
Once the heating process

 has been started 

the temperature can easily be adjusted by 
turning the multifunction knob. Also the 
microwave power level is possible to change. 
The Max. possible microwave power level 
when using the forced air is limited to a 
factory-preset level.

1

2

3

4

5

1

2

3

4

7

5

6

Note:

 If the cooking time is set to more than 90 

minutes, the display will show ”cONT”, I.e. the 
oven will run continuosly without any timelimit 
until you turn the oven off.

IFU AMW 524 GB.indd   11

15/04/2009   09:46:39

Summary of Contents for AMW 524

Page 1: ... Instructions for use www whirlpool com AMW 524 IFU AMW 524 GB indd 1 15 04 2009 09 46 38 ...

Page 2: ...e must be connected directly to the terminal The manufacturers are not liable for any problems caused by the user s failure to observe these instructions The earthing of this appliance is compulsory The manufacturer will accept no responsibility for injury to persons animals or damage to objects arising from the non observance of this requirement In the case of a permanent connection the appliance...

Page 3: ...ave oven for drying textiles paper spices herbs wood flowers fruit or other combustible materials Fire could result If material inside outside the oven should ignite keep oven door closed and turn the oven off Disconnect the power cord or shut off power at the fuse or circuit breaker panel Do not over cook food Fire could result Do not leave the oven unattended especially when using paper plastic ...

Page 4: ...ave oven for deep frying because the oil temperature cannot be controlled Use hot pads or oven mitts to prevent burns when touching containers oven parts and pan after cooking CAREFUL Always refer to a microwave cookbook not included for details Especially if cooking or reheating food that contains alcohol After heating baby food or liquids in a baby bottle or in a baby food jar always stir and ch...

Page 5: ...damaged Always ensure that the turntable is able to turn freely before starting the oven Ensure that the utensils you use are oven proof and allow microwaves to pass through them before cooking TURNTABLE SUPPORT Use the turntable support under the Glass turntable Never put any other utensils on the turntable support Fit the turntable support in the oven WIRE RACK Use the Wire rack when cooking and...

Page 6: ...paused Pressing the Start button TWICE will increase the time by 30 seconds If you don t want to continue cooking Remove the food close the door and press the STOP button A beep will signal once a minute for 10 minutes when the cooking is finished Press the STOP button or open the door to cancel the signal Note The oven will only hold the settings for 60 seconds if the door is opened and then clos...

Page 7: ...ress the Select button 3 seconds until the left hand digit hour s flicker 3 Turn the knob to set the hours 4 Press the Select button again The two right hand digits minutes flicker 5 Turn the knob to set the minutes 6 Press the Select button again The Clock is set and in operation Note When the appliance is first plugged in or after a power failure the display is blank If the clock is not set the ...

Page 8: ...icrowave position 2 Turn the knob to set the cooking time 3 Press the Select button to select power level 4 Turn the knob to set the preferred power level 5 Press the Start button COOK REHEAT WITH MICROWAVES Use this function for normal cooking and reheating such as vegetables fish potatoes and meat Once the cooking process has been started The time can easily be increased in 30 second steps by pr...

Page 9: ...es place the wire grid on top of the baking plate Note If the cooking time is set to more than 90 minutes the display will show CONT I E the oven will run continuously without any timelimit until you turn the oven off 1 2 3 4 5 GRILL COMBI Use this function to cook such food as Gratin s and Lasagne Do not use with this function 1 Turn the multifunction knob to the Grill Combi position 2 Turn the k...

Page 10: ...efore switching off During this time it is waiting for you to insert food and choose a Forced Air function to begin cooking Preheating is always done with the oven empty 1 2 3 F TURBO GRILL COMBI 1 Turn the multifunction knob to the Turbo Grill Combi position 2 Turn the knob to set the power level 3 Press the Select button to select cooking time 4 Turn the knob to set the cooking time 5 Press the ...

Page 11: ...il the set temperature is reached 1 Turn the multifunction knob to the Forced Air position 2 Turn the knob to set the temperature 3 Press the Select button to select microwave power 4 Turn the knob to set the power level 5 Press the Select button to select cooking time 6 Turn the knob to set the cooking time 7 Press the Start button Use the Wire rack to put food on to allow the air to circulate pr...

Page 12: ...ing the Auto functions except the Jet Defrost function you also have the possibility to personally control the end result through the Adjust doneness feature This feature enables you to achieve higher or lower end temperature or longer and shorter time increases the end temperature decreases the end temperature Note The Personal Preference can only be set or altered during the first 20 seconds of ...

Page 13: ...oor Turn the food Close the door and restart by pressing the Start button JET DEFROST Use this function for defrosting Meat Poultry Fish vegetables and bread For food not listed in the table below you should follow the procedure for Cook and reheat with microwaves and choose 160 W when defrosting Note the oven continues automatically after 2 min if the food hasn t been turned The defrosting time w...

Page 14: ... of each other or interlace them Thicker slices such as meat loaf and sausages have to be placed close to each other Releasing pressure Always cover the food with the Cover or some plastic foil Plastic foil should be pricked with a fork or cocktail stick to relieve the pressure and to prevent bursting as steam builds up during cooking Place food onto a microwave safe heatproof dinner plate or dish...

Page 15: ...d cook the bags one after another AUTO COOK Use this function for cooking ONLY Auto Cook can only be used for food belonging to the categories listed here Use Cook Reheat with microwaves for other food or weights not listed During the heating process the oven may stop depending on program and prompt you to TURN or STIR food Open the door Stir the food Close the door and restart by pressing the Sta...

Page 16: ...olls on the baking plate Put the plate in the oven when it promts you to Add food AUTO FORCED AIR COMBI For chicken and lasagne ensure that the dish you use is oven proof and allow microwaves to pass through it before cooking Else you may obtain a poor end result Always use the baking plate when making cookies and canned or frozen rolls Grease the baking plate lightly or cover it with baking paper...

Page 17: ...ew minutes can eliminate odors inside the oven Abrasive cleansers steel wool pads gritty wash cloths etc can damage the control panel and the interior and exterior oven surfaces Use a sponge with a mild detergent or a paper towel with spray glass cleaner Apply spray glass cleaner to a paper towel Do not spray directly on the oven Wire rack Baking plate Failure to maintain the oven in a clean condi...

Page 18: ...uld be replaced by the original mains cord which is available via our service organization The mains cord may only be replaced by a trained service technician WARNING Service only to be carried out by a trained service technician It is hazardous for anyone other than a trained person to carry out any service or repair operation which involves the removal of any cover which gives protection against...

Page 19: ...te waste handling of this product The symbol on the product or on the documents accompanying the product indicates that this appliance may not be treated as household waste Instead it shall be handed over to the applicable collection point for the recycling of electrical and electronic equipment Disposal must be carried out in accordance with local environmental regulations for waste disposal For ...

Page 20: ...frost Whirlpool Sweden AB SPECIAL NOTE When a function is finished the oven carries out a cooling procedure This is normal After this procedure the oven switches off automatically The cooling procedure can be interrupted without any harm to the oven by opening the door Data for test and heating performance In accordance with IEC 60705 The International Electrotechnical Commission has developed a s...

Reviews: