background image

ON

11

OFF

Fig. 21-1

Fig. 22

GETTING READY / OPERATION GUIDE

Problem

Remedy

The carbon brushes are worn out.

Replace with new ones according to the procedures on 

Pg. 17, Fig. 40.

When the motor becomes overheated from continuous use

Wait for the motor to cool down and start again.

When an oxide fi lm is generated in the motor

Allow the motor to rotate for about 10 minutes with no load.

Table 3

Fig. 21-2

Motor with built-in braking system


WARNING

Carry out the following checks before starting to cut or thread pipes. 

Should any problems arise, refer to "Troubleshooting" at the end of this manual and follow the appropriate instructions. 

Continuing to use the machine when a problem has arisen can lead to accident or injury.

9. Checks before starting

(1) Turn on the machine to set the main shaft in motion. (Fig. 20)

- Check there are no abnormal sounds or odours coming from the motor. 

- Check the pipe you installed does not vibrate abnormally. If it

does, install it again.

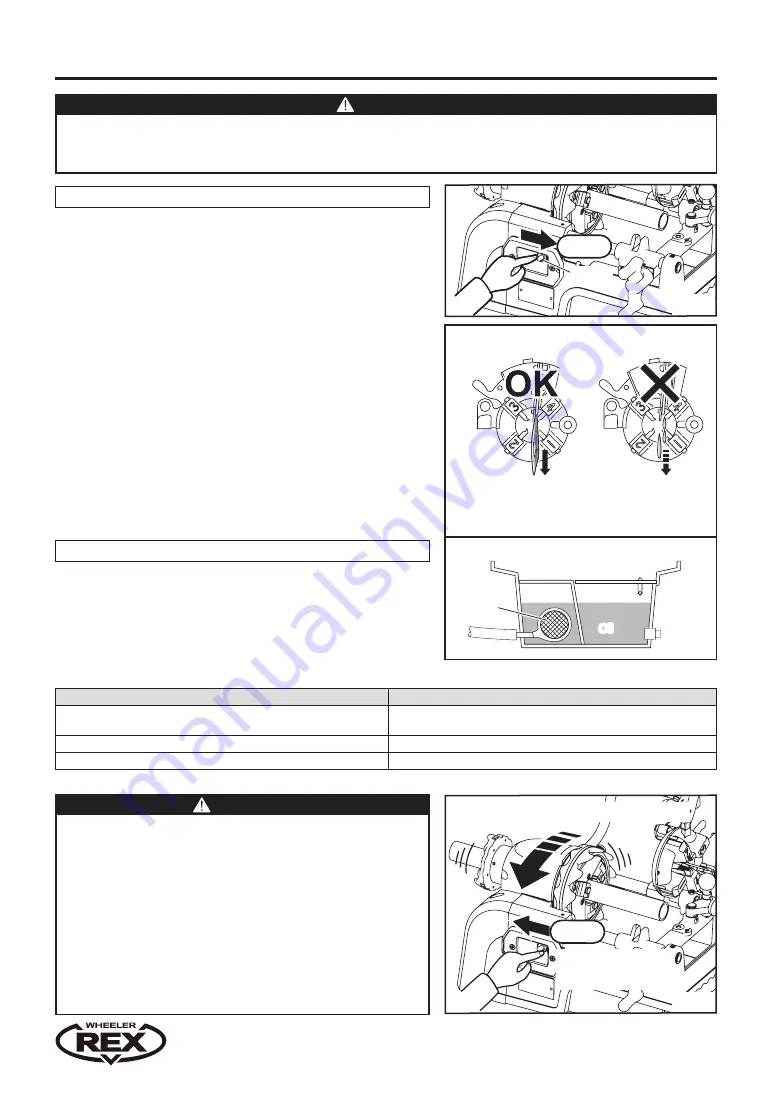
(2) Check that cutting oil fl ows as it should from the die head. (Fig. 21-1)

Confi rm that there is at least 1 liter of cutting oil in the tank. (tank

capacity:1.5 L)

When the volume of oil emitted from the die head is reduced, check 

that the amount of cutting oil in the tank is at least suffi cient to cover 

and hide the strainer. (Fig. 21-2) Replenish the oil as required.

* If the volume of oil fl owing from the die head remains low even

after the oil has been added, please contact your distributor or

WHEELER-REX.

(3) Allow the machine to rotate without any load for several minutes.

- Check the motor does not become abnormally hot, etc.

(4) Turn the machine off and allow it to stop rotating.

- Check there are no abnormal sounds or odours coming from

the motor. The unit uses a motor equipped with a built-in braking 

system for improved safety. Make sure you read and understand 

the points below relating to the use and performance of the system.

10. Motor with braking system 

(Fig. 22)

The braking system in the motor is designed to minimise idling 

after turning the machine off, and to prevent unexpected accidents 

and  injuries.  The  motor  can  stop  within  fewer  rotations  than 

conventional ones. However, under certain conditions the braking 

system may not engage correctly or it may become ineffective.

Read the following cautions carefully to ensure correct use.

Please note that the effectiveness of the brake will be diminished in the following cases.

If the brake does not work even under such circumstances, contact your distributor or WHEELER-REX.


WARNING

1. Make sure the braking system is working before using the machine.

- Although this machine is equipped with both a braking system

and a safety switch, the brake may not work or it may become

ineffective depending on conditions. Check the effectiveness

of the brake before use, and wait till the motor comes to a

complete stop before moving on to the next operation.

2. Be sure to use REX carbon brushes.

- Using other brushes may damage the motor or the machine itself, 

or the brake may not be applied.

3. Do not use the machine in rain, humid or damp places, or places 

where moisture can easily get into the machine.

- If stored for long periods in a humid place, an oxide fi lm may form 

on the motor, and the brake may not be engaged. Store in a place 

with low humidity.

brake is effective 

as OFF position

Oil

Strainer

Checking the amount of thread cutting oil /Oil tank

Con

fi

 rming the amount of thread cutting oil 

/ Die head

Appropriate amount of oil 

flows  smoothly  without 

interruption

Small  volumes  of  oil 

containing air bubbles 

produced intermittently 

come out

Fig. 20

Switch

Summary of Contents for 8991

Page 1: ...re using the machine Date of Purchase Year Month Distributor Note Be sure to hand this operation manual to the user Be sure to keep the manual where the operator can refer to it whenever necessary To ensure safe and efficient use read the manual thoroughly before using the machine 50 60Hz ...

Page 2: ......

Page 3: ...y Considerations and Precautions when using 8991 Before using the product therefore make sure you read the manual from start to finish paying particular attention to the Safety Considerations and Precautions To avoid accident and injury never use the machine for any purposes other than those described in this manual Should you need further advice contact your distributor or WHEELER REX CONTENTS In...

Page 4: ...e may result in overheating smoke or fire and may cause accident or injury If the unit overheats or produces smoke do not attempt to overhaul it yourself but ask for an inspection and repair 8 Keep the work site clean Ensure you keep workbenches and the worksite in good order and well lit Cluttered worksites and workbenches are liable to cause accidents 9 Do not let any unauthorised personnel near...

Page 5: ...affecting operation Do not use the machine if it has a damaged power cord or plug Doing so may cause electric shock or a short circuit leading to fire Do not use the machine if the Stop and Start switches do not work properly When replacing or repairing a broken protective cover and other parts follow the operation manual If no instructions are specified in the operation manual ask your distributo...

Page 6: ...ccur 11 Be sure to attach accessories according to the operation manual Attaching accessories incorrectly may cause the machine to topple over resulting in accident or injury 12 Precautions when using the machine with an oil tray If you are going to work with the machine placed in an oil tray be sure to put the machine on a table and make sure it is not immersed in oil otherwise the oil might be s...

Page 7: ...il may cause diarrhea or vomiting Emergency treatment Seek medical attention immediately without forcing the person to vomit 7 Do not place the oil where it can easily be reached by small children 8 Be very careful of fire 9 Storage Always close the lid after use to prevent the oil from being contaminated by dust water or other foreign bodies Store in a dark place away from direct sunlight 10 Drum...

Page 8: ...00 W Output 400 W series motor with brake Rotation speed 55r p m unloaded Net weight 58lbs 26 1kg Dimensions 18 x 12 5 x 14 450 L x 320 W x 350 H mm MAIN PARTS STANDARD SPECIFICATIONS ACCESSORIES OPTIONS AND THEIR APPLICATIONS Model No 8991 Die head Auto 1 NPT Dies 1 One set each Hexagonal keys 3mm 5mm 1 each Base Hammer chuck Handle Cutter Cutter handle Drain plug Carriage Handle lock pin Rear ch...

Page 9: ...n a flat surface the rear chuck of the machine is designed to be in a slightly raised position CAUTION If the rear chuck is too low oil will flow out of the pipe making the floor dirty and wasting oil 3 Cutting oil Fig 4 Fill the tank with the cutting oil that is supplied with the machine Use only genuine WHEELER REX cutting oil Fig 4 Using this oil for threading pipes made of other materials may ...

Page 10: ...thread pitches the dies need to be changed accordingly When replacing the dies please follow the instructions below 1 After opening the die head i e with the open lever removed from the groove on the block and the dies in the open position remove the size setting lever from the size setting pin 2 Turn the cam plate handle in the direction of the arrow dies No 3 and No 4 can then be removed 3 Raise...

Page 11: ...ckness allows pipes to be cut exactly to your requirements 1 Slightly loosen the lock bolt on the eccentric pin 2 Simply turn the microfine adjustment knob to the left to decrease and to the right to increase thread thickness 3 The knob is locked by a locking bolt which should be loosened with the hexagonal key provided and the knob turned three settings to the right before adjustments are made Si...

Page 12: ...on left of the arrow The dies will move towards the centre of die head If the eccentric handle does not move into position properly move the dies up and down a little while pushing and pulling the eccentric handle gently and try again 5 Adjust according to your desired thread cutting size see Threading Ensure the handle is lowered when the machine is in use Pg 6 Fig 2 7 Setting up the pipe Removin...

Page 13: ...rkpiece Fig 18 Use WHEELER REX pipe support Keeps long pipes stable WARNING Not using a pipe support may result in irregular threads damage to the machine and or accident or injury 8 Power supply Fig 19 Before using the unit check the voltage on the nameplate Use only an AC power supply If an extension cord is used it must be as short as possible and of sufficient capacity for the power supplied u...

Page 14: ... coming from the motor The unit uses a motor equipped with a built in braking system for improved safety Make sure you read and understand the points below relating to the use and performance of the system 10 Motor with braking system Fig 22 The braking system in the motor is designed to minimise idling after turning the machine off and to prevent unexpected accidents and injuries The motor can st...

Page 15: ...g pipe just before or during the cutting process while the pipe is rotating This will prevent the machine from becoming unstable under the weight of the workpiece If a pipe support is not used threading cannot be performed correctly causing problems with the machine and may even result in accident or injury 2 Pipe cutter may break Be sure to wear safety glasses and keep your hands and face away fr...

Page 16: ...ld be seriously injured Before threading a pipe 13 Carriage collision prevention mechanism Fig 27 When threading a very short pipe the carriage may hit the chuck and cause serious deformation or damage to the machine The collision prevention mechanism is designed to stop the motor automatically when it is on the verge of colliding and prevent damage to the machine 1 When the carriage approaches th...

Page 17: ...of the die head 3 Turn the carriage handle to the right to advance the die head against the pipe and allow the dies to begin cutting Fig 31 4 Once three or four threads have been cut the remainder will be cut automatically When the prescribed thread length is reached the dies will be released by the auto open lever 5 Turn the carriage handle to the left to release the die head from the pipe WARNIN...

Page 18: ...ading will then be performed automatically Fig 34 4 When the thread has been cut to the prescribed dimensions slowly raise the eccentric handle in the direction of the arrow and release the dies to complete the threading process Note If you release the dies too abruptly it may result in an imperfect finish such as a step edged thread Fig 35 5 Finally complete the process by releasing the die head ...

Page 19: ...he surface of the thread with your fingers feeling for any irregularity C Check if bits of scrap have been produced when cutting 2 Check if the diameter of the thread is too small or too large Fig 37 2 Check with a thread gauge 3 Distorted threads in the case of manual die heads Fig 37 3 When cutting threads that are wider than the width of the dies you can gradually open up the eccentric handle b...

Page 20: ...ecting the problem may result in overheating smoke or fire and lead to accident or injury 1 Oiling the pipe cutter Fig 39 Before you operate the machine be sure to maintain adequate lubrication by applying spindle oil or machine oil to the thread on the cutter handle roller shafts and blades once a day 2 Replacing the carbon brushes Fig 40 To protect the motor the unit is equipped with two auto st...

Page 21: ...e the carriage to the left 2 Hold the tank upper cover L and pull it up to remove it First loosen the wing bolt and while holding onto the wire lift up and remove the scrap tray 3 Remove the tank upper cover S and wipe off any chips adhering to the tank upper covers L S 4 Loosen the drain plug with a wrench and drain off the cutting oil from the tank Remove the strainer by using a Phillips screwdr...

Page 22: ... 18 Other causes See Motor with braking system on Pg 11 No oil flow Amount of oil is too low Replenish the oil Scrap clogging the flow Remove scrap in the oil tank The die head is not fitted correctly Fit the die head in the correct position Oil flows out of the back of the pipe Rear chuck is set too low Raise the rear chuck Difficulty in attaching the die head Scrap is in the way Remove scrap att...

Page 23: ......

Page 24: ...Product specifications are subject to change without prior notice 8V370 WH2 8991 1809D0100 Manufacturer ...

Reviews: