background image


23


Even  if  you  delete  a  programme,  the  remaining  amount  may  not  increase  by  the  amount  of 
deleted  time.  When  recording  new  video,  record  with  an  extra  margin  in  the  amount  of 
remaining space. 

Unrecordable Material 

In the unlikely event that there is some problem like loss of recorded video or audio content due to an 
HDD  malfunction,  please  be  aware  beforehand  that  we  will  bear  no  responsibility  to  compensate  for 
the content which could not be recorded or edited, for the loss of recorded or edited video, or for other 
related direct or indirect damages. 


If a power failure occurs 


The content being recorded or timer recorded may be damaged if power failure occurs.  


The content being played back may be damaged. 


For important recording  


If  the  HDD  malfunctions,  the  content  recorded  on  the  HDD  may  be  lost.  If  you  wish  to  save 
content permanently, we recommend copying or moving the content to Video or DVD. 


NOTE 


If  a  message  indicating  an  HDD  error  is  displayed  (such  as  “ERROR  IN  HDD.  CANNOT 
OPERATE.”) and the HDD has malfunctioned, you cannot replace the HDD by yourself. If you 
disassemble  the  Recorder,  the  warranty  will  become  void.  Also,  recovery  of  data  is 
impossible. If playback is possible, re-record the recorded content onto  a Video or DVD, and 
contact  the  approved  service  centre  with  the  details  provided  at  the  front  and  back  of  this 
operation manual. 


Hard Disk Operation (Recording / Playback / Time Shift Recording) 

If the Recorder is used in a cold location (a location at low temperature), the drive will only allow live 
viewing after power is turned on until the HDD is ready. During this time, the Recorder will not allow 
Time Shift Viewing, recording, display of recording lists or playback of recorded programmes. Please 
wait until the HDD is ready. 
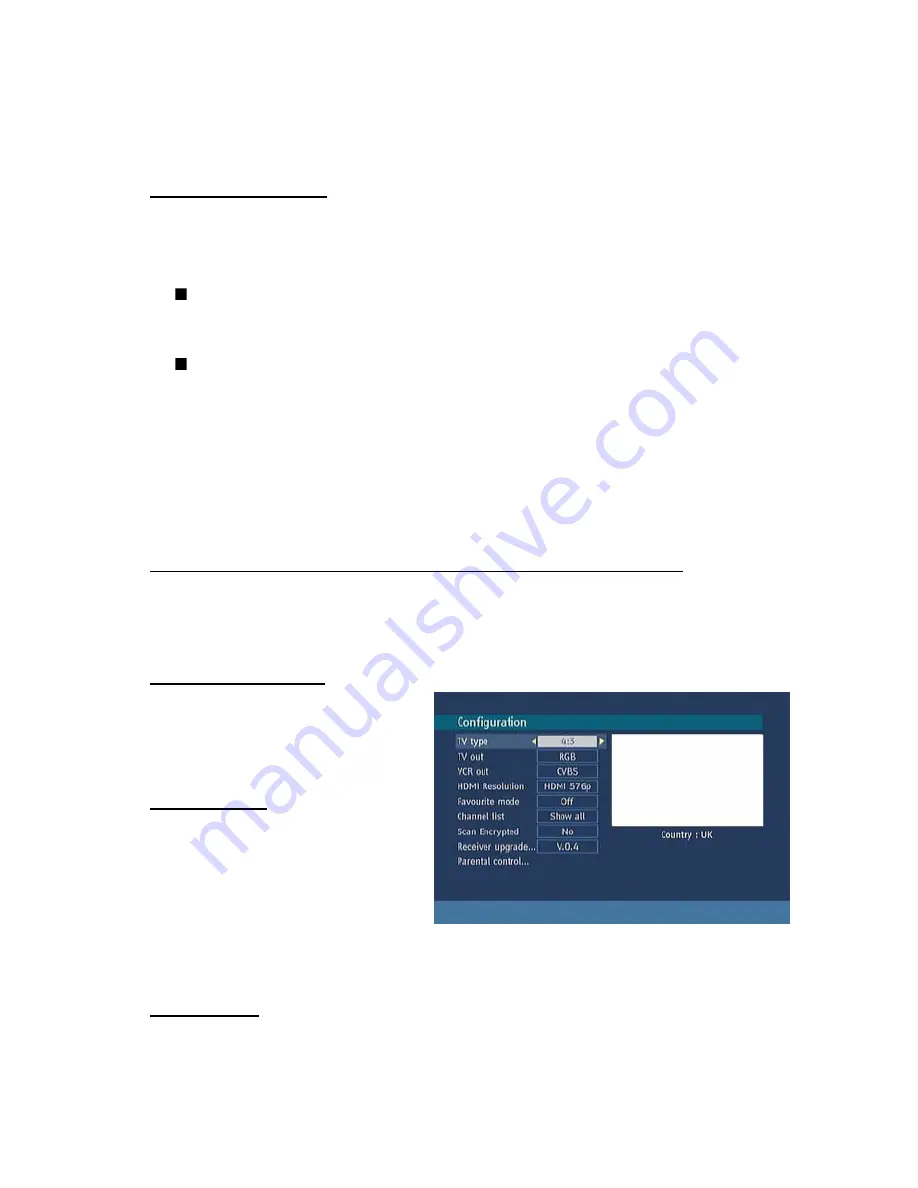
 

5.2. CONFIGURATION 

You  can  configure  the  settings  of  your  set 
top  box.  Select  Configuration  from  Setup 
menu  and  press 

OK

  to  enter  this  menu. 

Press  the  BACK  button  on  the  remote  to 
exit 

5.2.1. TV TYPE 

Digital  terrestrial  television  channels  can 
broadcast  programmes  in  a  widescreen 
format  which  must  be  output  differently  to 
normal  and  widescreen  TV  sets.  This 
function tells the receiver the screen format 
of the TV connected so that broadcasts are 
displayed  correctly.Highlight  the  TV  Type 
line  in  the  Configuration  menu  and  use  the“

3

/

4

”  keys  to  select  4:3  if  you  have  a  standard  TV  set 

connected or 16:9 if it is a widescreen TV. This function duplicates the selection made at the time of 
first installation and can be used if you change TV sets. 

5.2.2. TV OUT 

The    receiver  can  output  RGB  ,  CVBS  and  S-Video  signal  from  the  TV  SCART  on  the  rear  panel. 
Although the RGB format results in a better quality picture, not all equipment can cope with an RGB 
signal. 

Summary of Contents for 250DTRHDMI

Page 1: ...gital Video Recorder Twin Terrestrial Tuner USER MANUAL If you require any further assistance with setup or experience any technical difficulties please call the helpline number 0845 604 01 05 250DTRHDMI ...

Page 2: ...ECORDING TITLE 19 4 2 CHAPTER OPTIONS 20 4 2 1 CREATE NEW CHAPTER MARK 20 4 2 2 FORWARDS TO NEXT CHAPTER 20 4 2 3 BACK TO START OF CHAPTER 20 4 2 4 BACK TO PREVIOUS CHAPTER 20 5 SETUP 20 5 1 RECORDINGS 20 5 1 1 MAX TIMESHIFT 21 5 1 2 AUTO DISCARD 21 5 1 3 FORMAT DISK 21 5 1 4 HARD DISK INFO 22 Recording Format 22 Unrecordable Material 23 Hard Disk Operation Recording Playback Time Shift Recording ...

Page 3: ...t of unauthorised modifications or alterations or has been the subject of commercial use In the event of a problem with the product within the guarantee period please return it to your nearest Argos store If the item is shown to have had an inherent defect present at the time of sale the store will provide you with a replacement Your statutory rights remain unaffected Guarantor Home Retail Group 4...

Page 4: ...y and out of reach from children Under no circumstance should the cut off plug be inserted into a mains socket outlet due to high risk of electric shock Then fit an appropriate plug carefully following the wiring instructions shown below IMPORTANT The wires in the mains plug should be connected as shown in the diagram The colours of the wires in the mains lead of the unit may not correspond with t...

Page 5: ...and get expert advice Pull the mains plug out of the wall socket during thunderstorms and disconnect the aerial lead This product is only designed for household or similar general use Any other use may invalidate the guarantee and might be dangerous Ventilation Place the equipment on a hard flat surface away from direct sunlight and heat sources If it is in a cabinet allow at least a 10cm gap all ...

Page 6: ...ture 7 Time shift pause live TV 8 One button record Instant recording of channels 9 Dual recordings at the same time 10 Split and series recordings support 11 Ability to record one channel while watching another channel 12 X1 4 X1 2 X1 X2 X4 X8 X16 X32 forward and backward play options 13 Play list shows available recordings Event name Start time Duration delete playback permission 14 Timers list ...

Page 7: ...U REC OK PAUSE ON OFF MENU RECORD PAUSE MENU CHANNEL UP MENU CHANNEL DOWN MENU LEFT VOLUME DOWN MENU RIGHT VOLUME UP BACK PANEL RS 232 OPTICAL OUT ACIN CVBS LEFT RIGHT TV SCART HDMI OUT AUX SCART 35022373 ANTENNA 2 OUT ANTENNA 2 IN ANTENNA 1 OUT ANTENNA 1 IN DO NOT REMOVE 1 2 3 4 5 6 7 8 9 10 11 12 1 AERIAL 2 IN Loop through 2 AERIAL 2 OUT To watch analogue channels on the TV 3 AERIAL 1 OUT Loop t...

Page 8: ...7 CONNECTION DIAGRAMS NOTE This set top box supports Free To View only There is no provision for a CAM or Pay To View card ...

Page 9: ...WAP PIP TIMERS AUX 1 2 3 4 5 6 7 8 9 10 11 12 13 14 15 16 17 18 19 20 21 22 23 24 25 26 27 28 29 30 31 32 USING THE CONTROLS ON THE FRONT PANEL You can enter the main menu by pressing the menu button on the front of the unit Then navigate through the menus with the four arrow buttons on the front of the unit and make a selection with the OK button ...

Page 10: ...p the channels shown on the PIP Picture in picture window and normal screen Changes HDMI resolutions while watching mode 17 Pip PIP Picture in picture Window Channel Up 18 Mute Mute 19 4 Play 20 7 Search backward 21 Stop 22 Pause Timeshift Pause Live Recording 23 Guide Electronic Program Guide 24 Text Display Teletext 25 V V Volume UP DOWN 26 Green Green Teletext function key 27 Red Red Teletext f...

Page 11: ... RIGHT keys on the remote control you can select between 720p and 1080i Please check the HDMI resolutions supported by your TV set and select the most appropriate one from this menu The next menu will ask you if you want to begin with the automatic channel scan MAIN MENU Main menu is accessed by pressing the MENU key on the remote control Navigate with 5 6 keys among the menus and press OK to acti...

Page 12: ...onfirm your decision if you still want to delete select YES with the buttons or the operation will be cancelled if you select NO 1 3 EDIT CHANNELS To rename a specific channel highlight Edit Name button after the channel is selected and press OK A box appears on the screen 3 4 moves to the previous next character 5 6 toggles the current character i e b character becomes a on 6 and c on 5 Pressing ...

Page 13: ...ion of the channel programs weekly by means of 7 DAY EPG All programs of channels are displayed The current program is highlighted and there is brief information about the programs of the channel such as name short extended event description start end time By pressing 3 4 keys continuously the time scale can be changed If there is any event information data available only program names and dates a...

Page 14: ...S DELETE SERIES TIMER In EPG menu after you have selected a programme press the OK button and select the Record Series option in the menu which appears and press the OK button again So a series recording is set to the selected programme With this feature you can record a programme and all of it s following parts within 7 days The information belonging to the selected programme will be saved from t...

Page 15: ...ars and press the OK button again You can set a reminder for future programs To cancel an already set reminder highlight that programme and press the OK button and select the option Delete Reminder The reminder will be cancelled 2 1 6 SPLIT RECORD If you select a programme to be recorded with this feature if there is another part of the programme available it will also be set automatically to be r...

Page 16: ...lected programme If you pres it again the recording will be cancelled OK Pressing this button will save the latest changings and you will leave this window and go back to the EPG window Alternatives If you press this button you will get alternatives for the programme which causes a conflict NOTE A conflict is caused if more than two programmes are set for recording in the same time interval or if ...

Page 17: ... it from main menu The features of this menu are like below Delete You can delete the highlited single timer or series timer Edit You can edit the saved timers Add By pressing this button you will go to the Add Timer menu Options If you press the OK button you can select the Delete Timer Delete Series Timer and Check Conflicts To add a Timer press YELLOW button on the remote and the Add Timer wind...

Page 18: ...ton Edit the list via GREEN key and delete with the RED button 4 RECORDINGS LIBRARY All the recordings are kept in list To show the list of recordings press either LIB button on the remote or access it from the main menu RED BUTTON DELETE Erase the recordings GREEN BUTTON EDIT make changes to the recordings YELLOW BUTTON TAG marks the recordings for archiving BLUE BUTTON SORT change the order of t...

Page 19: ... external device like a DVD player Press the LIB Button and come to the Recordings Library In this library the saved recordings are listed To select a recording which should be archieved highlight one of them using the 5 6 buttons and select the TAG option by pressing the yellow button After then press the OK button to open the Play Options menu In this menu using the 5 6 buttons select the Create...

Page 20: ...RECORDING TITLE If you want to display a recording title select Include To do this use the 3 4 buttons If not select Skip By selecting Skip the options below will be disabled While archiving you could decide to show the names of the saved recordings on the scren DISPLAY In this option you could decide which of the following items should be displayed in the recording title Name Start date time and ...

Page 21: ...sing the 5 6 buttons select this option and press the OK button to go to the beginning of the current chapter This is the last played chapter 4 2 4 BACK TO PREVIOUS CHAPTER Using the 5 6 buttons select this option and press the OK button to go to back to the previous chapter If there is more than one chapter 5 SETUP The adjustments in this menu are 5 1 RECORDINGS The internal hard drive can store ...

Page 22: ... longest recordings will be deleted to make space for the requested timer Shortest Starting with the shortest recordings will be deleted to make space for the requested timer Unplayed If this option is set to EXCLUDED any unplayed recordings will NOT be deleted If this option is set to INCLUDED unplayed recordings WILL be deleted 5 1 3 FORMAT DISK On rare occasions the Hard Disk may malfunction in...

Page 23: ...ion with severe temperature variation Ø If the Recorder is set up in a location with severe temperature variation dew may form on and inside the Recorder If the Recorder is used with internal dew formation present this may cause HDD damage or malfunction We recommend keeping variation in room temperature within 10 C per hour Do not place the Recorder in a location with high humidity Place the Reco...

Page 24: ...t the approved service centre with the details provided at the front and back of this operation manual Hard Disk Operation Recording Playback Time Shift Recording If the Recorder is used in a cold location a location at low temperature the drive will only allow live viewing after power is turned on until the HDD is ready During this time the Recorder will not allow Time Shift Viewing recording dis...

Page 25: ...R buttons If you choose Show All all channels can be navigated with the PR PR buttons To save the recent changes and exit press the MENU button 5 2 7 SCAN ENCRYPTED CHANNELS Use buttons to go to the Scan Encrypted Channels option Use buttons to toggle YES or NO the searching for encrypted channels 5 2 8 RECEIVER UPGRADE OAD Over Air Download OAD To ensure that your STB always has the most up todat...

Page 26: ...NU Installation menu is locked So the user can t add channels Changes will be updated after exiting Configuration Menu 5 2 9 ii SET PIN The PIN code of the unit changed Use 5 6 buttons to go to Set PIN option Press OK to display the Set PIN window Use NUMERIC buttons to enter new pin number you will need to input your new pin a second time for verification purposes If Both pin numbers are four dig...

Page 27: ... manually and press OK 5 4 3 FIRST TIME INSTALLATION Use this option to load default settings which had been set at the factory To install factory settings highlight First Time Installation menu and press OK key then you will be asked to confirm deleting all channels and settings Selecting YES and pressing OK will delete the channel table Selecting NO and pressing OK will cancel the operation 6 ME...

Page 28: ...f the screen The small bar indicates the program duration On the channel info window there are Ø Current event name next event name and their start and end times Ø Program duration bar Ø Program mode TV or Radio Ø Channel number Ø Name of the channel The second press of the info button brings up a box containing a brief description of the currently viewed programme You can now use the button to ch...

Page 29: ...ure in Picture stands for a second channel presented on main screen You can watch two channels at the same time using PIP feature Press PIP button on remote control to activate this feature A small window will appear on the corner of the screen where initially the same channel of main screen is displayed You can switch to other channels on PIP window using PIP or PIP buttons You may also swap chan...

Page 30: ...channel by pressing the TEXT key Calling for the information banner or any menu on screen stops the receiver from displaying the digital teletext pages and they are temporarily replaced by a blank picture while the banner or menu is displayed Digital teletext cannot be accessed when the Subtitles are enabled WIDE TV sets are available with screens of the standard 4 3 format and widescreen 16 9 for...

Page 31: ...ms Accessories Communications Hyper Terminal menu 4 For a new connection run Hypertrm exe file 5 Give a name and choose an icon for the connection You do not need to make a new connection every time You can use this name for the future connections 6 Choose communication port in the new coming window COM1 or COM2 whichever you have used in Step 1 Port settings should be as follows Bits per second 1...

Page 32: ...htly dampened cloth only Do not use liquid or aerosol cleaners HEAT AND FLAMES The receiver should not be placed near to naked flames or sources of intense heat such as an electric fire Ensure that no naked flames sources such as lighted candles are placed on top of the Receiver LIGHTNING Unplug your receiver from the wall socket if there is a storm or lightning or if it is to be unused for a long...

Page 33: ...by Before unplugging your digital set top box make sure it is in standby The remote control is not working The digital set top box is in Stand by Remote control is incorrectly aimed Battery exhausted Press the standby key Check if anything is obstructing the front panel Change the batteries Password forgotten Take contact with the nearest service center Record does not start No or weak Aerial 2 in...

Page 34: ...IGITAL CAPABILITIES Transmission Standards DVB MPEG2 DEMODULATION COFDM with 2K 8K FFT mode FEC for all DVB Modes Automatically found VIDEO ALL MPEG 2 MP ML Video Decoder Aspect Ratio 4 3 16 9 with pan vector RGB analogue outputs BW 5MHz at 0 5 to 5 MHz sweep signal CVBS analogue output AUDIO MPEG1 Layer 1 and 2 Sampling frequencies supported 32 kHz 44 1 kHz or 48 kHz Output can be programmed as S...

Page 35: ... PR V V AUDIO R L Connector 2 x RCA R L Output 2 Vrms 0 dBfs Z 10 kohm DIGITAL AUDIO Output Optical SPDIF A V DATA IN OUT Scart TV scart AUX scart RGB Video Output TV scart RGB Video Intput AUX scart CVBS Video Output TV scart AUX scart CVBS Video Input AUX scart Analog Audio Output TV scart RCA jack AUX scart Analog Audio Input AUX scart Digital Audio Output Optical output Data Interface RS232 ma...

Page 36: ...If you do not reset your channels you risk losing some or all of your TV services during and following switchover Please refer to this instruction manual for help with resetting channels The instructions for resetting the channels are on page 15 of this manual Please note that in order to receive the maximum number of available TV services on your equipment you must preform a first time installati...

Page 37: ...posed of correctly you will help prevent potential negative consequences for the environment and human health which could otherwise be caused by inappropriate waste handling of this product For more detailed information about recycling of this product please contact your local city office your household waste disposal service or the shop where you purchased the product ...

Page 38: ...connected both the scart and HDMI outputs from the receiver to the TV using good quality scart and HDMI cables available from Argos You must not plug or unplug the HDMI cable while the receiver is powered on as this may damage the unit If you experience any issues with the HDMI connection please turn the power off at the mains switch leave for a minute then turn back on If the problem still contin...

Reviews: