background image


Rugged  Computing     

Users Manual                                                                                                      Rugged Table PCs 

13 

1.4


  Taking a Look at I/O Functions (for 9.7 inch Tablet PC) 

This section we will show the Tablet PC external connection parts and their 

functions. 

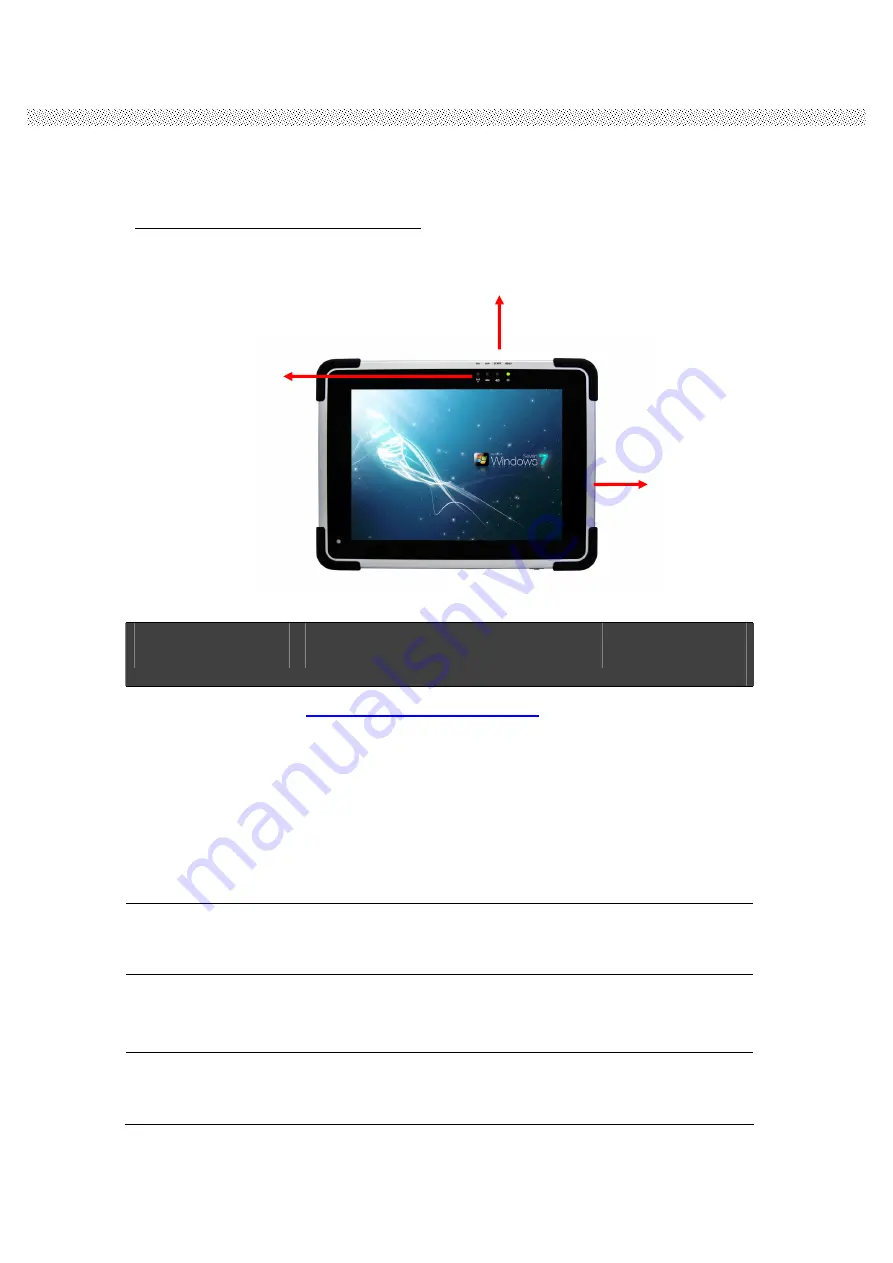
Front side Control Functions 


Components 

Function Description 

See Other 

Intro. 

Power Button 

Press 2 seconds continuous

 to 

turn-on the PC. 

Press once to turn off backlight when PC 

is on. 

Press once to tune on backlight when 

backlight is off 

Need 

8 seconds

 continuous push to 

force the Tablet PC turn-off 

immediately.   


LED Indicator 

From right to left shows the status 

about 

Power mode, Battery mode, 

Storage and WiFi

 status mode. 


Menu 

Push Menu function to show Brightness, 

Volume,Battery status and WiFi/ 

Bluetooth on/off. 

Chapter 2.2.1 

Hotkey (F1) 

1 programmable Hot-key for user to 

define by application 

Chapter 2.2.2 

Hot Key: 

Vol-, Vol+, F1. Menu   

LED Indicator 

WiFi, HDD, Battery, Power   

Power Button 

Summary of Contents for ID97

Page 1: ...Rugged Computing Users Manual Rugged Tablet PCs ID97 Rugged Tablet PC Intel Atom Duo Core N2600 Based Tablet PC USERS MANUAL Version 1 2 9 7 Compact Rugged Tablet PC ...

Page 2: ... not allow anything to rest on the power cord Do not locate this product where persons will walk on the cord Never push objects of any kind into this product through cabinet slots as they may touch dangerous voltage points or short out parts that could result in a risk of fire or electric shock Never spill liquid of any kind on the product Do not attempt to service this product by yourself as open...

Page 3: ...gement unless otherwise specified Applications that are described in this manual are for illustration purposes only WH makes no representation or warranty that such application will be suitable for the specified use without further testing or modification Warranty 2 X U warrants that each of its products will be free from material and workmanship defects for a period of one year from the invoice d...

Page 4: ...eripheral attachments Ø Software OS version application software etc Ø Description of complete problem Ø The exact wording of any error messages In addition free technical support is available from our engineers every business day We are always ready to give advice on application requirements or specific information on the installation and operation of any of our products Please do not hesitate to...

Page 5: ...ts can be damaged by sudden power surges Only experienced electronics personnel should open the PC chassis l Caution Always ground yourself to remove any static charge before touching the CPU card Modern electronic devices are very sensitive to static electric charges As a safety precaution use a grounding wrist strap at all times Place all electronic components in a static dissipative surface or ...

Page 6: ...ories 1 1 piece of Rugged Tablet PC Quick Start Guide 2 1 piece of CD for Recovery CD for Operation System Windows embedded standard 7 3 1 piece of CD for M970D Manual 4 1 piece of 12V Adapter w Standard Power Cord Euro U S Std type 1 8m 5 LAN female Adapter cable 6 Optional Accessories 1 Table Stand 2 HDMI female Adapter cable 3 Hand Strap 4 Capacitive Touch Stylus 5 VESA Mounting Kit 6 Vehicle c...

Page 7: ... How to use Menu Function 22 2 2 2 How to use Hotkey Function 24 Use the HotTab software utility to make it easy to program and define hot key by customer s usual application 24 2 2 3 Connecting to a Wireless Network 27 2 2 4 Using the Bluetooth Wireless Feature 28 2 2 4 Using the 3G Feature Optional 30 2 2 6 Using the Camera Feature 33 CHAPTER 3 TABLET PC POWER MANAGEMENT 35 3 1 ABOUT AC ADAPTER ...

Page 8: ...Rugged Computing Users Manual Rugged Table PCs 8 4 2 5 Security Menu 45 4 2 6 Save Exit Menu 46 ...

Page 9: ...Rugged Computing Users Manual Rugged Table PCs 9 CHAPTER 1 Getting Started ...

Page 10: ...adapter to the power connector of the tablet PC 2 Plug the female end of the AC power cord to the AC adapter and the male end to the power electrical outlet 3 When the AC adapter is connected the Battery Pack is also under charging You can check the Battery Status LED indicator to see the currently progress The indicator turns to green when is fully charged For information on using battery power s...

Page 11: ...e tablet PC is either connected to AC power or the battery pack with power 3 Press the power button on the right side by 2 3 seconds to start it 1 2 2 Turning off the Tablet PC To turn off the tablet PC power use the Shut Down command of your operating system Caution If you have to turn the tablet PC on again immediately after turning it off wait for at least five seconds Turning the tablet PC off...

Page 12: ...a result the modified LCD is viewable under lighting conditions The optimized angle of view is fourty five degree And the optimized distance of view is 30cm Caution Although transflective LCD is mainly used in outdoor environment and it may increase the reflective lights under sunlight it is suggested that you should keep the LCD in appropriate temperature for operation and storage and avoid direc...

Page 13: ...e to turn off backlight when PC is on Press once to tune on backlight when backlight is off Need 8 seconds continuous push to force the Tablet PC turn off immediately 2 LED Indicator From right to left shows the status about Power mode Battery mode Storage and WiFi status mode 3 Menu Push Menu function to show Brightness Volume Battery status and WiFi Bluetooth on off Chapter 2 2 1 4 Hotkey F1 1 p...

Page 14: ...ator Indicator Status Description Green light when Power On No light when Power Off Orange Light Under charging Red Blinking Light Low Battery Check Chapter 3 2 3 2 4 for low battery and replacing battery Green light when storage under operation No light when storage stop operation Green light when Wi Fi under operation No light when Wi Fi stop operation ...

Page 15: ...MI Right side Input Components Function Description See Other Intro 1 DC in Connect with power adapter for power charging 2 SIM card slot Bottom side Input Output Components Function Description See Other Intro 1 TableStand Connector Connect to the optional table stand 2 USB Standard USB2 0 port SIM card slot DC in ...

Page 16: ...Mic in Line Out Mic in for microphone Line Out for the external speaker or handset Through the first Chapter 1 1 to 1 4 you can understand the basic information when you own the machine in next Chapter you will understand more detail about how to operate the tablet PC Between this you can check our product function and specification ...

Page 17: ...ort and battery management The 9 7 rugged tablet provides an alternative solution for those between general consumer and extremely rugged application l 9 7 1024x768 Resolution IPS LED Panel l Low power system with Intel Atom N2600 processor l 2GB SODIMM DDR3 800 memory l Built in Wi Fi Bluetooth Module l Support 3G GPS function optional l Standard Battery 5300 mAh l Mobile Rugged Shock Vibration a...

Page 18: ...mSATA SSD Audio Audio out for headset Micro in for microphone jack 1 0W Speaker x2 Internal I O Connectors Bottom I O Port Stand Connector x1 Standard USB2 0 port x1 LAN HDMI Out combo connecter x1 Mic in Line Out x1 Right I O Port SIM card slot x1 DC in jack x1 Upper side button Volume up x1 Volume down x1 Hotkey F1 x1 Menu key x1 In Front Control LED indicator From right to left shows the status...

Page 19: ...condensing IP Proof IP54 Mounting Optional table stand Optional VESA Kit Shock Rugged mobile shock Vibration Rugged mobile vibration Drop 4 feets Certifications CE FCC Power Management Power Input 12V DC Battery Standard battery 5300mAh Operating time 5 Hours Adapter 100 240V AC in 50 60Hz 12VDC output Wireless Communication WLAN built in 802 11b g n Bluetooth built in Bluetooth 3G Optional built ...

Page 20: ...Rugged Computing Users Manual Rugged Table PCs 20 CHAPTER 2 Operating Tablet PC and HotTab Hotkey Utility ...

Page 21: ...omatically load the OS after you turn it on This is normal booting process NOTE The operating system is the platform for all software application programs to run on The Tablet computer is recommended to use the Microsoft Windows XP embedded operating system for default solution Stopping the Tablet PC When you finish your work you can stop the tablet PC by turning off the power or leaving the table...

Page 22: ...n can also be defined by user to control by their common use application 2 2 1 How to use Menu Function Menu Function Adjustment Action Function Description Funtion Adjustment 1 Push Menu button 1st Time Show Current Brightness Click Vol button to increase brightness Or Drag by Touch Click Vol to decrease brightness Or Drag by Touch 2 Push Menu button 2nd Time Show current Volume Click Vol button ...

Page 23: ...o normal operation NOTICE If you shutdown the Tablet PC during operating system By Touch under Lock condition you CAN NOT turn on the Tablet PC by Power Button you should push Menu button 4 seconds to Unlock the system and back to normal operation then you can turn on by power button Action Push Power button Under Lock status Push Menu button 5 seconds Under Unluck status LED Indicator Indicator S...

Page 24: ...nd you can see the software application at center of desktop Choose one software application as your hotkey function After that the software application which you set will open immediately when you short press F1 button The Hotkey software program is the programmable application software for the Hotkey we choose some usual applied function for default setup For example user can choose his own appl...

Page 25: ...Rugged Computing Users Manual Rugged Table PCs 25 Utilities Function A The first is virtual mouse B Screen rotation C Onscreen Keyboard D Camera Function ...

Page 26: ...listed on menu or use Browse and choose the execution program file 2 Power Manage function 3 System Information When you press menu button 5th time you can see the system information 4 Low battery warning When the battery under 10 system will show the battery low to remind you to change the new battery or insert adapter to charge ...

Page 27: ...Rugged Table PCs 27 2 2 3 Connecting to a Wireless Network To connect to a wireless network 1 Push Menu button 4 times and making sure the Wireless function is On 2 Please using the defult Windows Wireless Network Connection utility ...

Page 28: ...eless communicaitons between devices without requiring a cable connection The transmission can go through walls pockets and briefcases as long as two devices are within range around 10 meters Following the easy step to connect to the Bluetooth communication 1 Push Menu button 4 times and making sure the Bluetooth function is On 2 Double click the Bluetooth shortcut and it will search any bluetooth...

Page 29: ...PCs 29 3 Choose the bluetooth device you want to connect and left click to choose Connect Then the device will be connected to the module 4 When under connecting left click to check the connection status or choose Unplug to remove the connection ...

Page 30: ...application the 3G module can datacard and host PC software combination deliver multiband CDMA2000 1xEV DO UMTS and GSM wireless wide area network WWAN connectivity in a single hardware configuration 1 Push Menu button 4 times and making sure the 3G Module is On 2 The shortcut of 3G application program shown on screen then to executive Mobile Partner Internet connection management application ...

Page 31: ...Rugged Computing Users Manual Rugged Table PCs 31 3 Confirm whether to detect the telecommunications system operators then press the Connect connect to 3G networks ...

Page 32: ...Rugged Computing Users Manual Rugged Table PCs 32 4 After initialization is completed it will automatically connect to 3G networks Note No additional driver installation is required for 3G module ...

Page 33: ...Pixels Web Camera module for default function of the Tablet PC series 1 Push Menu button 4 times and making sure the Camera function is On 2 Press F1 button about 5 seconds to into the HotTab utilities menu Then choose the camera function 3 Click the icon to take a picture Picture video save path C Webcam ...

Page 34: ...Rugged Computing Users Manual Rugged Table PCs 34 CHAPTER 3 Tablet PC Power Management ...

Page 35: ...d then from the tablet PC A reverse procedure may damage the AC adapter or tablet PC 2 Always hold the plug head when you unplug the connector never pull out the cord 3 The AC adapter is designed for use with your tablet PC only Connecting the AC adapter to another device can damage the adapter The adapter operates on any voltage in the range of 100 240 V AC The AC adapter serves as a converter fr...

Page 36: ...d the Battery Charge Indicator flashes red when the environmental temperature gets above 55 C 131 F 3 2 3 Charging Approaches There is one way recommended to charge the battery pack By connecting the AC adapter to the tablet PC and an electrical outlet the Battery Charge Indicator on the tablet PC glowed orange to indicate that charging is in progress You are advised to keep the tablet PC power of...

Page 37: ...old and signals under Windows Immediately save your data upon Battery Low The remaining operating time depends on how you are using the tablet PC If you are using the audio subsystem hard or USB flash disk the battery might run out of charge very quickly CAUTION 1 If you do not take any action the tablet PC will automatically hibernate and turn off 2 If you fail to save your data when the battery ...

Page 38: ...tem has been idle for a set period The tablet PC enters the Standby mode The hard disk and display are turned off and the entire system consumes less power When the display has been idle for a set period When you press the power button The tablet PC enters the Hibernation mode When the entire system has been idle for a set period When you press the power button Depends on your settings in Windows ...

Page 39: ...Rugged Computing Users Manual Rugged Table PCs 39 CHAPTER 4 Expanding Your Tablet PC ...

Page 40: ...etup utility when the below status 1 Error message on sreen indicate to check BIOS setup 2 Restoring the factory default settings 3 Modifing the specific hardware specification 4 Want to optimize the specification In order to control the keyboard to select BIOS utility setup you need Keyboard Icon Function Description Selects a menu title Selects an item or option Enter Go to the sub menu when ava...

Page 41: ...t system including BIOS version processor RC version system language time and date 4 2 2 Advanced Menu The Advanced menu contains the selections of PXE OpROM and Watch Dog Timer and the settings of PCI Subsystem ACPI and S5 RTC Wake Besides it also contains the configuration information of CPU Thermal IDE SATA USB and PPM Configuration ...

Page 42: ...Rugged Computing Users Manual Rugged Table PCs 42 1 CPU Configuration 2 Thermal Configuration ...

Page 43: ...Rugged Computing Users Manual Rugged Table PCs 43 3 IDE SATA Configuration 4 USB Configuration ...

Page 44: ...Rugged Computing Users Manual Rugged Table PCs 44 5 PPM Configuration 4 2 3 Chipset Menu The Chipset menu contains the information of Host Bridge and South Bridge ...

Page 45: ...able devices will be automatically detected during POST and shown here allowing you to set the sequence that the BIOS uses to look for a boot device from which to load the operating system A brief description of button usage is listed next 4 2 5 Security Menu In the Security menu users can set Administrator Password User Passwaord and HDD Security Configuration ...

Page 46: ... resets BIOS system Discarding Changes and Reset resets BIOS system without saving the changes you have made Save Changes done so far to any of the setup options Discard Changes done so far to any of the setup options Resotre Defaults loads restore the factory default values for all the items Save as User Defaults saves the changes one so far as User Defaults Restore User Defaults loads restore th...

Reviews: