


V. Operation Menu (OSD) Function Descriptions
Adjust
NONE
NONE
Adjust display contrast
DCR
On
Activate dynamic contrast
Off
Inactive dynamic contrast
Return
Return to the previous menu
Exit
Exit from the whole menu
Normal work mode
Adjust display brightness
NONE
NONE
NONE
NONE
NONE
NONE
Contrast
Brightness
NONE
NONE
NONE
NONE
NONE
NONE
NONE
NONE
Standard
Movie
FPS
NONE
NONE
NONE
NONE
NONE
NONE
NONE
NONE
NONE
NONE
NONE
NONE
NONE
NONE
NONE
NONE
NONE
NONE
RTS
EyeSaver
Return
Exit
Cool
Warm
Mode
Color
Temp
.
User
Return
Exit
Auto
16
:
9
4
:
3
Return
Exit
Return
Exit
Aspect
Input
Red
Green
Blue
NONE
NONE
NONE
NONE
NONE
NONE
NONE
NONE
NONE
NONE
NONE
NONE
NONE
NONE
NONE
NONE
NONE
NONE
Movie mode
FPS game mode
RTS game mode
Eye protection ray filter application mode
Fine tuning of red color temperature
Return to the previous menu
Exit from the whole menu
Set as cold color temperature
Set as warm color temperature
Fine tuning of green color temperature
Fine tuning of blue color temperature
Return to the previous menu
Exit from the whole menu
Automatically adjust picture aspect ratio
Picture in 16:9 mode
Picture in 4:3 mode
Return to the previous menu
Exit from the whole menu
Return to the previous menu
Exit from the whole menu
First level
menu icon
Third level
menu icon
Second
level
menu icon
First level
menu item
Second level
menu item
Third level
menu item
Description
Gamma1
Gamma2
Return
Exit
Gamma
Adjust color tone brightness grey 1
Adjust color tone brightness grey 2
Return to the previous menu
Exit from the whole menu
Automatically adjust the horizontal/vertical
location, focusing and clock of pictures
Adjust the white balance of pictures
NONE
NONE
NONE
NONE
Auto
adjust
Auto color
NONE
NONE
VGA
HDMI
NONE
NONE
VGA (analog) signal input
HDMI (digital) signal input
Note: The functions may be adjusted due to specific model or the upgrade of software version.
The physical model shall govern.
7
All specifications and informations are subject to change without notice.
8
All specifications and informations are subject to change without notice.
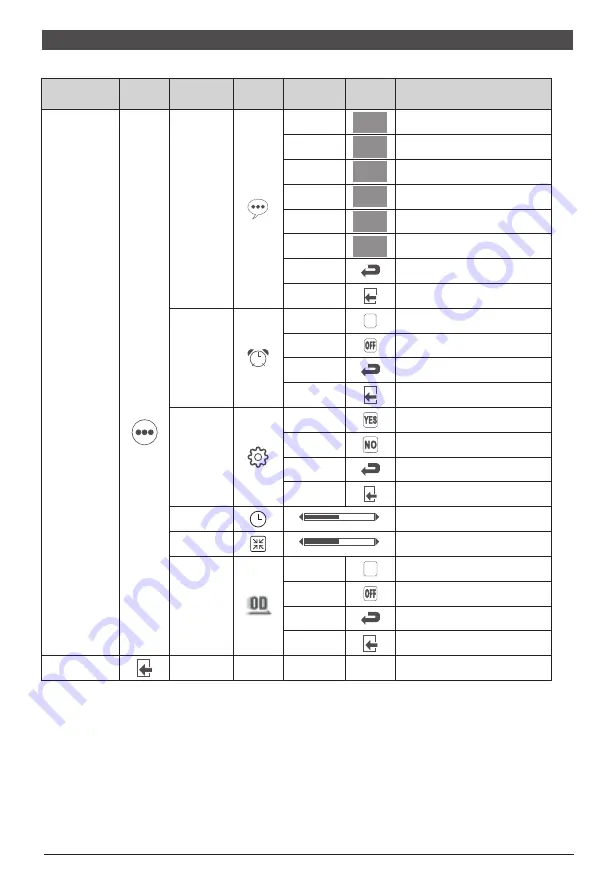
First level
menu icon
Third level
menu icon
Second
level
menu icon
First level
menu item
Second level
menu item
Third level
menu item
Description
ON
Exit
On
Off
Return
Exit
YES
NO
Return
Exit
Other
Language
Power
Off
Reset
Return to the previous menu
Exit from the whole menu
Automatically turn off after saving
power for 1minute
Inactivate the function of timed
switch-off
Return to the previous menu
Exit from the whole menu
Reset to factory setup
Exit from this function
Activate OD function
Return to the previous menu
Exit from the whole menu
Return
Exit
NONE
NONE
Exit
NONE
NONE
Over
driver
Inactivate OD function
Return to the previous menu
Exit from the whole menu
Exit from the whole menu
On
Off
ON
Return
Clock
Phase
Adjust the picture clock to reduce
vertical line noise (only for vga signals)
Adjust the picture phase to reduce
horizontal noise (only for vga signals)
0
50
100
0
50
100
English
English
English
Deutsch
Español
Deutsch
Español
Deutsch
Español
Русский
Русский
Русский
한국어
한국어
한국어
日本語
日本語
日本語


