


9
All specifications and informations are subject to change without notice.
10
All specifications and informations are subject to change without notice.
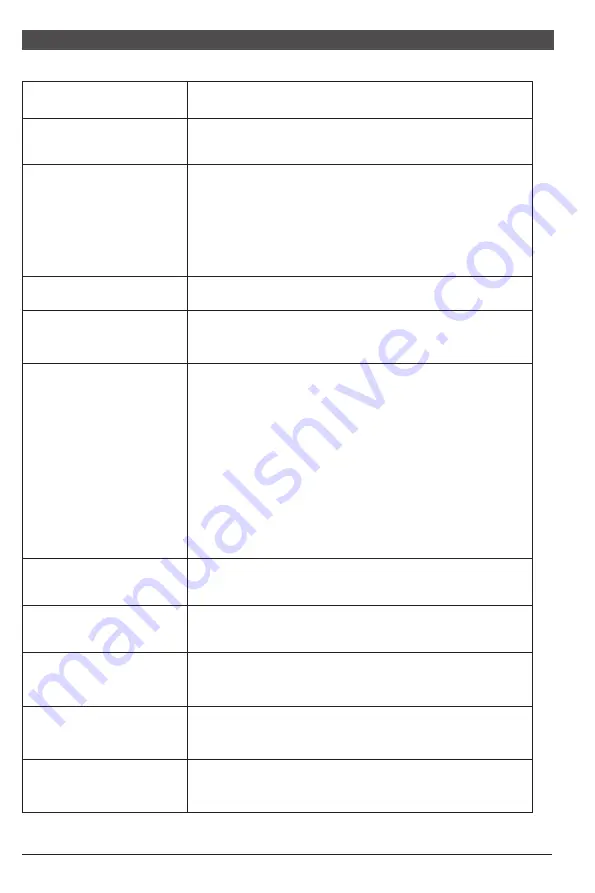
VI. FAQ
Faults occurring
The power indicator
light is not on
Possible solutions
Dimming picture
Flickering picture or
picture with ripples
Color shortage
(red, green and blue)
Picture with color difference
(white looks not white)
◆
Check if the power is on.
◆
Check if the power cord is connected.
◆
Adjust brightness and contrast.
◆
with electronic disturbance.
There may be electrical appliances or equipment
The power indicator
light is on (flickering),
but the monitor has no
pictures.
◆
◆
Check if the PC display card is inserted properly.
◆
Check if the signal cable of the monitor is correctly
connected with the PC.
◆
Check the signal cable plug of the monitor and make
sure every pin has no bending.
◆
Observe the indicator light by pressing the Caps
Lock key on the PC keyboard and check if the PC
is working.
Check if the PC power is on.
◆
sure every pin has no bending.
Check the signal cable of the monitor and make
◆
Adjust RGB color or reselect color temperature.
◆
is compatible with PC.
◆
Check if the display card is compatible with the
plug-and-play function.
Check if the function of plug-and-play of the device
Impossible plug-and-play
Screen font blur under
VGA signal
◆
Select the "E" to automatically adjust the image.
Screen color error under
VGA signal
◆
Select “Auto color" in OSD to correct under the
white output screen.
The picture is not in the
middle, or the size is not right
◆
Hot key(AUTO)
VII. Product Specifications
Note: The actual application of the above parameters shall be subject to the
specific model.
VIII. Table of Product Preset Modes
0.248
0.271
0.3114
Humidity
Picture
dimensions (mm)
476.1*267.8
521.3*293.2
597.9*336.3
Optimal
resolution
1920*1080@60Hz
1920*1080@60Hz
1920*1080@60Hz
Diagonal
dimensions
Picture
aspect ratio
Dot distance
(mm)
Ambient
temperature
Storage temperature
Working temperature
RH for operation
-20
℃
to +50
℃
0
℃
to 40
℃
20%
80%
to
55cm(21.5"FHD)
60cm(23.6")
68.6cm(27"FHD)
16:9
16:9
16:9
Note: “O” indicates the corresponding resolution/refresh rate is supported.
“
X” indicates the corresponding resolution/refresh rate is not supported.
Note: The actual application of the above parameters shall be subject to the
specific model.
16:9
16:9
21.5"
(
)
60Hz
1600x900
(
)
60Hz
1440x900
(
)
60Hz
1360x768
(
)
60/75Hz
1280x1024
(60/70
)
/75Hz
1024x768
(60/72
)
/75Hz
800x600
(60/75/
)
72.8Hz
640x480
(
)
70Hz
720x400
(
)
60Hz
1680x1050
Aspect ratio
Display
dimensions
Preset resolution/Refresh rate
(
)
60Hz
1920x1080
23.6"
16:9
27"


