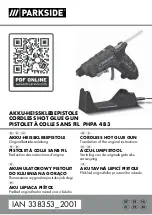
background image


Operation 

Preparation 

1.  The standard nozzle (10) is already attached. If desired screw the needle 

nozzle (2) onto the glue gun. 

2.  Attach the small support bracket and the large support bracket (4 resp. 5) 

into the openings (3) at the front part of the small and large gun for a 
secure stand. 

3.  Clean the surface you want to glue and make sure it is dry and without 

grease or dust. Roughen smooth surfaces before gluing them.


Using the large Glue Gun 

1.  Connect the power cord (1) to the heating station and to a wall outlet.  
2.  Insert a long glue stick into the gun from the rear opening (11) and then 

press the trigger (6) gently several times to push the stick into the barrel 
as far as it will go. This way the glue stick lies firmly on top of the heating 
element. 

3.  Place the glue gun on the connection socket (8). The LED (12) on the 

handle will light up. Allow the glue gun to heat up for approx. 5 minutes. 

4.  Take off the gun from the heating station, hold the nozzle over the point 

you want to glue. 

5.  Press the trigger until the melted glue flows from the nozzle. 
6.  Apply the glue directly, do not dispense. Press down the surface with the 

melted glue within 15 seconds. Continue to press the glued parts together 
for several seconds. 

7.  During pauses, put the glue gun back on the heating station to heat up 

again. You can glue with the glue gun up to 8 - 10 minutes, according to 
the adhesion, the quantity and the size of the surfaces to be glued. Allow 
excess melted glue to flow onto the drip tray (7). When melted glue does 
not come out from the nozzle, put the gun back on the heating station to 
heat up.  

8.  When the stick cannot be pushed any further by the trigger, put in a new 

stick into the opening.  
Do not try to take out the old glue stick, simply put in a new stick. The old 
stick will remain in the gun until it has been completely melted. 

Summary of Contents for 11 11 95

Page 1: ...Westfalia Bedienungsanleitung Nr 108411...

Page 2: ...2 tlg Klebepistolen Set Artikel Nr 11 11 95 2 Pcs Glue Gun Set Article No 11 11 95 Bedienungsanleitung Instruction Manual...

Page 3: ...opriately and help prevent misunderstandings and damage Mit diesem Hei klebepistolen Set k nnen Sie fast alle Materialien miteinander verkleben Jede ausreichend hitzefeste und trockene Oberfl che die...

Page 4: ...III bersicht Overview 1 2 9 8 11 12 6 13 7 5 4 3 10 6 11 3...

Page 5: ...racket 5 Gro er Standb gel Large Support Bracket 6 Abzug Trigger 7 Kleber Auffangschale Drip Tray 8 Anschlussbuchse f r Pistole Connection Socket for Glue Gun 9 Anschlussbuchse f r Kabel Connection So...

Page 6: ...Kinderh nde Achten Sie darauf dass kein Kleber auf Kleidung oder andere Textilien ger t Verwenden Sie zum Reinigen der Hei klebepistole keine Fl ssigkeiten Verwenden Sie h chstens ein leicht mit Wass...

Page 7: ...nun circa 5 Minuten aufheizen 4 Ziehen Sie die Pistole aus der Aufw rmstation und halten Sie die Spitze ber die Klebestelle 5 Dr cken Sie nun den Abzug bis aus der Spitze Klebstoff tritt 6 Tragen Sie...

Page 8: ...un wie in dem vorherigen Abschnitt ab Punkt 5 beschrieben Wartung Reinigung und Lagerung Vor allen Arbeiten am Ger t den Netzstecker aus der Steckdose ziehen Bei Defekten bergeben Sie das Ger t einem...

Page 9: ...lebepistole 60 W 10 W Schutzklasse II Gro e Pistole Gewicht gro e Pistole 200 g Abmessungen gro e Pistole 17 x 16 cm Kabell nge gro e Pistole 180 cm Abmessungen Klebestift lang 19 5 x 11 cm Kleine Pis...

Page 10: ...gun is not a toy It does not belong in the hands of children Be careful not to spill hot glue on clothes of other fabric you do not intend to glue Do not use liquids to clean the glue gun Use a moist...

Page 11: ...on the handle will light up Allow the glue gun to heat up for approx 5 minutes 4 Take off the gun from the heating station hold the nozzle over the point you want to glue 5 Press the trigger until the...

Page 12: ...ting the glue gun according to the previous chapter starting form point 5 Maintenance Cleaning and Storing Before working on the tool disconnect the plug from the power In case of malfunction have the...

Page 13: ...un 60 W 10 W Protection Class II Large Glue Gun Weight large Glue Gun 200 g Dimensions large Glue Gun 17 x 16 cm Cable Length large Glue Gun 180 cm Dimensions long Glue Stick 19 5 x 11 cm Small Glue G...

Page 14: ...A2 EN 60335 2 45 2002 Hagen den 20 August 2009 Thomas Klingbeil Qualit tsbeauftragter We the Westfalia Werkzeugcompany GmbH Werkzeugstra e 1 D 58093 Hagen declare by our own responsibility that the p...

Page 15: ...versand ch Internet www westfalia net Kundenbetreuung Customer Services Werter Kunde bitte helfen Sie mit Abfall zu vermeiden Sollten Sie sich einmal von diesem Artikel trennen wollen so bedenken Sie...

Reviews: