


Western Digital Quick Installation (WDE2170-WDE4360)
WD Enterprise Series 3.5-Inch SCSI Hard Drives
DRIVE
Capacity (MB)
WDE2170
WDE4360
2170
4360
BEFORE YOU BEGIN
Record the drive model number and serial number. Both are located on
the top of the drive.
Gather these supplies:
n
Computer system manual
n
Operating system manual
n
Host bus adapter manual
n
Non-magnetic screwdriver
You may also need:
n
Jumper shunts, if you change the drive configuration
n
Interface cable (for 50-pin or 68-pin models)
n
A drive tray or mounting rails, depending upon system requirements
n
Additional power cable(s)
HANDLING PRECAUTIONS
The WD Enterprise hard drive is designed to withstand normal handling
during unpacking and installation. Care must be taken to avoid excessive
mechanical shock or electrostatic discharge (ESD) that can permanently
damage the drive and void the warranty.
Be aware of the following precautions when unpacking and installing the
WD Enterprise drive:
n
Do not unpack the hard drive until you are ready to install it.
n
Handle the drive by the sides only and avoid touching the circuit board
components and connectors.
n
Do not attempt to remove the drive cover. Servicing components in the
sealed compartment require special cleanroom facilities. Failure to
observe this restriction will void the warranty.
n
For additional handling information, refer to the Western Digital 3.5-
Inch Drive Handling Guide (document number SO999).
SETTING THE DRIVE JUMPERS
NOTE:
This information will help you configure each WD Enterprise drive
to operate properly in your system.
The drive is designed for use in a variety of systems. Therefore, you can set
several configuration options using the option block on the front of the
drive (end opposite SCSI connector). In most cases, you do not need to
change the default settings for normal drive operation. However, some
installations may require you to install or remove certain jumpers in order
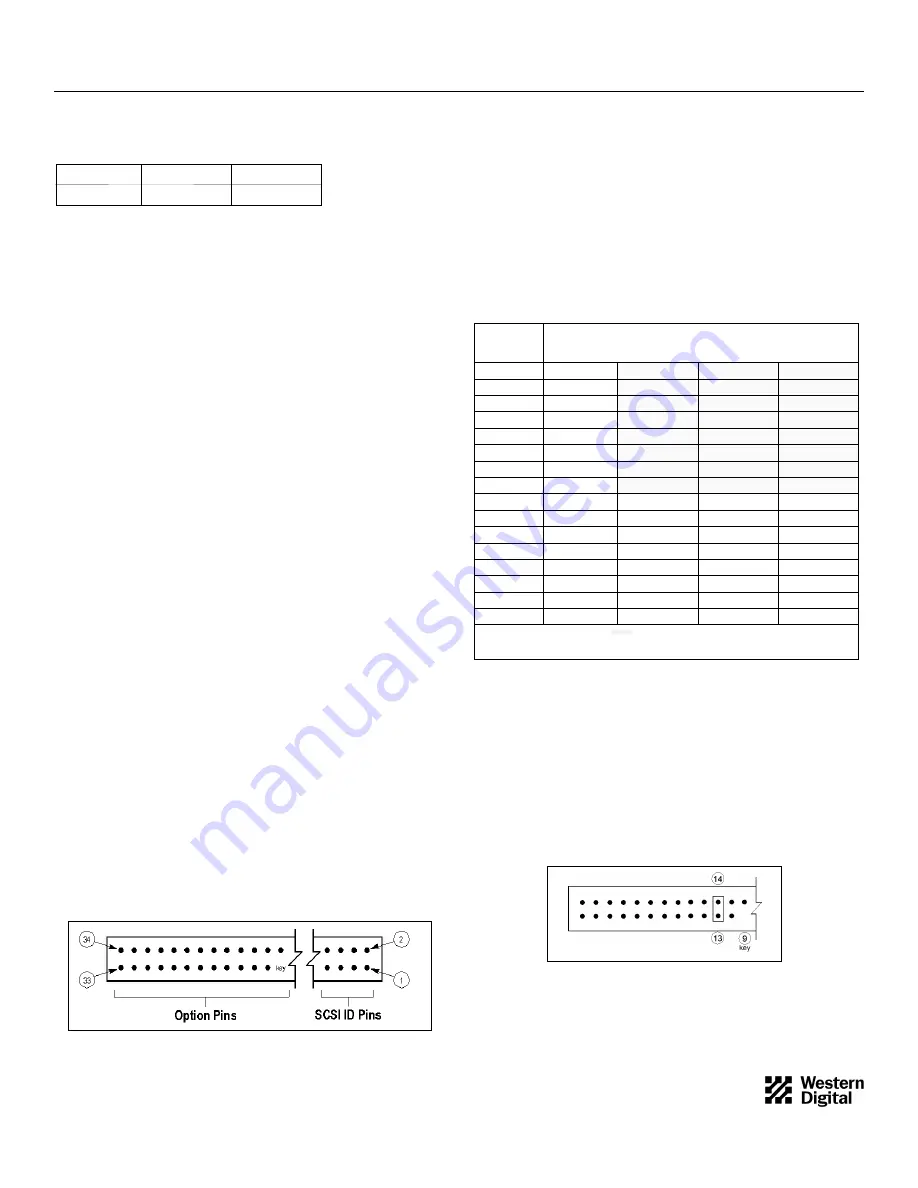
to meet system specifications. See Figure 1.
Figure 1. Option Block
JUMPER LOCATION
SCSI ID
Pins 7 & 8
Pins 5 & 6
Pins 3 & 4
Pins 1 & 2
0
¡
¡
¡
¡
1
¡
¡
¡
l
2
¡
¡
l
¡
3
¡
¡
l
l
4
¡
l
¡
¡
5
¡
l
¡
l
6
¡
l
l
¡
7
¡
l
l
l
8
l
¡
¡
¡
9
l
¡
¡
l
10
l
¡
l
¡
11
l
¡
l
l
12
l
l
¡
¡
13
l
l
¡
l
14
l
l
l
¡
15
l
l
l
l
SCSI ID Numbers
Each device on the SCSI bus requires a unique SCSI ID number (0 to 7
for 8-bit devices, 0 to 15 for 16-bit devices).
Option block pins 1 through 8 are used to set the SCSI IDs. Refer to
Table 1 for a complete matrix of jumper settings.
The host computer’s SCSI controller typically uses ID number 7, and the
other numbers are used for devices such as hard drives. The WD
Enterprise drive has a default SCSI ID of 0.
Table 1. SCSI ID Jumpers
Disable Auto Start
You can configure the WD Enterprise drive to Auto Start, or automatically
spin up when power is applied to the drive. If the drive is configured to
disable Auto Start, it powers up, but does not spin up until a start unit
command is issued by an operator.
Option block pins 13 and 14 are dedicated to the Auto Start option. To
disable Auto Start, install a jumper as shown in Figure 4. To enable Auto
Start, no jumper is required.
1
4079-001056 Rev. A 5/97 H0310
Figure 2. Disable Auto Start Jumper
l
jumper installed
¡
jumper removed
= legal 8-bit bus IDs*
* If any device on your computer’s SCSI bus supports only 8-bit SCSI IDs, the WD Enterprise drive must be set to one of these
values. When setting IDs on 50-pin drives, pins 7 and 8 are not used.


