background image


then the butter or margarine, next the dry ingredients and finally the yeast.  For 

best results level the dry ingredients before adding the yeast. 

4.  Plug the breadmaker cord into a 120 volt, AC electrical outlet ONLY.  

5.  Use the “MENU” button to select the desired program menu. 

6.  Use the “LOAF” button to select the desired loaf size. 

7.  Use the “TEMP” button to select the desired crust darkness.  

8.  If desired, use the “TIME” button to set the elapsed time for when the program is 

to be completed. 

9.  Press the “START/STOP” button to begin the program. After the breadmaker 

has been turned on, the programmed setting cannot be changed without 

canceling the program.  To change the setting, hold the “START/STOP” button 

down until the alert sounds. Then program the control as desired and turn back 

on.   

10.  When the bread is done, an alert will sound.  Turn the breadmaker off by holding 

the “START/STOP” button down until the alert sounds. Unplug the cord from the 

electrical outlet.  If the breadmaker is not turned off after the cycle is complete, 

the breadmaker will automatically go into a one hour “Keep Warm” mode.  If the 

machine is not turned off after the end of the “Keep Warm” period, the machine 

will turn itself off.  

11.  Remove the bread pan.  CAUTION: The handle is hot after baking.  Use oven 

mitts or hot pads when removing a hot bread pan. 

12.  Invert the bread pan and shake gently until the loaf falls out.  Place the bread on 

a rack to cool 15 to 20 minutes.  The knead blades will normally stay in the 

bread pan when the bread is removed, but may on occasion slide out in the 

bread.  If the knead blades are inside the loaf, remove with the included hook 

before slicing. CAUTION: The knead blades are very hot, remove with care. If 

making another loaf of bread right away, be sure the machine is turned off and 

allowed to cool 15 to 20 minutes with the cover open.  


Special Instructions for “Home Made”:  The “HOME MADE” setting is perfect for 

the user who is familiar with the intricacies of making bread at home and wants to 

customize their own settings.  

1) Press the “PROCESS” button once and “KNEAD1” will appear on the display; 

then press the “TIME” button to adjust the minutes. Press “PROCESS” again to 

confirm the time for the first kneading cycle. Press “PROCESS” again to advance to 

the next step. Note: To advance the time more rapidly, press and hold “TIME.” 

2) “RISE1” will now show on the display. Press the “TIME” button to adjust the 

minutes. Once the desired time has been set, press “PROCESS” again to advance.  

3) Continue until you have customized all settings. Press “START/STOP” to exit 

programming, then press again to begin the cycle. 

Note: Your breadmaker’s memory can remember your customized homemade 

settings unless power is lost for more than 5 minutes. When “HOME MADE” is first 

selected, the default setting is the same as BASIC. 


High Altitude Adjustment: Reduced air pressure at high altitudes causes yeast 

gases to expand more rapidly and the dough to rise more quickly.  The dough can 

rise so much that when it begins to bake, it will collapse due to overstretching of the 

gluten structure.  To slow the rising of the dough, reduce the amount of yeast by ¼ 

teaspoon at a time until you find the right amount.  You can also reduce the amount 

of liquid by a teaspoon or two.  Some experimentation will be needed when using 

your breadmaker at high altitudes.  

Summary of Contents for cook's essentials 41300B

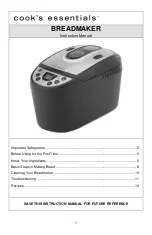
Page 1: ...Manual Important Safeguards 2 Before Using for the First Time 3 Know Your Ingredients 6 Basic Steps in Making Bread 8 Cleaning Your Breadmaker 10 Troubleshooting 11 Recipes 14 SAVE THIS INSTRUCTION MA...

Page 2: ...ectric shock or injury to persons Do not use this appliance outdoors Do not let cord hang over the edge of a table or counter or touch hot surfaces Do not place on or near a hot gas or electric burner...

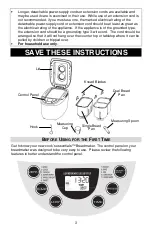
Page 3: ...ed type the extension cord should be a grounding type 3 wire cord The cord should be arranged so that it will not hang over the counter top or tabletop where it can be pulled by children or tripped ov...

Page 4: ...e cycle has begun unless you cancel the cycle TIME Button TIME is used to set a delayed program end time Only the following programs can be used with the delay timer 1 BASIC 3 FRENCH 5 WHOLE WHEAT 6 S...

Page 5: ...very familiar with baking in a bread machine This program allows for complete personalization of making bread The time of each cycle knead rise bake and keep warm can be customized The settable time r...

Page 6: ...short loaf of bread BREAD FLOUR should be used in your bread maker It contains more gluten forming proteins than all purpose flour and will provide well formed loaves with good structure Several diff...

Page 7: ...ore elastic and also adds flavor Use ordinary table salt in your bread maker Using too little or eliminating the salt will cause the dough to over rise Using too much can prevent the dough from rising...

Page 8: ...sired design Leave plain or sprinkle with seeds herbs grated parmesan or romano cheeses or other desired toppings Press toppings gently into the dough to ensure it adheres and will not fall off Close...

Page 9: ...read If the knead blades are inside the loaf remove with the included hook before slicing CAUTION The knead blades are very hot remove with care If making another loaf of bread right away be sure the...

Page 10: ...e to loosen Wash the inside of the bread pan and knead blade with a soft cloth rinse and dry Use a mild detergent Never use chemical cleaning agents oven cleaners abrasive scouring pads or cleansers o...

Page 11: ...east omitted Assemble ingredients as listed in recipe Yeast too old Check expiration date Liquid too hot Use lukewarm liquids 80 90 F 27 32 C Too much salt added Use amount recommended in recipe Sugar...

Page 12: ...fe or electric knife Center of loaf raw not baked through Too much liquid Reduce liquid by 1 2 teaspoons Power outage during operation If the power goes out during operation for longer than 5 minutes...

Page 13: ...urning odor noted during operation Ingredients spilled inside oven Be careful not to spill ingredients when adding to the bread pan as they will burn on the heating unit and cause smoke Bread pan leak...

Page 14: ...ingredients Level the dry ingredients quarter the butter or margarine and add to the corners Make an impression in the center of the dry ingredients and add the yeast Close the lid select Menu choose...

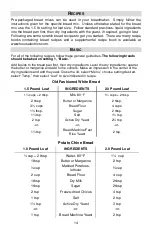
Page 15: ...ter 80 F 1 cups 1 tbsp Butter or Margarine 1 tbsp 2 cups Bread Flour 3 cups 1 cup Medium Rye Flour 1 cups 2 tbsp Dry Milk 2 tbsp 1 tbsp Sugar 1 tbsp 1 tsp Salt 1 Tsp 2 tsp Caraway Seed optional 2 tsp...

Page 16: ...ed Butter or Canola Oil 1 tsp Cider Vinegar 2 cups White Rice Flour cups Potato Starch Flour cup Tapioca Flour cup Non fat Dry Milk 3 tbsp Sugar 1 tbsp Xanthan Gum 1 tsp Salt 1 tbsp Active Dry Yeast P...

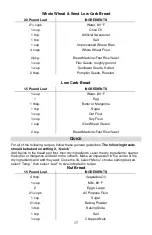
Page 17: ...tsp Bread Machine Fast Rise Yeast QUICK For all of the following recipes follow these general guidelines The following breads should be baked on setting 2 Quick Add liquids to the bread pan first the...

Page 18: ...dry ingredients Level the dry ingredients quarter the butter or margarine and add to the corners Make an impression in the center of the dry ingredients and add the yeast Close the lid select Menu cho...

Page 19: ...d on setting 5 Whole Wheat Add liquids to the bread pan first then dry ingredients Level the dry ingredients quarter the butter or margarine and add to the corners Make an impression in the center of...

Page 20: ...e bread pan first then dry ingredients Level the dry ingredients quarter the butter or margarine and add to the corners Make an impression in the center of the dry ingredients and add the yeast Close...

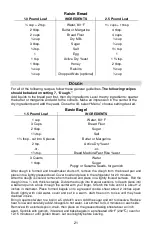
Page 21: ...ppy or Sesame Seeds for garnish After dough is formed and breadmaker shuts off remove the dough from the bread pan and place into a lightly greased bowl Cover bowl and place in the refrigerator for 20...

Page 22: ...led in size lightly brush the tops with butter or egg white and bake in a 350 F oven for 15 20 minutes or until golden brown Serve warm JAM For the following recipe follow these general guidelines The...

Page 23: ...NOTES...

Page 24: ...L5815 06 10 Printed in China NOTES...

Reviews: