
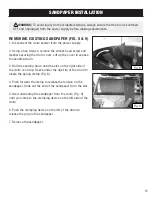


PREPARATION
1. Make sure the drum sander is switched off and disconnected from the power supply. Connect the
sander to a suitable dust collection system before operation.
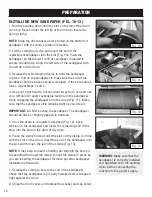
2. Inspect the workpiece and make sure it is acceptable for the sanding operation. Make sure that the
correct sandpaper grit is selected and the sandpaper is properly installed onto the drum.
3. Lay the workpiece flat on the conveyor belt below the sanding drum.
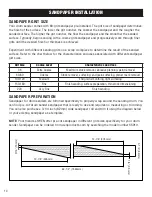
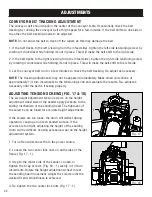
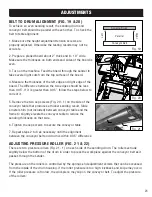
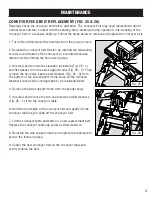
4. Loosen the height lock knob (Fig. 14 - 1) and turn the height adjustment wheel (Fig. 14 - 2) to
lower the sanding drum until it lands on the top surface of the workpiece. This will allow the sander
to take off just the top surface of the workpiece with the first pass. Remove the workpiece from the
conveyor belt and set it aside.
5. Plug in and turn on the sander. Adjust the conveyor feed rate to suit the sanding operation.
6. Stand to the side of the conveyor belt to avoid the risk of kickback. Allow the sanding drum to
reach full speed before inserting the workpiece.
7. Place the workpiece onto the infeed side of the conveyor belt, flush against the belt and parallel to
the direction of the belt’s movement. Hold the workpiece on the conveyor and carefully ease it into
the sander. Be careful not to get your hand or any body parts close to the sanding drum.
8. Once the sanding drum has control of the workpiece, step to the side of the outfeed conveyor belt
and support of the workpiece as it leaves the sanding drum. Do not stand in line with the sanding
path.
NOTE:
Do not apply upward or downward pressure when supporting or guiding the workpiece
through the sander. Doing so may induce snipe, where the sander drum digs into the workpiece.
9. Rotate the workpiece horizontally 180 degrees and pass it through the sander again, without
changing the depth of cut setting. This will create a even finish on your sanding surface.
10. Increase the depth of cut by the correct amount (must be less than 1/32”), then repeat steps
7–10 with progressively finer sandpaper grits until you have produced the desired results. Always
use the correct depth of cut and feed rate. Taking too heavy of a cut or using too fast a feed rate may
cause kickback.
NOTE:
Keep in mind that as you change to finer grit size, the feed rate needs to be reduced
accordingly.
11. When the sanding operation is complete, turn off the drum sander and unplug the power cord.
Wait for the drum to come to a complete stop before leaving the work area.
20
Summary of Contents for 65911
Page 35: ...35 NOTES ...
Page 36: ...THANKS FOR REMEMBERING ...


