8.
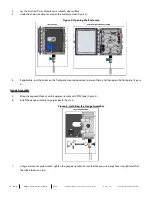
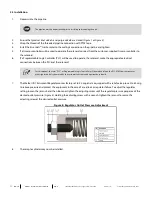
Using a flat head screwdriver, press and release the solenoid test button eight to ten (8–10) times to actuate the MPS-2
and build pressure (
). With each actuation, a slight pressure increase should be observable on the outlet
pressure gauge.
Figure 9: Solenoid Diagram
Do not leave the solenoid test button in the locked position, as this will prevent the controller from actuating the solenoid.
Do not actuate the solenoid too rapidly, as it requires enough time to actuate and reset.
9.
Open purge valve B and allow the MPS-2 to build pressure (
).
10.
Once pressure on the outlet pressure gauge has risen to pipeline pressure, close purge valve B (
).
11.
Using a flat head screwdriver, press and release the solenoid test button every 5 seconds to actuate the MPS-2 and
build pressure (
). With each actuation, a pressure increase should be observable on the outlet pressure gauge.
12.
If pressure is holding, continue to step 13. If pressure has dropped, check for leaks and repair as necessary. If an
increase in pressure is observed without manually actuating the solenoid, the inline relief may need to be adjusted;
Section 3.3, Adjusting the Inline Relief
. If pressure has increased up to pipeline pressure without actuating
the solenoid, the O-ring in the inline relief may have failed; proceed to
13.
Open the outlet valve on the sample cylinder to relieve test pressure, and then close the outlet valve.
14
IOM-222
MODEL: ESSENTIALS™ GAS SAMPLER
REV: A
13839 West Bellfort Street, Sugar Land, TX 77498
welker.com
Service Department 281.491.2331


