2.3 Installation
1.
Depressurize the pipeline.
The pipeline must be depressurized prior to installing and removing the unit.
2.
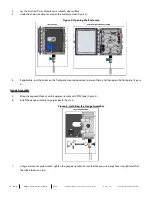
Ensure that product inlet valve A and purge valve B are closed (
).
3.
Wrap the threads of the threaded pipeline connection with PTFE tape.
4.
Install the Essentials™ Gas Sampler to the mating connection on the pipeline and tighten.
5.
If a timer or controller will be used to operate the solenoid, connect from the customer-supplied timer or controller to
the solenoid.
6.
If a Programmable Logic Controller (PLC) will be used to operate the solenoid, make the appropriate electrical
connections between the PLC and the solenoid.
For this manual, the term "PLC," or Programmable Logic Controller, will be used to refer to the PLC, EFM, flow computer, or
other signal control system used by the customer to activate and operate the solenoid.
7.
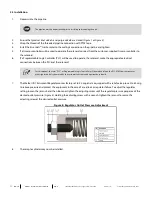
The Welker IR-7 Instrument Regulator comes factory-set to 50 psig and is equipped with a relief valve pre-set to 85 psig
to relieve pressure and protect the equipment in the case of a seal leak or regulator failure. To adjust the regulator
setting, loosen the jam nut, and then loosen or tighten the adjusting screw until the regulator pressure gauge reads the
desired outlet pressure (
). Holding the adjusting screw with a wrench, tighten the jam nut to secure the
adjusting screw at the desired outlet pressure.
Figure 8: Regulator Outlet Pressure Adjustment
8.
The sample cylinder may now be installed.
12
IOM-222
MODEL: ESSENTIALS™ GAS SAMPLER
REV: A
13839 West Bellfort Street, Sugar Land, TX 77498
welker.com
Service Department 281.491.2331


