background image

WM

 6658

1a 

11

/20

1

7

OXYWAY  

EN

3


1

Introduction  

5

1.1

Intended use  ................................................................................. 5

1.2

Function ........................................................................................ 5

1.3

Operator and user qualification ...................................................... 5

1.4

Contraindications .......................................................................... 6

1.5

Side effects  ................................................................................... 6

2

Safety  

7

2.1

Safety information ......................................................................... 7

2.2

General instructions  ...................................................................... 9

2.3

Warnings in this document  .......................................................... 10

3

Description  

11

3.1

Overview ..................................................................................... 11

3.2

Labels on the product .................................................................. 14

4

Preparation and operation 

 15

4.1

Installing the pressure reducer  ..................................................... 15

4.2

Removing the pressure reducer .................................................... 16

4.3

Inserting the pressure reducer ...................................................... 17

4.4

Setting the inhalation flow  .......................................................... 19

5

Hygienic preparation 

 21

5.1

General instructions  .................................................................... 21

5.2

Intervals ...................................................................................... 21

5.3

Hygienic preparation of pressure reducers  .................................... 22

6

Function check 

 23

6.1

Intervals ...................................................................................... 23

6.2

Performing a function check  ........................................................ 23

6.3

Repairing leaks ............................................................................ 25

7

Faults  

26

8

Maintenance  

27

8.1

General instructions  .................................................................... 27

8.2

Intervals ...................................................................................... 27

8.3

Sending in device  ........................................................................ 27

8.4

Replacing the disposable filter  ..................................................... 28

Summary of Contents for OXYWAY

Page 1: ...I Fix III fixed r glage fixe Fine I variable r glage en continu Fast I Fast II Fast III multistep r glage par paliers Instructions for Use for Devices from Serial Number 1810000 Mode d emploi pour ap...

Page 2: ...English 3 Fran ais 37...

Page 3: ...aration and operation 15 4 1 Installing the pressure reducer 15 4 2 Removing the pressure reducer 16 4 3 Inserting the pressure reducer 17 4 4 Setting the inhalation flow 19 5 Hygienic preparation 21...

Page 4: ...ng 29 9 Storage 30 9 1 General instructions 30 9 2 Storing the device 30 10 Disposal 31 11 Technical data 32 12 Scope of supply 35 12 1 Standard product 35 12 2 Accessories and spare parts 35 13 Appen...

Page 5: ...bolt with hand screwed connection and two filters in series When the cylinder valve is open the cylinder pressure can be read off the contents indicator Depending on the type of device the cylinder p...

Page 6: ...indications There are no known contraindications 1 5 Side effects Concerning side effects which may occur during inhalation of medical oxygen please consult your doctor or pharmacist and read the sect...

Page 7: ...le set the inhalation flow to 0 after operation Risk of injury from uncontrolled oxygen output Not all outlets have a check valve which closes the outlets automatically when a connection hose pressure...

Page 8: ...e adequate ventilation Keep the device and all the screwed unions completely free from oil and grease Do not immerse the device in a disinfectant or any other cleaning solution Wash your hands before...

Page 9: ...orized by WEINMANN Emergency The manufacturer WEINMANN Emergency guarantees the compatibility of the device and all components or accessories connected to the patient prior to use Only have modificati...

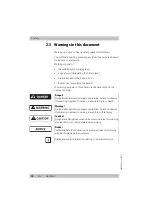
Page 10: ...three hazard levels depending on the degree of danger Danger Designates an extremely dangerous situation Failure to observe this warning may lead to serious irreversible injury or death Warning Design...

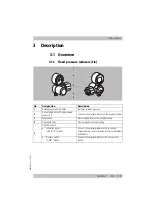
Page 11: ...d screwed connection Connects the pressure reducer to the oxygen cylinder 3 Safety valve Protects against excessively high pressure 4 Disposable filter Protects against external soiling 5 Possible out...

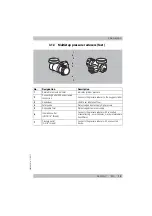
Page 12: ...ion Connects the pressure reducer to the oxygen cylinder 3 Handwheel Used to set inhalation flow 4 Safety valve Protects against excessively high pressure 5 Disposable filter Protects against external...

Page 13: ...onnects the pressure reducer to the oxygen cylinder 3 Handwheel Used to set inhalation flow 4 Safety valve Protects against excessively high pressure 5 Disposable filter Protects against external soil...

Page 14: ...lation outlet Observe the instructions for use CE mark confirms that the product complies with the applicable European directives Other labels and symbols 2 xx l min Maximum output at pressure outlet...

Page 15: ...and the pressure reducer thoroughly using a lint free dry or moistened cloth 4 Check that the disposable filter is clean 5 If the disposable filter is dirty Replace the disposable filter see 8 4 Repla...

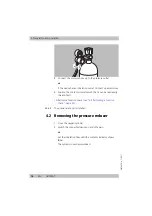
Page 16: ...the contents indicator such that it can be read easily Fix and Fast 10 Perform a function check see 6 2 Performing a function check page 23 Result The pressure reducer is installed 4 2 Removing the pr...

Page 17: ...the oxygen cylinder by hand Result The pressure reducer is removed 4 3 Inserting the pressure reducer Risk of injury from insufficient oxygen supply In cases with an oxygen requirement of more than 90...

Page 18: ...lose the valve on the oxygen cylinder 6 On variable and multistep pressure reducers set the inhalation flow to 0 see 4 4 Setting the inhalation flow page 19 Risk of injury due to supply pressure being...

Page 19: ...alation flow using the handwheel The flow indicator shows the set value 2 Monitor the inhalation flow 3 If necessary Reset the inhalation flow Result The inhalation flow is set Risk of injury from ins...

Page 20: ...ndwheel When doing so note The handwheel must click in correctly Result The inhalation flow is set Risk of injury from insufficient oxygen supply If the handwheel is midway between two different setti...

Page 21: ...f chemical processes etc Wear suitable protective equipment for hygienic preparation work You can find further information about hygienic preparation and a list of all the suitable cleaning agents and...

Page 22: ...ntaining alcohol or grease are used for wipe disinfection Disinfectants containing alcohol or grease react with oxygen to create a flammable mixture and can result in explosions and injury to the user...

Page 23: ...Check that the screwed unions and hose connections are secure 6 If necessary tighten the screwed unions by hand 7 Open the valve of the oxygen cylinder slowly 8 Read off the cylinder pressure on the c...

Page 24: ...e device 17 Use your finger to check whether there is oxygen escaping around the safety valve If there is no oxygen escaping The safety valve is free from leaks If there is oxygen escaping The safety...

Page 25: ...Coat all the screw connections with the soap solution Bubbles will form if a leak is present 4 Dry the screw connections with a lint free cloth 5 Close the oxygen cylinder 6 If the sealing ring has a...

Page 26: ...ot continue using the device Fault Cause Remedy Leak at cylinder connection Damaged sealing ring Replace sealing ring see 8 5 Replacing the sealing ring page 29 Leak at device connection Damaged seali...

Page 27: ...INMANN Emergency Part concerned Interval Maintenance by Pressure reducer Maintenance every 6 years Manufacturer or a technician specifically authorized by the manufacturer Disposable filter Replace ev...

Page 28: ...Wash your hands thoroughly in advance The Allen key 5 mm must be clean dry and free from any oil or grease 1 Hold the hand screwed connection facing downwards in order to avoid contamination with any...

Page 29: ...small screwdriver must be clean dry and free from any oil or grease 1 Lift the sealing ring gently using the screwdriver 2 If necessary Clean the groove with a lint free dry or moistened cloth 3 If ne...

Page 30: ...nder the prescribed ambient conditions see 11 Technical data page 32 9 2 Storing the device 1 Clean and disinfect the pressure reducer see 5 3 Hygienic preparation of pressure reducers page 22 2 Store...

Page 31: ...cer as household waste Consult an authorized certified waste disposal company for the proper disposal of the pressure reducer You can find out their address from your environmental officer or from you...

Page 32: ...4 x 71 63 x 64 x 71 63 x 109 x 71 115 x 96 x 99 63 x 64 x 108 63 x 64 x 108 63 x 109 x 108 63 x 64 x 108 High pressure hand screwed connection country specific thread Weight in g 500 500 590 730 610 6...

Page 33: ...0 min 100 DIN min 90 AGA min 90 Bayonet min 90 Throughput at pressure outlet in l min at inlet pressure 200 bar min 90 max 220 DIN min 150 max 180 AGA min 150 max 180 Bayonet min 120 max q150 min 190...

Page 34: ...tor and longer connecting bolt Notice All specifications concerning the inhalation flow apply for ambient conditions of 15 C and 1 013 mbar The flow differs proportionately by 1 for every 3 C of tempe...

Page 35: ...ized dealer Part Article number OXYWAY Pressure reducer WM 30101 to WM 33901 Safety tag WM 16211 OXYWAY Instructions for Use EN WM 66581 Set of o rings WM 1148 Part Article number Nasal cannula for ad...

Page 36: ...send you the warranty terms and conditions by mail If you wish to make a warranty claim consult your authorized dealer 13 2 Declaration of Conformity WEINMANN Emergency Medical Technology GmbH Co KG...

Page 37: ...le produit 49 4 Pr paration et utilisation 50 4 1 Montage du manod tendeur 50 4 2 D montage du manod tendeur 51 4 3 Utilisation du manod tendeur 52 4 4 R glage du d bit d inhalation 54 5 Pr paration...

Page 38: ...Stockage 65 9 1 Remarques g n rales 65 9 2 Stockage de l appareil 65 10 limination 66 11 Caract ristiques techniques 67 12 Gamme de produits 70 12 1 quipement standard 70 12 2 Accessoires et pi ces de...

Page 39: ...rim pression de la bouteille jusqu 20 000 kPa 200 bars Ils ne sont pas pr vus pour alimenter des dispositifs chirurgicaux 1 2 Description du fonctionnement L oxyg ne sous pression de la bouteille trav...

Page 40: ...erordnung r glementation allemande relative l utilisation des dispositifs m dicaux Recommandation g n rale tre form selon les r gles par une personne habilit e par WEINMANN Emergency la manipulation l...

Page 41: ...obinet de la bouteille d oxyg ne R gler si possible le d bit d inhalation sur 0 apr s usage Risque de blessures en cas de lib ration non contr l e d oxyg ne Toutes les sorties ne sont pas dot es d un...

Page 42: ...r dans l environnement p ex v tements cheveux draps et d clencher un embrasement avec blessures pour patient l utilisateur ou des personnes se tenant proximit Ne pas fumer Ne pas faire du feu Assurer...

Page 43: ...dans ce cas tout droit relatif la garantie et la responsabilit sera annul si ni les accessoires recommand s dans le mode d emploi ni les pi ces de rechange d origine ne sont utilis s Des articles d a...

Page 44: ...i nique afin d viter toute infection ou contamination bact rienne voir 5 Pr paration hygi nique page 56 Respecter les instructions des modes d emploi des composants et des accessoires Effectuer un con...

Page 45: ...nt signalis s selon trois niveaux de risque en fonction du degr du danger Danger D signe une situation exceptionnelle de grand danger En cas de non respect de cette consigne il y a risque de blessures...

Page 46: ...cord manuel Relie le manod tendeur et la bouteille d oxyg ne 3 Soupape de s ret Prot ge contre une forte pression non admissible 4 Filtre interchangeable Prot ge contre les salet s venant de l ext rie...

Page 47: ...od tendeur et la bouteille d oxyg ne 3 Molette Sert r gler le d bit d inhalation 4 Soupape de s ret Prot ge contre une forte pression non admissible 5 Filtre interchangeable Prot ge contre les salet s...

Page 48: ...nod tendeur et la bouteille d oxyg ne 3 Molette Sert r gler le d bit d inhalation 4 Soupape de s ret Prot ge contre une forte pression non admissible 5 Filtre interchangeable Prot ge contre les salet...

Page 49: ...Tenir compte du mode d emploi Sigle CE atteste que le produit est conforme aux directives europ ennes en vigueur Autres marquages et symboles 2 xx l min D bit maximum sur la sortie de pression 3 Le m...

Page 50: ...yg ne et du manod tendeur avec un chiffon non pelucheux sec ou humide 4 V rifier la propret du filtre interchangeable 5 Si le filtre interchangeable est encrass le remplacer voir 8 4 Remplacement du f...

Page 51: ...ntenu de fa on bien pouvoir lire son affichage Fix et Fast 10 R aliser un contr le du fonctionnement voir 6 2 R alisation du contr le du fonctionnement page 58 R sultat Le manod tendeur est mont 4 2 D...

Page 52: ...xyg ne R sultat Le manod tendeur est d mont 4 3 Utilisation du manod tendeur Risque de blessures en cas d alimentation insuffisante en oxyg ne Si les besoins en oxyg ne d passent 90 l min l alimentati...

Page 53: ...bit d inhalation page 54 5 Apr s l intervention fermer le robinet de la bouteille d oxyg ne Risque de blessures si la pression d alimentation est insuffisante La pression d alimentation passant par l...

Page 54: ...1 R gler le d bit d inhalation voulu avec la molette L indicateur de quantit affiche la valeur r gl e 2 Surveiller le d bit d inhalation 3 Le cas ch ant modifier le r glage du d bit d inhalation R su...

Page 55: ...arque La molette doit tre correctement enclench e R sultat Le d bit d inhalation est r gl Risque de blessures en cas d alimentation insuffisante en oxyg ne Si la molette se trouve entre deux r glages...

Page 56: ...ets chimiques etc Porter un quipement de protection ad quat lors de la pr paration hygi nique Des remarques suppl mentaires concernant la pr paration hygi nique et une liste de tous les nettoyants et...

Page 57: ...ion par essuyage Les d sinfectants base d alcool ou de produits gras forment un m lange inflammable avec l oxyg ne et peuvent provoquer des explosions et par voie de cons quence des blessures de l uti...

Page 58: ...on teindre l appareil 4 Si possible r gler le d bit d inhalation sur 0 5 V rifier la bonne assise des raccords viss s et des connecteurs de tuyau 6 Le cas ch ant resserrer les raccords viss s la main...

Page 59: ...outeille d oxyg ne 14 Si possible r gler le manod tendeur sur le d bit d inhalation maximum 15 S assurer que le d bit d inhalation s coule bien 16 Lorsqu un appareil m dical est branch sur la sortie d...

Page 60: ...solution d eau savonneuse avec du savon non parfum 2 Ouvrir lentement le robinet de la bouteille d oxyg ne 3 Appliquer de la solution d eau savonneuse sur tous les raccords viss s Une fuite provoquer...

Page 61: ...Que faire D faut d tanch it du raccord c t bouteille Bague d tanch it endommag e Remplacer la bague d tanch it voir 8 5 Remplacement de la bague d tanch it page 64 D faut d tanch it du raccord c t ap...

Page 62: ...composants et ses accessoires WEINMANN Emergency ou un personnel sp cialis d ment autoris par WEINMANN Emergency Pi ce concern e P riodicit Ex cutant Manod tendeur Maintenance tous les 6 ans Fabrican...

Page 63: ...sse et tre propre et s che 1 Diriger le raccord manuel vers le bas afin d viter que des particules de poussi re ne tombent dedans 2 D visser le filtre interchangeable et le sortir 3 Mettre en place un...

Page 64: ...doit pr senter aucune trace d huile ni de graisse et tre propre et sec 1 Soulever la bague d tanch it avec pr caution l aide du tournevis 2 Le cas ch ant nettoyer la rainure avec un chiffon non peluc...

Page 65: ...itions ambiantes prescrites voir 11 Caract ristiques techniques page 67 9 2 Stockage de l appareil 1 Nettoyer et d sinfecter le manod tendeur voir 5 3 Pr paration hygi nique du manod tendeur page 57 2...

Page 66: ...res Pour l limination appropri e du manod tendeur s adresser une entreprise d limination des d chets certifi e et autoris e Pour en obtenir l adresse s adresser au responsable de l environnement de vo...

Page 67: ...0 30850 30850 30600 Dimensions l x H x P en mm 63 x 64 x 71 63 x 64 x 71 63 x 109 x 71 115 x 96 x 99 63 x 64 x 108 63 x 64 x 108 63 x 109 x 108 63 x 64 x 108 Raccordmanuel haute pression Filet sp cifi...

Page 68: ...6 1 20 D bit sur la sortie de pression en l min pour une pression d admission de 20 bars 100 mini DIN 90 mini AGA 90 mini Ba onnette 90 mini 100 mini DIN 90 mini AGA 90 mini Ba onnette 90 mini D bit...

Page 69: ...est dire qu une augmentation de la temp rature de 3 C augmente le d bit de 1 Le d bit se comporte proportionnellement l inverse de la pression atmosph rique c est dire qu une augmentation de la pressi...

Page 70: ...buteur agr Pi ce R f Manod tendeur OXYWAY De WM 30101 WM 33901 tiquettes s curit WM 16211 Mode d emploi OXYWAY FR WM 66581 Jeu de joints toriques WM 1148 Pi ce R f Lunettes nasales pour adultes double...

Page 71: ...oir la garantie contacter le distributeur agr 13 2 D claration de conformit La soci t WEINMANN Emergency Medical Technology GmbH Co KG d clare par la pr sente que le produit est conforme aux dispositi...

Page 72: ...r for Production Logistics Service WEINMANN Emergency Medical Technology GmbH Co KG Siebenst cken 14 24558 Henstedt Ulzburg GERMANY Manufacturer WEINMANN Emergency Medical Technology GmbH Co KG Frohb...

Reviews: