background image

上海维宏电子科技股份有限公司


SHANGHAI WEIHONG ELECTRONIC TECHNOLOGY CO., LTD. 


20

 / 

36


3.3


Set Valve Control Process 

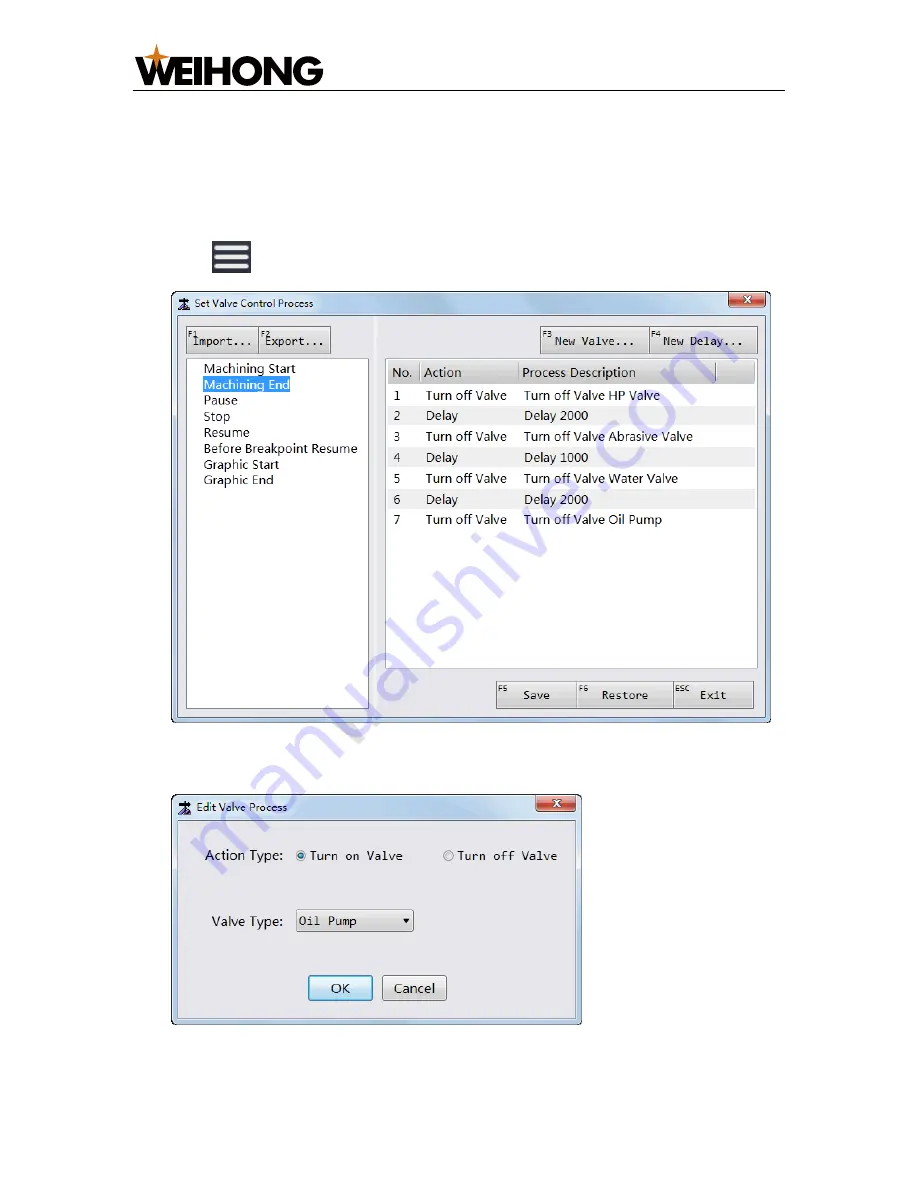
This operation is used to define the turning on/off sequence and delay time for 

valves in current machining mode. 

To set valve control process, do the following: 

1.


Click 

 → 

Valve Control

Set Valve Control Process

 dialog box pops up: 


2.


Select the target machining mode on the left, and double click the target action 

on the right. 

Edit Valve Process

 / 

Edit Delay Process

 dialog box pops up: 


3.


Modify the action type and valve type/ delay time. 

Summary of Contents for NC65C

Page 1: ...on 2 1 1 3 Performance 2 1 2 Main Software Interface 3 1 2 1 Operator Interface 4 1 2 2 Technician Interface 7 2 Commissioning 10 2 1 Clear I O Port Alarms 10 2 1 1 Clear the E stop Alarm 10 2 1 2 Cle...

Page 2: ...the Standard Machining Mode 22 3 6 2 Use the Remote Machining Mode 22 4 Common Operations 24 4 1 Customize Common Parameters 24 4 2 Execute I O Port Related Operations 25 4 3 Check System Logs 26 4 4...

Page 3: ...4 6 2 1 Simulation Result Shows Running Range Exceeded Machine Stroke Switch to Log Window to Learn More 34 6 2 2 Cannot Execute the Operation The System has not Returned to the Machine Origin 35 6 2...

Page 4: ...in software interface 1 1 NC65C Industrial Personal Computer NC65C industrial personal computer also called NC65C Controller hereinafter referred to as NC65C Compared with NC65A and NC65B NC65C has fa...

Page 5: ...nnect to display screen Lambda terminal board used to connect to Lambda terminal board 1 1 2 Mounting Dimension Mounting dimension of NC65C is as follows 1 1 3 Performance Performance of NC65C is as f...

Page 6: ...l core N2830 2 17GHz 3 Memory 2GB 4 SSD 60G 1 2 Main Software Interface According to the operational role and usage scenarios the software interface can be divided into the following Operator interfac...

Page 7: ...ode display area 4 Axis direction and mode selecting area 5 Speed control area 6 Function control area 7 Operational buttons 8 Function window 9 CNC status bar 1 2 1 1 Title Bar This bar consists of t...

Page 8: ...ging speed Press Rapid and an axis direction at the same time The machine tool moves at rapid jogging speed Press several axis direction buttons The selected axes move at the same time Note The axis n...

Page 9: ...Turn on off common ports including water valve abrasive valve oil pump high pressure valve and lube Enable disable analog See Execute Analog Machining for details Enable disable simulation See Simulat...

Page 10: ...ne control area 4 Mode control area 5 Function control area 6 Operational buttons 7 Function windows 1 2 2 1 CNC Status Bar This bar is used to check the following Current system status including Idle...

Page 11: ...s Auto mode Used to show the loaded tool path file in details Manual mode Used to show axis direction buttons and mode buttons See Axis Direction and Mode Selecting Area for details Reference mode Use...

Page 12: ...eal time during machining analog or simulation Offset window used to set workpiece offset and public offset Common window used to check modify and customize common parameters See Customize Common Para...

Page 13: ...required 2 1 Clear I O Port Alarms This operation is used to clear I O port alarm so as to establish good communication between the system and the servo drive Common I O port alarms are as follows Cl...

Page 14: ...If it is proceed to the next step If it is not modify the setting value of the parameter according to the drive station address of the machine tool 3 Check if the polarity of port Servo Alarm is in N...

Page 15: ...ommon all drive parameters select Show Common Show All To initialize drive parameters click Factory Reset 2 3 Clear Drive Alarms This operation is used to clear common drive alarms so as to avoid adju...

Page 16: ...tting should match the actual situation Mechanical Reducer Ratio Reducer Input Speed Reducer Output Speed Teeth No of Drive Wheel Teeth No of Driving Wheel Motor Rotational Speed Screw Rotational Spee...

Page 17: ...to the judged direction change the setting value to the opposite value Example Current setting value of parameter Axis Direction X is 1 Manually move X axis towards the positive direction judged by t...

Page 18: ...achine origin changes click Clear Average to clear history average If history average is not cleared an error prompt will pop up Distance between coarse and fine positioning signals is out of toleranc...

Page 19: ...d X2 axis keeps the measured value 5 Switch to Technician interface and switch to Reference mode 6 To set datum for the axis that has returned to the machine origin click Machine Tool Datum Setting Af...

Page 20: ...Before loading a tool path prepare a tool path file To load a tool path click and select the target tool path file The loaded tool path shows in the function window 3 2 Set the Workpiece Origin This...

Page 21: ...mode is selected proceed to step 3 2 To clear X axis by space do the following 1 To ensure the distance between workpieces set parameter G54 Distance between Workpiece Origins of Double Tools G55 Dis...

Page 22: ...kpiece origin do the following 1 To move Y axis to the target position click Y Y in Manual mode 2 To clear Y axis click 3 2 3 Set Z axis Workpiece Origin To set Z axis workpiece origin do the followin...

Page 23: ...me for valves in current machining mode To set valve control process do the following 1 Click Valve Control Set Valve Control Process dialog box pops up 2 Select the target machining mode on the left...

Page 24: ...ving track of the cutter at a high speed shows in the function window To simulate machining do the following 1 To enter into simulation mode enable Simulate in the function control area 2 In Auto mode...

Page 25: ...machining in the standard machining mode click in Auto mode The system automatically starts machining During machining you can do the following to control machining To stop machining click To pause m...

Page 26: ...If left and right stations are both available the system selects left station to execute machining by default If machining process ends abnormally and you need to continue machining click to continue...

Page 27: ...installation package Select a system language The above operations are executed in Technician interface and manufacturer password is required 4 1 Customize Common Parameters This operation is used to...

Page 28: ...eat step 3 and 4 until all target parameters are added 6 Optional To move a parameter out of the common parameter list select the parameter in the common parameter list and click Delete The customized...

Page 29: ...4 3 Check System Logs This operation is used to check different types of system logs and it is good for troubleshooting To check system logs do the following 1 Click System Log Log dialog box pops up...

Page 30: ...the system To generate an installation package do the following 1 Click File Generate Installation Package Packup Tool dialog box pops up 2 Click Browse to select the storage path for the generated in...

Page 31: ...h one tool Before selecting the tool s set parameter Min Distance between X1 and X2 and Max Distance between X1 and X2 to protect tools from collision Select the tool s in tool selecting area in Opera...

Page 32: ...ensure the following Workpiece is ready on the station Z axis has correctly returned to the machine origin See Confirm Machine Coordinates of Double Tools for details To measure height do the followin...

Page 33: ...anually measure height do the following 1 In Height Measurement Mode area select Manually 2 In Manual mode move the tool to the target position 3 Click T1 T2 The system starts to measure height 5 2 2...

Page 34: ...he tool to the best cutting height click Z1 Z1 Z2 Z2 in the function control area 5 4 Execute Y1Y2 Jiggle This operation is used to eliminate offset and reset datum of Y axis when machine coordinates...

Page 35: ...ne tool during running To set safety light curtains do the following 1 To open Parameter dialog box do one of the following In Operator interface click Global Param In Technician interface click Syste...

Page 36: ...ng speed is too slow 6 1 1 Cannot Detect Origin Signal Cause Error in origin switch Solution 1 Touch the origin switch check and observe related ports in the function window If they have signals conta...

Page 37: ...a larger value 2 Convert its polarity See Execute I O Port Related Operations for details 6 2 Questions about Warnings It includes the following common warnings Simulation result shows running range e...

Page 38: ...e Confirm Machine Coordinates of Double Tools for details 6 2 3 The Parser is Busy Cannot Execute the Operation Cause Cannot execute the operation in running status Solution Execute the operation in i...

Page 39: ...e 2 Convert its polarity See Execute I O Port Related Operations for details 3 Troubleshoot according to alarm type of the inverter 6 3 4 Alarm of Terminal Board Disconnection Cause 1 Incorrect polari...

Page 40: ...Shanghai Weihong Electronic Technology Co Ltd Address No 1590 Huhang Rd Fengxian Shanghai China 201401 Hot line 400 882 9188 Website www weihong com cn en SPECIALIZED CONCENTRATED FOCUSED...

Reviews: