


11
10
The weight bench is designed to be used with your own weight set (not included). The steps below explain how
the weight bench can be adjusted. See EXERCISE GUIDELINES on page 14 for important exercise information
and refer to the accompanying exercise guide to see the correct form for several exercises. Refer also to the
exercise information accompanying your weight set for additional exercises.
Make sure all parts are properly tightened each time you use the weight bench. Replace any worn parts immediate-
ly. The weight bench can be cleaned with a damp cloth and a mild, non-abrasive detergent. Do not use solvents.
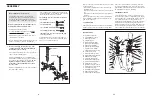
ADJUSTING THE BACKREST
The Backrest (6) can be used in a decline position, a
flat position, or two incline positions. To use the
Backrest in the decline position, remove the
Adjustment Pin (32) and lay the Backrest on the M10
x 57mm Adjustment Knob (not shown).
To use the Backrest (6) in the flat position, lift the
Backrest and insert the Adjustment Pin (32) through
the top set of holes in the adjustment tubes and the
Bench Frame (2).
To use the Backrest (6) in an incline position, lift the
Backrest and insert the Adjustment Pin (32) through
one of the bottom two sets of holes in the adjustment
tubes and the Bench Frame (2).
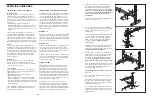
ATTACHING THE CURL PAD
For some exercises, the Curl Pad (27) must be
attached to the bench. Remove the 50mm Square
Inner Cap (40) from the Front Leg (8). Insert the Curl
Post (26) into the Front Leg. Tighten the M10 x 57mm
Adjustment Knob (33) into the Front Leg and the Curl
Post.
6
Adjustment
Tubes
32
2
WARNING:
When using the
Backrest (6) in an incline or flat position, make
sure that the Adjustment Pin (32) is inserted
completely through both adjustment tubes
and the Bench Frame (2).
WARNING:
When the Curl Pad
(27) is not in use, replace the 50mm Square
Inner Cap (40). Store the Curl Pad away from
the bench so it will not interfere with other
exercises.
ADJUSTMENTS
27
26
40
33
8
14.
Make sure that all the bolts and nylon locknuts are properly tightened before you use the weight
bench.
The use of all remaining parts will be explained in ADJUSTMENTS, starting on the following page.
15
15
27
26
13. Attach the Curl Pad (27) to the Curl Post (26)
with two M6 x 16mm Bolts (15).
13


