1.
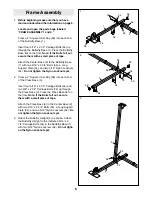
Before beginning, make sure that you have
read and understood the information on page 5.
Locate and open the parts bags labeled
“FRAME ASSEMBLY 1 and 2.”
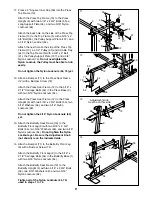
Press a 2” Square Inner Cap (59) into each end
of the Butterfly Base (1).
Insert four 5/16” x 2 1/2” Carriage Bolts (54) up
through the Butterfly Base (1). Place the Butterfly
Base flat on the floor.
Note: If the Bolts fall out,
secure them with a small piece of tape.
Attach the Center Base (2) to the Butterfly Base
(1) with two 5/16” x 2 3/4” Bolts (55), a Long
Support Plate (34), and two 5/16” Nylon Locknuts
(64).
Do not tighten the Nylon Locknuts yet.
2. Press a 2” Square Inner Cap (59) into each end
of the Press Base (3).
Insert four 5/16” x 2 1/2” Carriage Bolts (54) and
two 3/8” x 2 1/2” Carriage Bolts (76) up through
the Press Base (3). Place the Press Base flat on
the floor.
Note: If the Bolts fall out, secure
them with a small piece of tape.
Attach the Press Base (3) to the Center Base (2)
with two 5/16” x 2 3/4” Bolts (55), a Long Support
Plate (34), and two 5/16” Nylon Locknuts (64).
Do
not tighten the Nylon Locknuts yet.
1
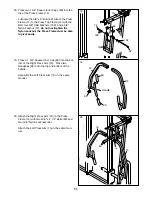
3. Orient the Butterfly Upright (4) as shown. Attach
the Butterfly Upright to the indicated 5/16” x 2
1/2” Carriage Bolts (54) in the Butterfly Base (1)
with two 5/16” Nylon Locknuts (64).
Do not tight-
en the Nylon Locknuts yet.
3
6
Frame Assembly
2
55
34
64
64
59
54
54
59
1
64
1
4
64
54
2
55
76
54
54
64
64
2
34
3
59
59


