


Page
7
of
16
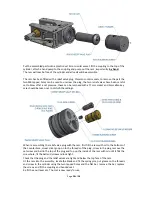
5.
AFTER USE
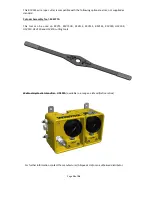
When the tool is retrieved, it should be hosed off with clean water, allowed to drain and
sprayed externally with a de-watering fluid. Before storage, inspect the general condition of the
tool. Particular attention should be paid to the anvil and blade. The anvil should be clean and
free from any damage or bruising on the outside diameter that would prevent it from retracting
properly. The blade edge should be smooth and free from any serrations. Note that a slight
ripple to the blade edge is acceptable and will not cause problems. Any minor damage can be
smoothed off with an oil stone if necessary.
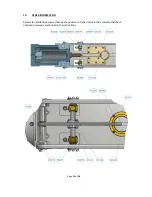
6.
SERVICE
It is unlikely that service would be required on the hydraulic components of the tool under
normal circumstances, but a seal spares kit is available if required. The only parts that would
need intermittent replacement would be the anvil, blade and wear plates, depending on the
frequency of use and materials being cut. These parts can be ordered up on the following spares
reference numbers, but in addition please quote the tool serial number.
Seal Kit
Part Number
995 284
Anvil
Part Number
SSC 6491
Blade
Part Number
705 054C
Wear plates
Part number
765 231A & B
2 off each
We advise that any servicing should be carried out by an authorised distributor only.
If required, the tool can be returned to the manufacturer for servicing and testing.
If servicing is to be undertaken by the user, please see note on proof testing under
SAFETY (Chapter 1), and the following:-
All servicing operations should be carried out in a clean environment to prevent contamination
of the oil and mating components.
Care should be taken with all mating areas ie. threads and sealing faces, as any damage or
abrasive contamination could cause galling or seizing on re-assembly.
The cylinder is a pressure vessel and should not be drilled, machined, mutilated or damaged in
any way for mounting purposes or to assist in its removal for servicing, any warranty could be
invalidated by such actions.
The use of stilsons to remove the cylinder is not recommended as damage will occur.
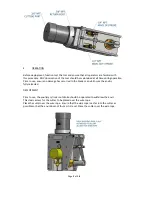
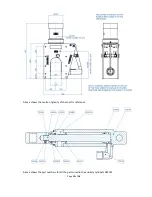
7.
REPLACEMENT OF THE ANVIL
Extend the auxiliary cylinders so that the lever arm 765213exits the anvil guide bush 715354.
Loosen the 8 off M6 screws 035079 holding pivot pin housings 749045A & B.
Loosen the M6 retaining screw 035073.


