


Setting Up Websense V-Series Appliances
32
Websense V-Series Appliances
1.
Open a supported browser, and enter the following URL in the address bar:
https://<IP address>:9447/appmng
Replace <
IP address
> with the address assigned to network interface C during
initial configuration of the appliance (see
Perform initial command-line
configuration
).
For information about supported browsers, see the
Websense Technical Library
.
2.
Log on with the user name
admin
and the password set during initial appliance
configuration.
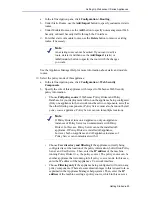
3.
In the left navigation pane, click
Configuration > System
.
4.
Under
Time and Date
:
a.
Set the time zone.
b.
Set the time and date:
•
Automatically synchronize with an NTP server
: select this option to use
a Network Time Protocol server. Specify up to three NTP servers. Use of
an NTP server is recommended, to ensure that database downloads and
time-based policies are handled precisely.
•
Manually set time and date
: select this option to enter a system time and
date yourself.
c.
Click
Save
in the Time and Date area.
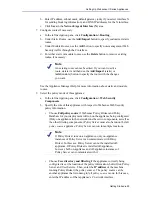
5.
In the left navigation pane, click
Configuration > Network Interfaces
.
6.
Under
Websense Email Security Gateway Interfaces (E1 and E2)
, configure
the E1 and E2 (optional) interfaces.
The E interfaces are used to accept users’ requests (inbound traffic) and
communicate with the Internet (outbound traffic).
To configure the E interfaces:
a.
Select whether
E1 only
or both
E1 and E2
are used.
If you choose E1 only, enter configuration information (IP address, subnet
mask, default gateway, DNS IP addresses) under
E1
.
If you choose E1 and E2, enter configuration information under both
E1
and
E2
. Note that default gateway and DNS configuration (under
Shared
Setting
) are shared between both E1 and E2.
b.
Click
Save
in the
Websense Email Security Gateway Interfaces (E1
and E2)
area when you are done.
When only E1 is used, it handles both inbound and outbound traffic.
Alternatively, you could use both E1 and E2 such that E1 handles inbound traffic
and E2 handles outbound traffic.
See the Appliance Manager Help for more information about configuring E1 and
E2.
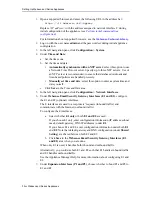
7.
Under
Expansion Interfaces (P1 and P2)
, choose whether to bond P1 and P2 to
E1 and E2.


