


2
www.waynepumps.com
Operating Instructions and Parts Manual
INSTALLATION (CONTINUED)
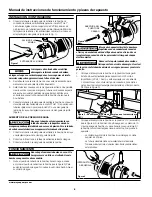
The inlet hose must be a reinforced type when
pumping from lakes, ponds, or small streams.
Regular garden hose will collapse and lead to pump failure.
5. A foot valve with strainer should be used to maintain prime during
operation.
6. Seal all connections in the inlet hose. An air leak in the fittings, hose,
pipe or connections will draw air even though no water leaks out.
These inlet leaks will reduce pump performance and lead to pump
failure.
7. Connect outlet pipe or hose to pump. The outlet connection is
designed for 1” NPT thread. Rigid pipe such as PVC or garden hose
may be used. An adapter to garden hose thread is included (Figure
1).
BOOSTING WATER PRESSURE
Do not run pump with outlet pipe or nozzle
closed. The hose may burst from excessive
pressure. Use only reinforced high-pressure hose or pipe for outlet pipe.
1. Connect inlet pipe or hose to pump. An adapter to garden hose
thread is included (Figure 1).
2. Connect the other end of inlet line to water supply.
3. Connect outlet pipe or hose to pump.
OPERATION
Never run the pump dry. Running pump without
water will cause seal failure. Fill pump with
water before starting.
1. Remove priming port on pump and fill with water. Reinstall priming
port on pump (see Figure 2). For boosting water pressure: Do not
remove priming port. Turn on water supply.
Figure 1
PUMP OUTLET
PUMP INLET
Figure 2
PRIMING PORT
OPENING
Figure 3 - Inserting power cord into GFCI outlt
Risk of electrical shock! This pump is supplied
with a grounding conductor and grounding type
attachment plug. Use a grounded receptacle to reduce the risk of fatal
electric shock.
Never cut off the round grounding prong on
the power cord. Cutting the cord or plug will
make the pump unsafe to operate and void the warranty.
2. Turn the pump switch to the ‘Off’ position.
3. This pump is only for use on 120 volt (single phase), 60 Hz, 15 amp
service and is equipped with a 3-conductor cord and 3-prong,
grounding type plug. Insert power cord directly into GFCI outlet (see
Figure 3).
4. Turn pump switch to the ‘On’ position (see Figure 4). If the pump
does not pump water within 10 minutes, turn off pump and refill with
clean water. If the pump does not operate after repeated attempts,
check the following:
- Vertical distance of pump to water level must not be over 20 feet.
- Suction line must be airtight.
- All valves in suction and discharge line must be open.
MAINTENANCE
Maintain adequate ventilation for the pump motor. The motor bearings are
permanently lubricated at the factory. Additional lubrication is not required.
DRAINING FOR WINTER
Always protect pump and piping against freezing temperatures. If there is
any danger of freezing, drain the system.
1. Disconnect suction and discharge lines from pump.
2. Remove plug from lower front face of pump.
3. Drain all piping below the frost line, or store piping indoors.
4. Store pump indoors.
Figure 4
POWER
SWITCH