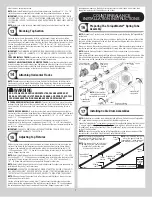
ratchet wheel or the mark on the winding shaft. After 2 to 3 turns, remove the ratchet wrench
and adjust the counterbalance lift cable on the left side. Ensure counterbalance lift cables are
in the first groove of the cable drums, as shown in Step Adjusting Counterbalance Lift Cable.
NOTE:
Single spring applications require no spring winding on the left hand side, but lift
cable tension needs to be adjusted.
FOR SINGLE SPRING APPLICATIONS:
Return to the right hand end bracket and continue
winding the spring to the required number of turns for your door following the double spring
instructions below. Place pawl knob in lower position.
FOR DOUBLE SPRING APPLICATIONS:
Either use the black tooth on the ratchet wheel for
winding reference or place a mark on the winding shaft and end bracket. Place the ratchet
wrench with 5/8” socket and a 3” ratchet extension onto the left hand winding shaft end.
To wind the spring, rotate the winding shaft clockwise, while watching the black tooth on
the ratchet wheel or the mark on the winding shaft. Rotate the winding shaft to the required
number of winding turns for your door. Then return to the right hand side and wind the right
hand spring to the required number of turns. Place pawl knob in lower position on both sides.
IMPORTANT:
MARK THE NUMBER OF SPRING TURNS ONTO THE END BRACKET WARNING
TAG.
WINDING SPRING TURN CHART
DOOR HEIGHT
SPRING TURNS
6’-0”
14
6’-3”
14-1/2
6’-5” - 6’-6”
15
6’-8” - 6’-9”
15-1/2
7’-0”
16
7’-3”
16-1/2
7’-6”
17
7’-9”
17-1/2
8’-0”
18
NOTE:
Since total turns to balance door can deviate from winding spring turn chart values by
± 1 turn, adjustments to the recommended number of turns may be required after rear back
hangs are installed.
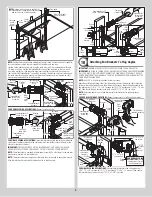
Counterbalance
lift cable
Right hand
end bracket
Pawl knob
in upper
position
5/8”
Socket
Ratchet
wrench
Winding
shaft
3” Ratchet
extension
Marks
Counterbalance
lift cable
Left hand
end bracket
Pawl knob
in upper
position
5/8”
Socket
Ratchet
wrench
3”
Extension
Marks
Winding
shaft
Securing Drum Wraps (Optional)
23
NOTE:
If you don’t have drum wraps, then skip this step. Refer to Package Contents / Parts
Breakdown, to determine if you have drum wraps.
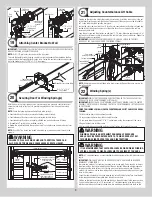
Starting on the left hand side, position the left hand drum wrap, as shown. Slide the left hand
drum wrap over the cable drum assembly.
IMPORTANT:
PULL THE COUNTERBALANCE LIFT CABLE AWAY FROM THE HEADER TO
CLEAR THE LATCH, WHILE SIMULTANEOUSLY SLIDING THE DRUM WRAP AGAINST THE LAST
RIB UNTIL THE THREE CATCHES ENGAGE THE 3
RD
RIB.
Secure the hinge latch by rotating upward until a distinct snap is felt. Confirm the catch is
fully engaged by lightly tugging on it. Repeat the same process for right hand side.
Left hand
drum wrap
Cable
drum
Re-engage
hinged latch
3
rd
rib
Counterbalance lift
cable. Pull to clear latch
Left hand
drum wrap
3
Catches
Left hand
drum wrap
Last
rib
NOTE:
Repeat the same process for right
hand side.
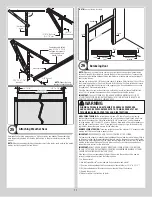
Attaching Rear Back Hangs
24
IMPORTANT:
HOLD THE DOOR DOWN TO PREVENT IT FROM RISING UNEXPECTEDLY IN THE
EVENT THE SPRING(S) WERE OVER-WOUND AND CAUTIOUSLY REMOVE LOCKING PLIERS
FROM VERTICAL TRACKS.
Raise the door until the top section and half of the next section are in the horizontal track
radius. Do not raise door any further since rear of horizontal tracks are not yet supported.
WARNING
RAISING DOOR INTO THE LOOSE HORIZONTAL TRACKS CAN RESULT IN
DOOR FALLING AND CAUSE SEVERE OR FATAL INJURY.
Clamp a pair of locking pliers onto the vertical tracks just above the second track roller on
one side, and just below the second track roller on the other side. This will prevent the door
from raising or lowering while installing the rear back hangs.
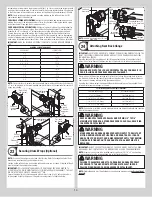
Using the chart below, select the appropriate perforated angle (may not be supplied). Fabri-
cate and install rear back hangs, as shown.
Perforated Angle Gauge Weight Limitations:
Perforated Angle Gauge
Door Balance Weight
2” x 2” x 12 Gauge
Less Than 800 lbs.
1-1/4” x 1-1/4” x 13 Gauge
Less Than 305 lbs.
1-1/4” x 1-1/4” x 15 Gauge
Less Than 220 lbs.
1-1/4” x 1-1/4” x 16 Gauge
Less Than 175 lbs.
NOTE:
If an opener is installed, position horizontal tracks one hole above level when securing
them to the rear back hangs.
WARNING
KEEP HORIZONTAL TRACKS PARALLEL AND WITHIN 3/4” TO 7/8”
MAXIMUM OF DOOR EDGE, OTHERWISE DOOR COULD FALL, RESULTING
IN SEVERE OR FATAL INJURY.
WARNING
MAKE SURE BACK HANGS ARE BRACED SUFFICIENTLY TO RESIST ANY
MOTION DURING SPRING APPLICATION AND DOOR TRAVEL. IF BACK
HANGS PIVOT OR DEFLECT, ADD REINFORCEMENT UNTIL THEY REMAIN
FIRM AND STATIONARY. ANY BACK HANG THAT HAS BENT MUST BE
REPLACED.
IMPORTANT:
DO NOT SUPPORT THE WEIGHT OF THE DOOR ON ANY PART OF THE REAR
BACK HANGS THAT CANTILEVERS 4” OR MORE BEYOND A SOUND FRAMING MEMBER.
NOTE:
If rear back hangs are to be installed over drywall, use (2) 5/16” x 2” hex head lag
screws and make sure lag screws engage into solid structural lumber.
WARNING
FAILURE TO ASSEMBLE AND ATTACH REAR BACK HANGS PROPERLY
ACCORDING TO THE ABOVE INSTRUCTIONS MAY RESULT IN DOOR
FALLING WHEN RAISED, CAUSING SEVERE OR FATAL INJURY.
NOTE:
Perforated angle must be attached to sound framing members and
nails should not
be used
.
10


