WaveReX WaveU Operating Manual Download Page 25


First steps 


page 25 of 30 


The sample positions (offsets) Start, Loop and End can be set in single 
steps using the arrow keys on the number fields or entered directly in the 
text field. The offsets are the start point, the loop (start) point and the end 
of the sample. The start point defaults to the sample start (zero-based, i.e. 
0) and can only be changed upwards. The sample end is set by default to 
the sample end and can only be changed downwards. 

To set the step size of the number fields to the zero crossings of the sam-
ple, check the snap at zeros checkbox. This way, each time a number field 
is changed, the corresponding offset is set to the next zero crossing. This 
is especially useful for loops. 

Activate the checkbox lock Loop if you want to change the loop offset or 
end offset but keep the loop length. If you change the loop offset, the end 
offset will be changed by the same value. The same applies to the end off-
set. 

Loop Modes 

If the Loop Mode Forward (FW) is selected, the sample will be continued 
from the loop point after reaching the end and played back in a continuous 
loop. 

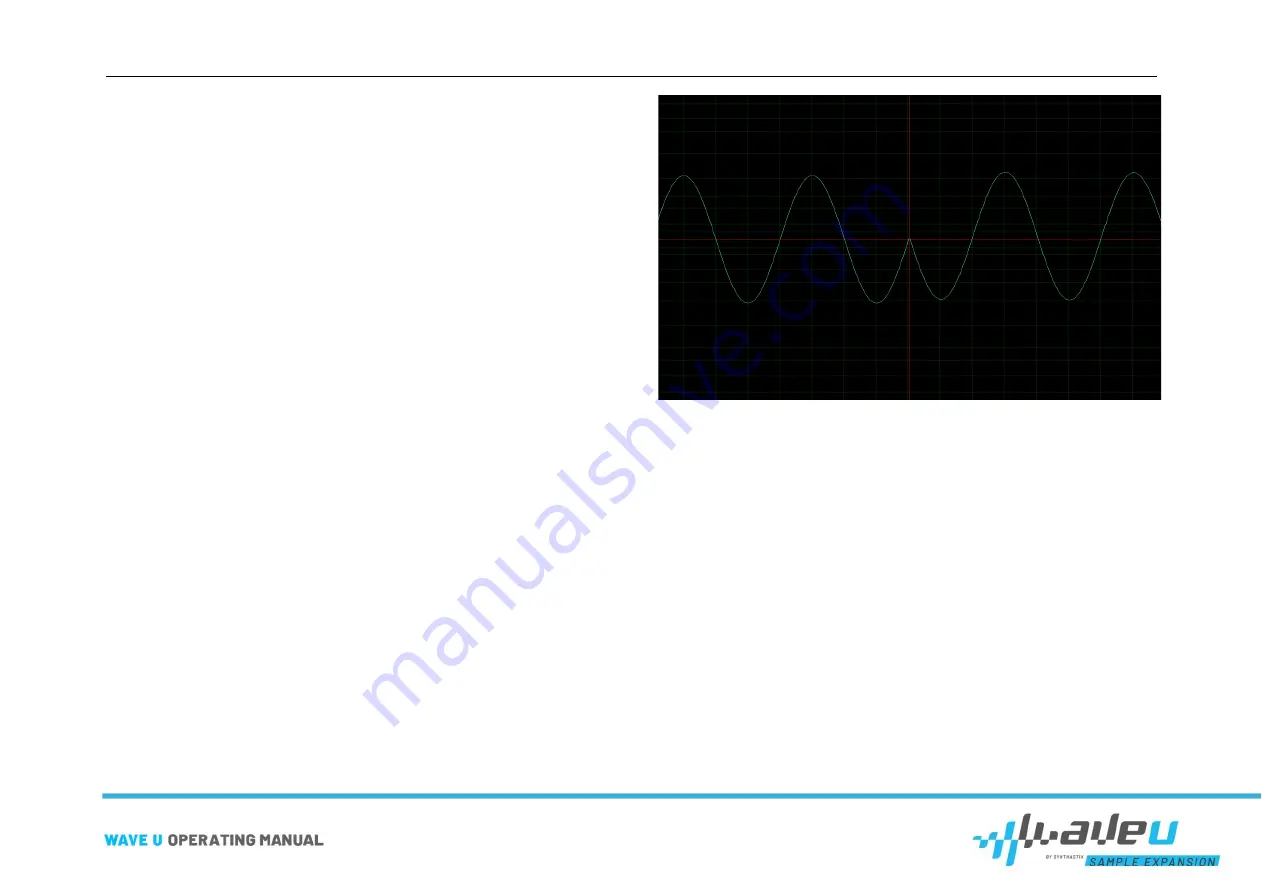
Note that the beginning of your loop must match the end. Let's take a sine 
wave for example. If the sample ends, for example, with the zero crossing 
of the negative oscillation, the loop must start with the positive half-wave. 
Otherwise, this happens: 


If the Loop Mode Alternating (ALT_INV) is selected, the sample will con-
tinue inversely from the end to back to the loop point (etc.) after reaching 
the end and will be played in a continuous loop. This loop mode is some-
times called Ping Pong. 

Note that the sample is continued inversely in the loop mode Alternating. 
This means that the sample must be point-symmetrical at the end of the 
sample for this loop to work at all. The easiest way to achieve this is to 
place the end of the sample on a zero crossing. 

Let's take a sine wave again, for example. If the sample ends with the 
zero-crossing of the negative half-wave, this is inverted for the loop, i.e. 
figuratively speaking flipped upwards (the point symmetry is thus given) 
and played backwards. The sine wave is thus continued correctly. If you 
get a result like on the picture above, just change the Loop Mode to Alter-
nating. Now it should fit. 

The Alternating Mode is also interesting to counteract the effects of lyring 
or jumping, which often occur with loops. These effects occur because the 
beginning of the loop often differs from the end (frequency response, mod-
ulations, etc.). The transition from the end of the loop to the beginning is 

Summary of Contents for WaveU

Page 1: ......

Page 2: ...don t want to expose yourself and your environment to unnecessary dan ger do you Your WaveReX Team This is a product to praise the glory of Roland and its outstanding musical products Note We assume n...

Page 3: ...Manual Revision English Version 1 0 19 12 2022 Many Thanks to Emily Anne Rainer Buchty Tobias Hopp Dirk Stephan and all our sup porters How to reach us www waverex de www waverex com www shop waverex...

Page 4: ...0 The USB port 10 The card 10 THE SOFTWARE EDITOR 11 The user interface 11 New Card Button 11 Open Card button 11 Save Card button 11 Save Card As button 11 General area 12 Play button 12 Card Info 12...

Page 5: ...ing a loop 24 Loop Modes 25 Special feature of the loop 26 File formats 27 Saving a card 27 Transferring a card 28 And go to the U 29 TECHNICAL DATA 29 TROUBLESHOOTING 30 My card is not recognized in...

Page 6: ...s state of the art electronic com ponents and was developed and built according to the current state of the art ATTENTION Use WaveU only in rooms with room temperature and low humidity Do not expose W...

Page 7: ...s any obvious damage If you are not sure con tact support A defective device can severely damage your WaveU ATTENTION Do not use WaveU if your device has a defect Faulty voltages short cir cuits etc c...

Page 8: ...ndheitsanforder ungen der nachstehend aufgef hrten EU Richtlinien entspricht Bei einer mit uns nicht abgestimmten nderung des Produktes verliert diese Erkl rung ihre G ltigkeit Die alleinige Verantwor...

Page 9: ...n the Roland D 70 at your own risk Preparation To connect WaveU to your computer you need a micro USB cable This is not included in the delivery You can also use a USB extension but make sure that the...

Page 10: ...a little tight Never insert your USB cable with force you can destroy the connector The card The card was manufactured in a sandwich process from conventional board material GRP The layers are both so...

Page 11: ...U as card sounds 128 tones are possible per card The user interface New Card Button Press this button if you want to discard your composition and create a new one Open Card button With this button yo...

Page 12: ...and Voice 2 for tones with two voices Play button Press Play to preview the currently selected sample Alterna tively you can press the space bar Card Info Here you will always see information about th...

Page 13: ...the bottom in forms you about the progress of the transfer Knobs You can operate each knob in several ways You can click on it with the left mouse button and move the mouse up or down The knob moves...

Page 14: ...be distributed over several keyboard zones Use the Plus button to add a new empty sample to your list Then double click the sample to assign a file to it Alternatively you can add files to the list by...

Page 15: ...p Activate the checkbox lock Loop to keep the loop length when the loop start or sample end is changed Pitch settings The drop down field allow you to set the root note for the currently se lected sam...

Page 16: ...ime and L1 to the attack level The course of this part of the envelope is always linear T2 is the time until the level has changed from L1 to L2 L2 can be higher or lower than L1 If both levels are th...

Page 17: ...over the slider the currently set dB value is displayed via a tooltip If you want to know exactly and do all the math calculate 20 log10 x 1 127 X stands for the integer value set at the controller Th...

Page 18: ...ort WaveU will be powered when the green LED is lit Your WaveU will start in bootloader mode for five seconds You can see this by the double blinking of the blue LED After that your WaveU will au toma...

Page 19: ...ter Then specify the folder of the USB driver under Search for driver software in this loca tion Confirm with Next Windows will then install the driver for WaveU WaveU will be displayed in the Device...

Page 20: ...The con nected WaveU and its serial number are displayed here You can also connect multiple WaveUs In this case you can use the drop down field to select the WaveU you want to use Loading a card Clic...

Page 21: ...he list A new initially empty Tone is created Each tone consists of at least one voice at most two voices which correspond to a multisample Samples can be assigned to these voices later Rename a tone...

Page 22: ...name as displayed in your U defaults to WaveU However you can change it at any time to your liking The Card Name text box is located in the upper left corner of the main window Creating a tone Click...

Page 23: ...is set to 64 and it is a Velocity Switch type Tone Voice 1 will play for all velocities up to 64 and Voice 2 will play for all velocities above 64 Tone Types Single this is a Tone that consists exclu...

Page 24: ...e sample you want to add to your voice Double click on your selection or confirm by clicking OK The second way to add a sample is by drag and drop Simply drag your sample over the samples list and rel...

Page 25: ...wave for example If the sample ends for example with the zero crossing of the negative oscillation the loop must start with the positive half wave Otherwise this happens If the Loop Mode Alternating A...

Page 26: ...sible This is indicated by the coloring of the loop offset If the address is red you can be sure that the loop will not work or the de vice does not read this address as it is written on the card Howe...

Page 27: ...those interested please note that the U s samples must be provided in a format compressed to 7Bit So a higher bit depth than 16Bit does not help at all to a higher quality Please note Currently only W...

Page 28: ...card are always occupied by the card format Click on Send Card in the lower right corner to start the transfer The left corner of the WaveU flashes blue to indicate that the transfer is in progress Y...

Page 29: ...sis Now switch on your U When the card is correctly inserted the upper right corner of your WaveU will light up green indicating that your WaveU is powered by the device Now select a patch on the devi...

Page 30: ...e contact support at support waverex de The software editor does not show my WaveU Please make sure that your WaveU is installed correctly Please refer to the section Installing the USB driver If this...

Reviews: