background image

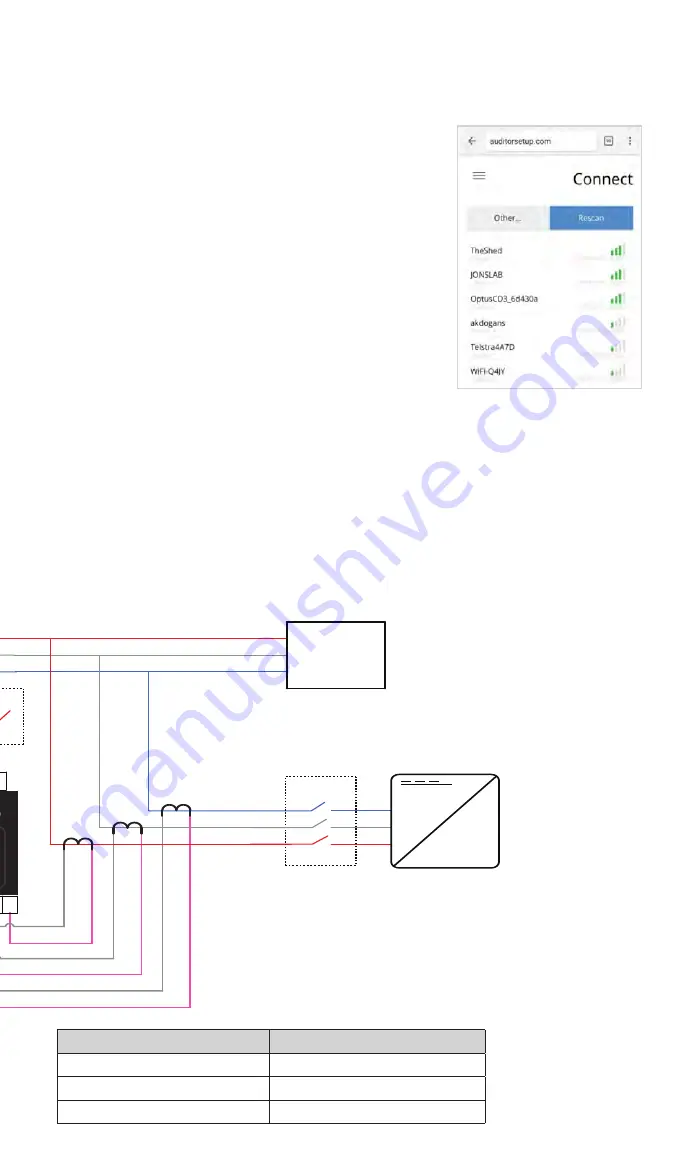
3. WiFi settings

Phase C

Phase A

GRID SUPPLY

MAIN SWITCH

Load

Neutral

Neut ral Block

Phase B

Auditor

CB

kWh

METER

1

2

3

N

4

5

6

3 2 1

Inverter

K

L

K

L

CT1

+ –

CT2

+ –

L1

L2

L3

CT5

+ –

CT6

+ –

L

K

L

K

CT3

+ –

L

K

K

L

CT4

+ –

x

x

x

x

CB

x

x

x

x

x

Auditor 6 Wiring Diagram

Supply

3 phases

Loads

None

Solar

3 phases

3. WiFi settings 

continued 


4. Use the onboarding tool

5)

   Whilst connected to the Auditor’s network,  

open a web browser  and navigate to  

auditorsetup.com

6)

   The screen will then display the available site 

networks. Select the site  network and connect. 

7)

   Enter the password for the  site WiFi network. Enter 

and press connect.

8)

   Once connection starts, the Auditor  LED lights will 

flash whilst it establishes a connection.

9)

   A successful connection to the site WiFi will be 

shown  when all LED lights go solid green (no 

flashing). If this step fails the WiFi network signal 

may be too weak.

The onboarding tool at


onboarding.wattwatchers.com.au


collects the installation 

details for each site including device serial number, circuit names and CT size. Log 

into the onboarding tool and work through the steps to configure your devices for 

the installation site.

Wattwatchers WiFi Setup

Page 2 of 2

5.

Whilst connected to the Wattwatchers device’s
network, open a web browser and navigate to
auditorsetup.com

6.

The screen will then display the available home
networks.  Select the home network and connect.

7.

At this time you will need to enter the password for
the home WiFi network.  Enter and press connect.

8.

Once connection starts, the Wattwatchers energy
device LED lights will flash whilst it establishes a
connection.

9.

A successful connection to the home WiFi will be
shown when all LED lights go solid green (no flashing)

Most common problem when connecting WiFi networks is signal strength 
from the home WiFi access point to the location of the device.  This can be a 
problem whether the meter box door is open or closed, usually worse when 
closed.

Place CT connected to ...

On cables connected to ...

1+ and 4+

P1

2+ and 5+ 

P2

3+ and 6+ 

P3

Summary of Contents for Auditor 6M

Page 1: ...ge connections are labelled P1 P2 P3 N Connect voltage phases to P1 P2 and P3 Connect neutral to N Use three phase wiring tails if they were provided with your Auditor Single Phase Voltage Connections Use this configuration when one phase is present The voltage connections are labelled P1 P2 P3 N Connect P1 P2 P3 to the same phase Connect neutral to N Use single phase wiring tails if they were pro...

Page 2: ... For load monitoring arrow is towards the load The CT connections are labelled 6 5 4 3 2 1 The white wires connect to terminals labelled three wires in each terminal The pink wires connect to the terminals labelled The CTs and Voltage phases must match as stated below Place CT connected to On cables connected to 1 and 4 P1 2 and 5 P2 3 and 6 P3 It is acceptable to use less than six CTs minimum of ...

Page 3: ...e that Current Transformer can accommodate the cable size i e cable diameter fits within CT opening width Ensure there is a way to isolate the Auditor voltage inputs An existing or new circuit breaker can be used depending on the regulations in your jurisdiction A breaker is not included in the Auditor package WiFi network details signal Ensure that you have the WiFi network name and password on h...

Page 4: ...e that Current Transformer can accommodate the cable size i e cable diameter fits within CT opening width Ensure there is a way to isolate the Auditor voltage inputs An existing or new circuit breaker can be used depending on the regulations in your jurisdiction A breaker is not included in the Auditor package WiFi network details signal Ensure that you have the WiFi network name and password on h...

Page 5: ...ge connections are labelled P1 P2 P3 N Connect voltage phases to P1 P2 and P3 Connect neutral to N Use three phase wiring tails if they were provided with your Auditor Single Phase Voltage Connections Use this configuration when one phase is present The voltage connections are labelled P1 P2 P3 N Connect P1 P2 P3 to the same phase Connect neutral to N Use single phase wiring tails if they were pro...

Page 6: ...2 400 25 600 36 Current Transformer Direction Install Current Transformers CTs such that For grid monitoring arrow is from grid For solar monitoring arrow is from inverter For load monitoring arrow is towards the load About the split core CTs Only Wattwatchers supplied CTs are supported All CTs can be interchanged in the field in sets of 3 Different sized CTs can be used on one device in sets of t...

Page 7: ...e white wires connect to terminals labelled three wires in each terminal The pink wires connect to the terminals labelled The CTs and Voltage phases must match as stated below Place CT connected to On cables connected to 1 and 4 P1 2 and 5 P2 3 and 6 P3 It is acceptable to use less than six CTs minimum of one ...

Page 8: ...municate over the internet using the household WiFi the network name and password is required This allows the Wattwatchers energy device to send and receive data over the homeowner s internet link Any smartphone tablet or computer can be used for this process 1 Check you can access the home WiFi network from the meter box using a smart device 2 The Wattwatchers energy device should be on and all 3...

Page 9: ...CT size Log into the onboarding tool and work through the steps to configure your devices for the installation site Wattwatchers WiFi Setup Page 2 of 2 5 Whilst connected to the Wattwatchers device s network open a web browser and navigate to auditorsetup com 6 The screen will then display the available home networks Select the home network and connect 7 At this time you will need to enter the pas...

Page 10: ...itor should be lit solid The table below shows the meaning of the lights Auditor 6W Indicators L1 Mode L2 Network L3 Internet Explanation Blink Off Off No WiFi network Code started Blink Blink Off Found WiFi Blink On Off DHCP complete On On Off Connected Time On On On Normal Operation Connected Logging All Fast Blink Configuration ...

Page 11: ...is ve and expected value on all circuits Grid and load CTs are installed correctly Ensure CT phase and orientation are correct CTs on the wrong phase may cause negative PF readings Where there is solar operating Grid circuits show ve PF if there is feed in Current measured with tongs meter is the same as current reported in the data The Auditor is configured correctly Use onboarding tools to chang...

Page 12: ...itor should be lit solid The table below shows the meaning of the lights Auditor 6W Indicators L1 Mode L2 Network L3 Internet Explanation Blink Off Off No WiFi network Code started Blink Blink Off Found WiFi Blink On Off DHCP complete On On Off Connected Time On On On Normal Operation Connected Logging All Fast Blink Configuration ...

Page 13: ...o the onboarding tool and work through the steps to configure your devices for the installation site Wattwatchers WiFi Setup Page 2 of 2 5 Whilst connected to the Wattwatchers device s network open a web browser and navigate to auditorsetup com 6 The screen will then display the available home networks Select the home network and connect 7 At this time you will need to enter the password for the h...

Page 14: ...rees 400 25 600 36 CT Direction Install Current Transformers CTs such that For grid monitoring arrow is from grid For solar monitoring arrow is from inverter For load monitoring arrow is towards the load About the split core CTs Only Wattwatchers supplied CTs are supported All CTs can be interchanged in the field in sets of 3 D ifferent sized CTs can be used on one device in sets of three eg chann...

Reviews: