background image

IS-HF-M100+-29293  Rev 4


6


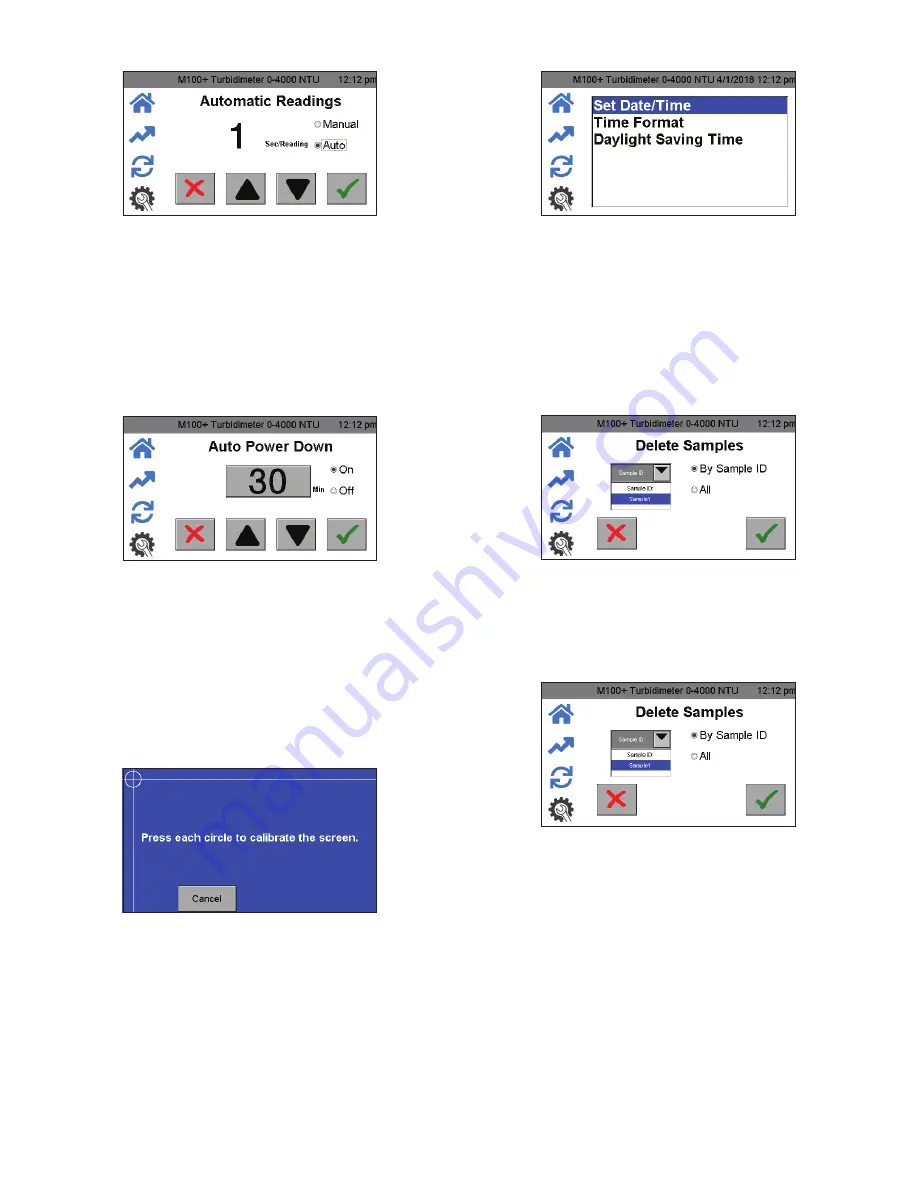
Auto/Manual Readings

1.  Press the 

Setup

 icon. Select Auto/Manual Readings.

2.  In this screen, a selection can be made for continuous readings 

(Auto) or for a single reading (Manual).

3.  If Auto is selected, the rate of updates can be selected from 1 to 60 

seconds using the 

 and 

 buttons. 

If Manual is chosen, a button will appear in the Home icon to take 

readings. (Manual readings take approximately 10 seconds to 

display. It will say “capturing” to indicate that it is processing.)

4.  Push 

 to save and confirm.

Auto Power Down

The M100+ can be set to power down automatically. The 

factory setting is to power down after 30 minutes. This setting is 

recommended to save lamp life. There is also an option to manually 

power off the instrument.
1.  Press the 

Setup

 icon. Select Auto Power Down.

2.  If setting Auto Power Down to On, the time before automatically 

powering down can be adjusted using the 

 and 

 buttons.

3.  Set the Auto Power Down to Off if you need to keep the instrument 

on. To turn the M100+ off when this setting is set to Off, press the 

power button on the Home screen.

Touch Screen Calibration

The screen has been factory adjusted but can be adjusted if the 

alignment is off. The screen may need to be calibrated if new software 

has been downloaded. It is a 5 position setup.
1.  Press the 

Setup

 icon. Select Touch Screen Calibration.

2.  If this calibration fails, restart the instrument by unplugging and 

reinserting the power plug.

3.  Press the top screen time banner for 5 seconds to reset to factory 

default screen setting.

4.  Then attempt the calibration again.

Set Date/Time

1.  Press the 

Setup

 icon. Select Set Date/Time.

2.  Set the date and time by using the 

 and 

 buttons.

3.  Set the Time Format to either 12 or 24 hour time by using the 

 and 

 buttons. This menu will change slightly if the 24-hour 

format is selected. 

4.  Enable or disable the Daylight Savings Time setting by using the 

 and 

 buttons. 

5.  When complete, press the 

 to save the setting and return to 

Setup

 menu.

Delete Samples

1.  Press the 

Setup

 icon. Select Delete Samples.

2.  Select either All or By Sample ID.
3.  If Sample ID is selected, select sample. 
4.  Press 

 to delete sample. 

Data Resolution

1.  Press the 

Setup

 icon. Select Data Resolution.

2.  Set the resolution or number of digits after decimal point shown in 

Home

 screen.

3.  Use the 

 and 

 buttons to set the resolution. The screen shows a 

representation. 

4.  Press 

 to save and return to 

Setup

 menu.

Summary of Contents for M100+ 28060

Page 1: ...en Calibration 6 Set Date Time 6 Delete Samples 6 Data Resolution 6 Offset 7 Device ID 7 Calibration Reminder 7 Calibration Download 7 Firmware Update 7 Reset Defaults 7 About Device 7 Calibrating the M100 8 Calibration Standards 8 Care of ProCal Standards 8 Indexing Calibration Cuvettes 8 Calibration Procedures 8 Calibration Procedures continued 9 Calibrating using ProCal Standards 9 Calibrating ...

Page 2: ...hould not permit anyone to touch this equipment unless they are over 18 years of age are adequately trained and supervised and have read and understood this manual Owners should also ensure that no unauthorized personnel comes in contact with this equipment If this equipment or any of its parts becomes damaged or needs repair stop using the equipment and contact an experienced service individual i...

Page 3: ...lt in death or serious injury This symbol identifies hazards which if not avoided could result in death or serious injury This symbol identifies hazards which if not avoided could result in minor or moderate injury This symbol identifies practices actions or failure to act which could result in property damage or damage to the equipment This pictorial alerts you to the need to read the manual This...

Page 4: ...ons for the M100 are valid only for measurement of static non flowing samples Touch Screen Standard Inserted in Optics USB Connector Unpacking and Inspection of the Instrument Remove all items from packing carton and carefully inspect to ensure that no visible damage has occurred during shipment and that all items listed below have been received If the items received do not match the order please ...

Page 5: ...igned to provide the ability to customize the instrument according to your needs at any time during normal operation The Setup screen has been split into sub menus to facilitate instrument configuration This section describes how to use each of the sub menus to configure the instrument Turning on the Instrument 1 Confirm that the M100 is safely and properly plugged into a suitable power source 2 T...

Page 6: ...ration The screen has been factory adjusted but can be adjusted if the alignment is off The screen may need to be calibrated if new software has been downloaded It is a 5 position setup 1 Press the Setup icon Select Touch Screen Calibration 2 If this calibration fails restart the instrument by unplugging and reinserting the power plug 3 Press the top screen time banner for 5 seconds to reset to fa...

Page 7: ...nsert the USB memory stick that contains the software into the USB port 3 If the firmware revision on the memory stick is older than the firmware currently installed the instrument will ask if you wish to continue 4 Press the to continue with the firmware installation The upload will take several minutes During the initial upload the screen will show busy and screen anomalies may appear until the ...

Page 8: ...ided as general guidelines for proper care of ProCal standards Standards should only be handled by the top black cap or by the very bottom of the cuvette Keep cuvette glass clean of fingerprints and debris Cuvettes can be cleaned with any domestic glass cleaner and the provided microfiber cloth Prevent ProCal standards from freezing This will most likely destroy them Standards under 100 NTU must b...

Page 9: ...on on the left side of the screen 2 Insert the 4000 NTU standard 3 Press the Command button in the middle of the screen to start calibration A countdown from 30 will appear on the screen When the countdown is complete the screen will request the 1000 NTU standard 4 Press the 1000 NTU button on the left side of the screen 5 Insert the 1000 NTU standard 6 Press the Command button to continue the cal...

Page 10: ...ostic Banner On Off Reading List Setup Calibration Trend Home Data Retrieval Data logging can only save 100 points per Sample ID All data is saved in CSV format and is date and time stamped Sample ID Data can be downloaded to a USB memory stick or printed in the Trend screen after pressing Download Print Calibration data can be downloaded to a USB memory stick in the Calibration Download menu by p...

Page 11: ...Toll Free 888 203 7248 Fax 239 454 0694 Email HF Info wattswater com www hfscientific com Routine Maintenance Routine maintenance should include calibration of the instrument See Calibration section in this manual for more information Cleaning the Cuvette Measurement cuvettes used for the sample should be clean and free of marks or scratches Clean the interior and exterior of the cuvettes with a d...

Page 12: ...e cost of repairing or replacing other property which is damaged if this product does not work properly other costs resulting from labor charges delays vandalism negligence fouling caused by foreign material damage from adverse water conditions chemical or any other circumstances over which the Company has no control In addition the Company shall not be responsible for any costs incidental to the ...

Reviews: