background image


15 


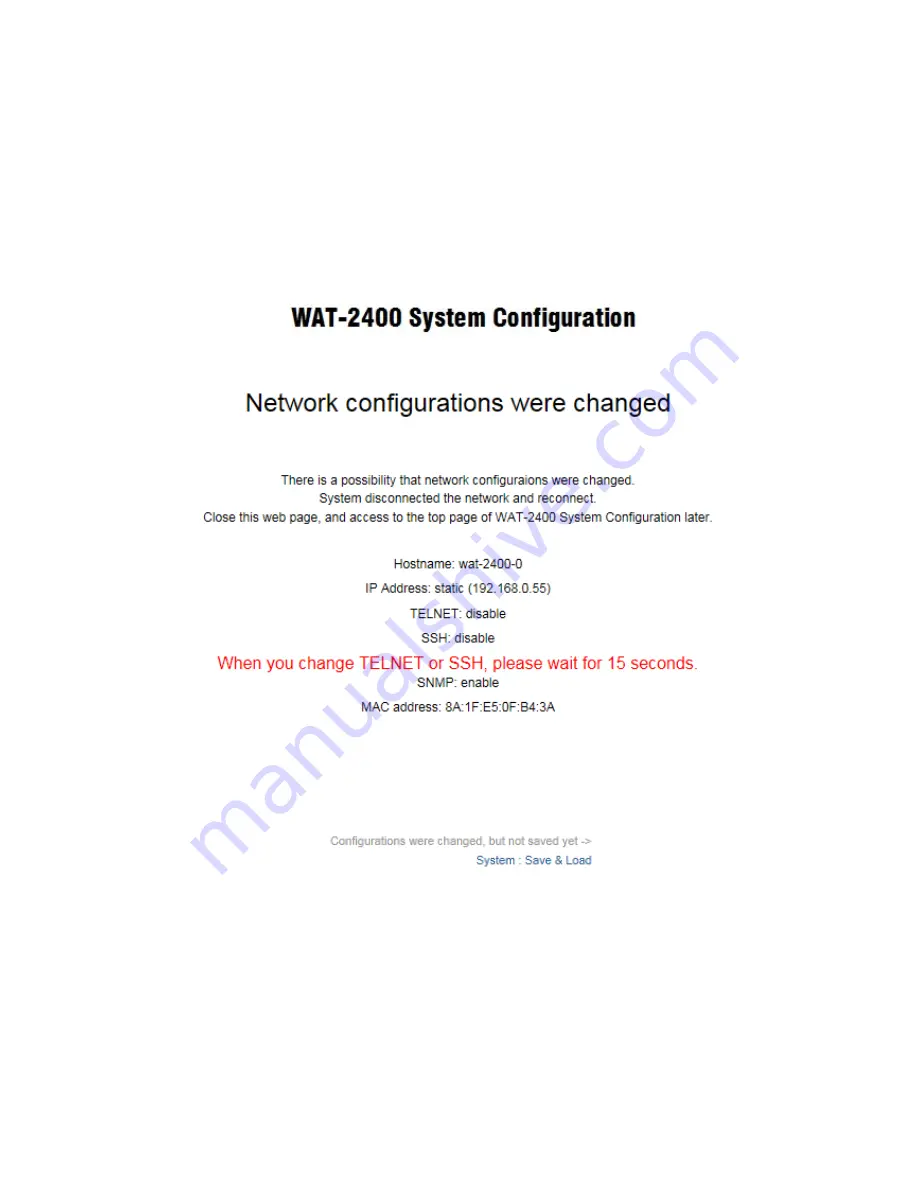
When the change of network settings is made, the below figure will be shown. 
If you would like to change the network settings continuously, please access the top page of 
the  WAT-2400  System  Configuration  again.  If  you  modify  the  TELNET  or  SSH  settings, 
please wait for the change completion about 15 seconds to re-access. At this time, the video 
outputs pause due to change in the network settings. 


Back to the top page and the following message will be displayed in upper right in the 
window. 


As  per  above  message,  if  you  made  any  configuration  changes  not  only  in  the  network 
configuration, the changed configuration will not be saved and power-supply disconnection 
will make the change go back to the original unless you save the configuration to the flash 
ROM in the Save & Load page which will be described later. 


Summary of Contents for WAT-2400

Page 1: ...WAT 2400 User s Manual Rev 2 00 Watec Co Ltd 2016 11 11 ...

Page 2: ...Network settings Password for ONVIF client software 3 Checking the image from the camera Add descriptions on MJPEG stream 4 1 2 System Add settings on Network page TELNET SSH SNMP Add Date Time page 4 1 3 Camera Add descriptions on Video output settings 4 1 4 ONVIF Add ONVIF Settings page Add ONVIF User management page ...

Page 3: ...f VLC media player 8 4 Changing the camera settings 11 4 1 Configuration changes from the Web browser WAT 2400 System configuration 11 4 1 1 WAT 2400 System Configuration Overview top page 11 4 1 2 WAT 2400 System Configuration System 12 4 1 3 WAT 2400 System Configuration Camera 23 4 1 4 WAT 2400 System Configuration ONVIF 29 4 2 Setting initialization by the reset button 32 Reference 33 ONVIF De...

Page 4: ...ndividually to the router and the PoE hub Connect the LAN cable of camera side to a PoE port of the PoE hub and connect the LAN cable of the router side to a normal LAN port If you want to power the camera using the AC power supplies connect the camera and the router directly with exception of the PoE hub from the above The router is also not required if it is in a closed network configuration and...

Page 5: ...In that case please contact the administrator of the camera as there might need to change the viewed on PC or the camera network in accordance with the situation The network settings of the WAT 2400 can be changed in the setting change by the Web browser which will be described later If the network setting of the WAT 2400 is unclear it is possible to initialize all the settings of the camera inclu...

Page 6: ... order to accommodate WAT 2400 s requirement PC network settings for a local area connection in Windows7 as follows Control Panel Network and Internet Network and Sharing Center Local Area Connection Properties Internet Protocol Version 4 TCP IPv4 Properties ...

Page 7: ... configuration IP Address 192 168 0 200 static go through the following steps to set up the PC network settings Control Panel Network and Internet Network and Sharing Center Local Area Connection Properties Internet Protocol Version 4 TCP IPv4 Properties Input the values below press the OK and close the property PC WAT 2400 LAN cable PoE hub LAN cable ...

Page 8: ...thod Image Size Frame Rate fps enable H 264 1280 720 20 MJPEG 1280 720 20 disable H 264 1920 1080 30 H 264 1280 720 30 When ONVIF MODE is enabled both of the streams can be distributed simultaneously When ONVIF MODE is disabled only one of them can be distributed by switching settings A case of VLC media player Download the appropriate VLC which meets your PC from VideoLAN official download page h...

Page 9: ...treaming in your VLC rtsp WAT 2400 IP Address udp unicast Profile_H264 Example rtsp 192 168 0 200 udp unicast Profile_H264 The URI above is to see the stream of H 264 format The URI below is to see the stream of MJPEG format when ONVIF MODE is enabled rtsp WAT 2400 IP Address udp unicast Profile_JPEG Example rtsp 192 168 0 200 udp unicast Profile_JPEG ...

Page 10: ...starts to stream Please check again the network settings if it does not start The screen might become grey during the viewing in that case please click the stop button in the lower left and click the play button again rtsp 192 168 0 200 udp unicast Profile_H264 ...

Page 11: ...browser is Internet Explorer 11 4 1 1 WAT 2400 System Configuration Overview top page Open your web browser and go to following address page http WAT 2400 IP Address index cgi Example http 192 168 0 200 index cgi Or http WAT 2400 Host name local index cgi Example http wat 2400 0 local index cgi Network settings work properly WAT 2400 System Configuration will be displayed as shown in the below fig...

Page 12: ...d changing of network settings At the first time connection the authentication window will open such as shown in the below figure User name admin Password admin Enter the above and click the OK button The user name and password can be changed in the password submenu which will be described later System has 6 submenus System Overview Network Date Time Password Firmware Save Load A description of ea...

Page 13: ...13 System Overview Overview of the system will be displayed as same as top page ...

Page 14: ...P DHCP and STATIC IP Advanced settings for STATIC IP Changing the Hostname Enabling Disabling TELNET login Enabling Disabling SSH login Enabling Disabling SNMP agent function Enter the each item and click the Update button then network settings will be changed Click the Cancel prior to clicking the Update then the settings will be before correction ...

Page 15: ...ds to re access At this time the video outputs pause due to change in the network settings Back to the top page and the following message will be displayed in upper right in the window As per above message if you made any configuration changes not only in the network configuration the changed configuration will not be saved and power supply disconnection will make the change go back to the origina...

Page 16: ...ver You can synchronize the system time with any NTP server by entering a valid IP address or domain name of NTP server in the textbox Set manually You can set the system time manually by entering the yyyy MM ddThh mm ss format in the textbox y year M month d day h hour m minute s second After select and enter the each item click Update to Date Time settings will be changed If you click Cancel bef...

Page 17: ...e zone settings will be reflected but others will not be made When the change in the time zone settings is performed the figure below is displayed If you want to return to the previous page from this page please click not the browser s back function but the Back button displayed in this page In addition please wait for about 10 seconds due to the change completion ...

Page 18: ...ton and the change will be made with the information entered in When you change the settings the confirmation page will be displayed in the same way of changing the network settings If you would like to change the settings continuously please access the top page of the WAT 2400 System Configuration again Please note that when you made any configuration changes the changed configuration will not be...

Page 19: ...r you change the username and password Firmware You can update the userland and kernel of the Linux which configure the systems of the WAT 2400 at this page These updates will be made by downloading each image file to the WAT 2400 from our website via the internet Therefore the WAT 2400 must be connected to the internet when you update the firmware ...

Page 20: ...rland button when you update the userland And click the Update kernel button when you update the kernel After you updated the firmware the confirmation dialog will be displayed and click the OK button And the update will begin During the update the below page will be displayed Please do not disconnect the network or turn off the camera until the display of the page is finished And the camera might...

Page 21: ...please try to update again When the update is completed successfully and back to the original page you can see the following message in upper right of window As per the message please be aware that the updated F W will not be adapted to the camera unless you reboot the camera from the Save Load page which will be described later ...

Page 22: ...ve the current settings to flash ROM Reload Discard current system configuration and change the settings back to the default stored in the flash ROM Restore Defaults Discard current system configuration and change the settings back to the default of F W write Reboot the camera in order to reflect the change Reboot Reboot the system ...

Page 23: ...posure control 1 longtime AE Take a longer exposure time to the normal AE which extending the frame 2 AE hold Hold the current exposure setting 3 manual Manual exposure control The default setting is 0 Exposure Change the exposure mode to 3 manual and you can set the exposure time of the camera manually The exposure time will be approximately as follows Input value 10 000 s The range of values 1 2...

Page 24: ... depending on the AE setting and DC iris lens used basically the default setting 128 is recommended If you want to intentionally make the lens fully open set the value 255 on the other hand in case of making it fully closed set the value 0 In the range of 0 255 you switch the set value The default setting is 128 DC Iris control speed You can adjust the convergence point of the auto iris when you u...

Page 25: ...W Follow the change of color temperature of the object and adjust the white balance 1 full open Draw the wider range of colors to white 2 AWB hold Stop the AWB operation and hold the white balance gain value 3 MWB Set the target value of the white balance to a specific color temperature along the black body emission curve The default setting is 0 ...

Page 26: ...re K Set value Color temperature K 0 1500 21 2143 42 3750 1 1522 22 2188 43 3889 2 1544 23 2234 44 4038 3 1567 24 2283 45 4200 4 1691 25 2333 46 4375 5 1615 26 2386 47 4565 6 1641 27 2442 48 4773 7 1667 28 2500 49 5000 8 1694 29 2561 50 5250 9 1721 30 2625 51 5526 10 1750 31 2692 52 5833 11 1780 32 2763 53 6176 12 1810 33 2838 54 6562 13 1842 34 2917 55 7000 14 1875 35 3000 56 7500 15 1909 36 3088...

Page 27: ...switch the set value The default setting is 128 Hue You can set the hue of the image In the range of 128 127 you switch the set value The default setting is 0 Aperture You can set the enhancement of the outline edge of the image The enhancement will increase following the increased set value In the range of 0 255 you switch the set value The default setting is 64 Video output settings Changing the...

Page 28: ...fault setting is 0 After changing configuration values of each item described above with the slider or text box by clicking the Update button the change will be reflected Once the Default button is clicked the entire camera settings to this pare will return to the default configuration At the same time the output size of the image also will be changed therefore the output of video will pause Pleas...

Page 29: ...NVIF Settings You can switch the ONVIF MODE by this page ONVIF MODE You can enable or disable ONVIF MODE If this mode is enabled WAT 2400 runs well with the ONVIF profile S There are differences between available video outputs depending on the mode ...

Page 30: ...t etc To access to this page the authentication is required as in the case of the System page Initial user name and password for ONVIF client software are as described below Name root Password root Create Create new user account You can create up to 10 accounts Modify Modify password and role of the existing account Delete Delete account This item will be displayed when there are two or more accou...

Page 31: ...m enter the new password again Role Select the role which is applied when the camera operator checks or changes configurations of the camera with the ONVIF client software Select from these 3 roles administrator All of the available settings will be displayed and can be changed operator Settings except for User management will be displayed and can be changed user Only some parts of the settings li...

Page 32: ...e button is pressed continuously for about 10 seconds while using a thin rod into the camera on operation all of the settings such as network settings and camera settings can be returned to the default configuration while WAT 2400 will automatically restart when the setting initialization is completed Reset button ...

Page 33: ...http sourceforge net projects onvifdm Then install the ODM to your PC and initiate the ODM ODM starts as follows If the network configuration has been successfully connected without error the WAT 2400 will show up in the Device list Please make sure there is no error in the network settings if you do not see ...

Page 34: ...een and log in by clicking the Log in button When you click the icon which is indicated by a red circle in the upper right in the window as below figure then the settings window will open Select the UDP in Video streaming transport red underline and click the Apply button ...

Page 35: ... click the Live video in it If there is not any problem with the configuration the moving image will be displayed as shown in the figure below Once your WAT 2400 is configured the further settings are unnecessary In case of such as Loading is displayed and the image does not appear please restart the ODM ...

Page 36: ... provided by Milestone Corporation You can download the software at the Milestone s site https www milestonesys com Download and install are complete start the XProtect Management Application from icon below The software will start as shown in the figure below and then click Add hardware which is enclosed by red circle ...

Page 37: ...37 Then the window opens as below and then click the Scan for hardware Check the Local Network Scan and then click Next If there is any scan location where you want to add hardware add from button ...

Page 38: ...perly the device is displayed as the IP address that was set up as shown in the figure below At this time the camera is not displayed as WAT 2400 Enter User name and Password default root root then click the Go button If there is the devise that you do not like to add as shown above remove the check When the login is done successfully and then click Next The device is WAT 2400 ...

Page 39: ...d successfully click the OK button and close the window After that the message in the top of the window is shown in the figure below and click Save button The adding camera will be saved Once you have completed the Save exit the XProtect Management Application ...

Page 40: ...40 Start the XProtect Smart Client start from an icon below Then the authentication screens are displayed and click the Connect button ...

Page 41: ...orner of the window and go on to the setting mode Please select the menu in the left side of the menu below View Shared folder Default Group and add the view in the form of reference to the screen while clicking the Create a new view button If you already have a default view above process is not necessary ...

Page 42: ...n the XProtect Management Application previously is displayed and select the camera then drag and drop to any position on the view If there is not any problem in settings the images from the camera will be displayed on the view When you finished the settings click the Settings button in the upper right window again and exit the setting mode ...

Reviews: