background image

Hardware Guide

5

Hardware Specifications

AC Power Adapter

The AC power adapter supplies power for the XTM 3 Series device. You must use the correct plug for the AC 
power adapter for the power source used in your country.

The international plug kit includes four plugs: Q-NA (North America), Q-UK (United Kingdom), Q-EU (European 
Union), and Q-SAA (Asia).

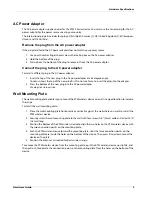
Remove the plug from the AC power adapter

If the plug installed in the AC power adapter does not match your power source:

1. Use your thumb or finger to press down the locking key on the AC power adapter.

2. Hold the bottom of the plug.

3. Pull up from the bottom of the plug to remove it from the AC power adapter.

Connect the plug to the AC power adapter

To install a different plug in the AC power adapter:

1. Insert the top of the new plug in the AC power adapter at a 45-degree angle.

You must insert the top of the new plug first. Do not use force to insert the plug into the adapter.

2. Press the bottom of the new plug into the AC power adapter.

The plug clicks into position.

Wall Mounting Plate

The wall mounting plate enables you to mount the XTM wireless device on a wall in a good location to increase 
the range. 

To install the wall mounting plate:

1. Place the wall mounting plate horizontally or vertically against the wall where you want to install the 

XTM wireless device. 

2. Securely screw the wall mounting plate to the wall with four screws 1/8" (3 mm) wide and at least 3/4" 

(18 mm) long. 

3. Position the bottom of the XTM wireless device to align the two holes on the XTM wireless device with 

the two connection points on the mounting plate.

4. Push the XTM wireless device toward the mounting plate, until the two connection points on the 

mounting plate are inside the holes on the bottom of the device. Then press firmly down to seat the 
device on the plate.

5. Position the antennas as needed for best wireless range.

To remove the XTM wireless device from the mounting plate, push the XTM wireless device up slightly, and 
then pull out, to separate the connection points on the mounting plate from the holes on the bottom of the 
device.

Summary of Contents for XTM 33

Page 1: ...WatchGuard XTM 3 Series Hardware Guide XTM 33 33 W FS2E5 FS2E5W ...

Page 2: ...ight 1998 2011 WatchGuard Technologies Inc All rights reserved WatchGuard the WatchGuard logo Firebox LiveSecurity and any other mark listed as a trademark in the Terms of Use portion of the WatchGuard Web site that is used herein are either registered trademarks or trademarks of WatchGuard Technologies Inc and or it s subsidiaries in the United States and or other countries All other trademarks a...

Page 3: ...e hardware products offered by WatchGuard The WatchGuard XTM 33 is a network security device for small organizations and branch offices Note This Hardware Guide applies to XTM 33 and XTM 33 W devices If your XTM 3 Series device has a different model number your hardware is described in the XTM 3 Series Hardware Guide that applies to that model Fireware XTM OS The XTM 3 Series devices support Watch...

Page 4: ...reless model only Three antennas wireless model only Hardware Description Hardware Specifications Interface Specifications XTM 33 XTM 33 W Processor Power Architecture Dual Core Power Architecture Dual Core Memory Flash 512 MB 512 MB Memory RAM 1 GB 1 GB Power supply 12V 2A 12V 2A Dimensions D 156mm 6 13 W 163mm 7 4 H 32mm 1 25 D 203mm 8 0 W 273mm 10 75 H 32mm 1 25 Antenna height 127mm 5 0 Weight ...

Page 5: ...nds after you connect to the device with the Fireware XTM Web UI or the command line interface It is also lit when the device is polled by WatchGuard System Manager Mode The Mode indicator shows the status of the external network connection If the device can connect to the external network and send traffic the indicator is green The indicator flashes if the device cannot connect to the external ne...

Page 6: ...ed AC power adapter Reset button To reset the device use the procedure in Restore Factory Default Settings on page 9 USB interface Connect a USB storage device to use for USB backup and restore or to store a support snapshot For more information about USB functions see current Fireware XTM WatchGuard System Manager Help or Fireware XTM Web UI Help Serial port Console An RJ45 connector for the seri...

Page 7: ... bottom of the new plug into the AC power adapter The plug clicks into position Wall Mounting Plate The wall mounting plate enables you to mount the XTM wireless device on a wallin a good location to increase the range To install the wall mounting plate 1 Place the wall mounting plate horizontally or vertically against the wall where you want to install the XTM wireless device 2 Securely screw the...

Page 8: ...on openings These openings prevent overheating of the XTM device o Never push objects of any kind into slots or openings on this equipment If you make contact with a voltage point or short out a part it can result in fire or electrical shock o If the equipment is supplied with a three conductor AC power cable the power cable must be plugged in to an approved three contact electrical outlet with th...

Page 9: ... Die Ventilation verhindert ein Überhitzen des XTM Gerätes o Stecken Sie niemals Gegenstände irgendwelcher Art in Schlitze oder Öffnungen des Gerätes Wenn Sie Kontakt mit einem spannungsführenden Punkt oder ein Bauteil kurzschließen kann es zu einem Brand oder elektrischen Schlag führen o Falls dieses Gerät mit einem Schutzkontaktnetzkabel ausgeliefert wird verwenden Sie ausschließlich nur dieses ...

Page 10: ...d objet de quelque sorte dans les fentes d ouverture de cet équipement Si vous faites contact avec un point sous tension ou court circuitez un composant cela peut causer un incendie ou un choc électrique o Si l appareil est fourni avec un câble d alimentation électrique à trois points avec prise terre le câble d alimentation doit impérativement être branché sur une prise à trois points correctemen...

Page 11: ...set button on the back of the device 3 Connect the power supply while you continue to depress the Reset button 4 Continue to depress the button until the Attn indicator stays lit This shows that the device was successfully restored to the factory default settings This process can take 75 seconds or more You must start the device again before you can connect to it If you do not when you try to conn...

Page 12: ... mercury street lamps at night to name a few Multi path reflection occurs when RF signals to the receiver arrive via more than one path because of reflections off walls and other surfaces between the transmitter and the receiver Multi path reflection can cause signal strength to vary by as much as 30dB To reduce variation in signal strength due to multi path reflection the XTM 3 Series Wireless us...

Page 13: ...ereby release WatchGuard from any liability for performance of enforcement of or damages or other relief on account of any such warranties or any breach thereof 2 REMEDIES If any Product does not comply with the WatchGuard warranties set forth in Section 1 above WatchGuard will following the receipt of the product you claim is defective and at its option either a repair the Product or b replace th...

Page 14: ... 1980 United Nations Convention on Contracts for the International Sales of Goods as amended shall not apply You agree not to directly or indirectly transfer the Product or use of the product or associated documentation to any country to which such transfer would be prohibited by the U S Export laws and regulations If any provision of this Warranty is found to be invalid or unenforceable then the ...

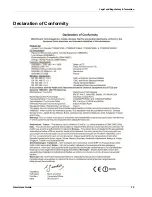
Page 15: ...Hardware Guide 13 Legal and Regulatory Information Declaration of Conformity ...

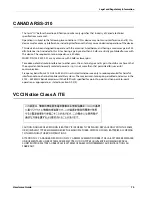
Page 16: ...rating in conjunction with any other antenna or transmitter Caution Changes or modifications to ANY PART OF THIS PRODUCT not expressly approved by WatchGuard could void the user s authority to operate the equipment per FCC regulations In particular modifying antenna gain to exceed 2 0 dBi voids the FCC certification CE Notice The CE symbol on your WatchGuard Technologies equipment indicates that i...

Page 17: ...s gain should be so chosen that the equivalent isotropically radiated power e i r p is not more than that permitted for successful communication Frequency band from 5 15 GHz to 5 25 GHz is restricted to indoor use only to reduce potential for harmful interference to co channel mobile satellite systems The maximum antenna gain permitted on devices in the 5725 5825 MHz band complies with the EIRP li...

Page 18: ...16 WatchGuard XTM 3 Series Legal and Regulatory Information Korean Class A Notice Korean Wireless Notice Taiwanese Class A Notice Taiwanese Wireless Notice ...

Page 19: ...al and electronic equipment put on the market within the member states must not contain certain hazardous materials The WatchGuard XTM 3 Series complies with the European Union s R0HS directive 2002 95 EC and similar regulations that may be adopted by other countries for European Sales WEEE Statement WEEE is a general set of requirements dictated in the EU Directive 2002 96 EC This Directive manda...

Page 20: ...atchGuard is strongly committed to working with our customers and supply chain to define and implement the REACH requirements and ensure a smooth transition to compliance One of the REACH requirements is that manufacturers and importers have the duty to register substances they are producing or importing In accordance with the regulations the products of WatchGuard do not need to be registered for...

Page 21: ...f you wish that you receive source code or can get it if you want it that you can change the software or use pieces of it in new free programs and that you know you can do these things To protect your rights we need to make restrictions that forbid anyone to deny you these rights or to ask you to surrender the rights These restrictions translate to certain responsibilities for you if you distribut...

Page 22: ... that you changed the files and the date of any change You must cause any work that you distribute or publish that in whole or in part contains or is derived from the Program or any part thereof to be licensed as a whole at no charge to all third parties under the terms of this License Ifthe modified program normally reads commands interactively when run you must cause it when started running for ...

Page 23: ...on of the source code even though third parties are not compelled to copy the source along with the object code 4 You may not copy modify sublicense or distribute the Program except as expressly provided under this License Any attempt otherwise to copy modify sublicense or distribute the Program is void and will automatically terminate your rightsunderthisLicense However partieswhohavereceived cop...

Page 24: ... in detail to address new problems or concerns Each version is given a distinguishing version number If the Program specifies a version number of this License which applies to it and any later version you have the option of following the terms and conditions either of that version or of any later version published by the Free Software Foundation If the Program does not specify a version number of ...

Reviews: