


Vehicle Installation Instructions
WGD00085 REV B1
Page 30
Test Functions of DVR
Ensure all components are connected properly by performing a few tests.
1.
Connect 7.5 amp Fuse at the Battery
2.
Start the vehicle and power on system by pressing the on ( ‘I’) button, if it does not start
automatically
3.
Load Vehicle configuration on DVR from USB drive.
4.
Ensure the display screen shows the camera feed.
5.
Press
MENU
button on the front panel and select any button to check that the touchscreen is
working.
6.
Press the
Auto Zoom
button on the camera to test front camera functionality.
7.
Turn ON the wireless microphone, and insert the microphone in the permanent charging base.
Once the green LED light on the microphone stops flashing, the microphone has synced with the
base. Pull out the microphone, and press the talk button. Ensure the wireless microphone icon
appears on the screen. Go to the volume screen and under advanced menu turn up the wireless
microphone volume in order to listen for the live feed through the display speakers. Press STOP
to end the recording.
8.
If equipped, connect and test secondary wireless microphone (see above)
9.
Press the
RECORD
button on the front panel to start a recording. Record for at least 15 seconds.
Press
STOP
to stop the recording.
10.
Check that all inputs are wired correctly by going to
Menu>Status> Devices
. Activate and verify
each input turns on:
a.
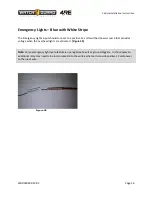
Emergency Lights
b.
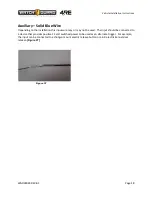
Brakes
c.
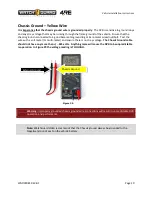
Ignition
d.
Wireless Microphone
11.
Turn on the secondary camera by selecting “CAMERAS” and toggling the secondary camera(s)
on and off. Verify the view angle is set properly
12.
Verify no connectors such as “Scotch Locks” were used. Only Crimp connections must be used
13.
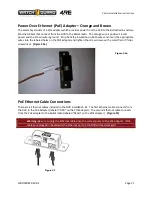
Test Wireless Connectivity and if available, upload video to server.
a.
Check for at least 3 LED lights on the Bullet (Wireless Radio)
i.
LED 1 Power – Green
ii.
LED 2 Connectivity – Green flashing
iii.
LED 3 Low signal – Red
iv.
LED 4 Medium signal – Yellow
v.
LED 5 Good Signal – Green
vi.
LED 6 High Signal – Green
b.
Check for Wireless Signal on the Display 1-4 bars
c.
If server is configured and ready, the upload icon will appear


