background image

2

Safety Precautions

CAUTION

1. Do not connect the mains water to the hot water pipe (only connect to cold water 
supply)

2. After the installation, make sure to check all water supply connections for leaks. 
Rubber washers should be in place for the water connection hoses and T valves.

3. If the product will not be used for a long period of time, unplug the power cord, 
close the main water supply valve and drain any water in the water tank.

4. Do not pull hoses or connection hose using excessive force.

5. Do not use thinners, benzene, acidic chemicals, chloride or hydrochloric acid 
detergents. This may result in corrosion to the metallic components and potential 
discolouration or scratches to the body of the unit.

6. This appliance is not intended for use by persons (including children) with reduced 
physical, sensory or mental capabilities, or lack of experience and knowledge unless 
they have been given supervision or introductions concerning the use of the 
appliance by a person responsible for their safety. Children should also be 
supervised to ensure that they do not play with the appliance.

Summary of Contents for Levitate

Page 1: ...Washloo Levitate Monolith Floor Standing Installation Clean Comfort Hygiene...

Page 2: ......

Page 3: ...ription Page Number Safety Precautions 2 Bill of Materials 3 Technical Drawings Dimensions 5 Levitate Installation 6 Maintenance Service 16 Flush Adjustment Cleaning 20 Technical Specifications 22 War...

Page 4: ...pull hoses or connection hose using excessive force 5 Do not use thinners benzene acidic chemicals chloride or hydrochloric acid detergents This may result in corrosion to the metallic components and...

Page 5: ...3 Levitate Bill of Materials Note The above illustration is an example only your version may vary Assembled Cistern Glass Front Panel Drainage Pipe Push Button...

Page 6: ...Note The above illustration is an example only your version may vary 4 Levitate Bill of Materials...

Page 7: ...Note The above illustration is an example only your version may vary 5 Levitate Technical Drawings Dimensions...

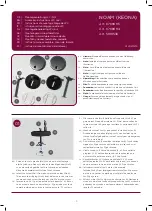
Page 8: ...6 Note The above illustration is an example only your version may vary Levitate Installation...

Page 9: ...an example only your version may vary Levitate Installation 7 Put a spirit level above the cabinet and check if cabinet is placed level horizontally If not adjust the floor fixation screws to achieve...

Page 10: ...8 Note The above illustration is an example only your version may vary Levitate Installation...

Page 11: ...Note The above illustration is an example only your version may vary Levitate Installation 9 Install the outer decoration cover Lift it up first align the guide rail and threaded hole then push in...

Page 12: ...illustration is an example only your version may vary Levitate Installation Press the buttons on the armrest and check if the raising lowering of the cabinet is smooth Finally put the cabinet to it s...

Page 13: ...Note The above illustration is an example only your version may vary Levitate Installation 11...

Page 14: ...12 Note The above illustration is an example only your version may vary Levitate Installation...

Page 15: ...Note The above illustration is an example only your version may vary Levitate Installation 13 Use a file to chamfer the edge of the flush pipe and waste pipe Apply a lubricant...

Page 16: ...Note The above illustration is an example only your version may vary Levitate Installation 14...

Page 17: ...Note The above illustration is an example only your version may vary Levitate Installation 15...

Page 18: ...16 Note The above illustration is an example only your version may vary Levitate Maintenance and Service...

Page 19: ...Note The above illustration is an example only your version may vary Levitate Maintenance and Service 17...

Page 20: ...18 Note The above illustration is an example only your version may vary Levitate Maintenance and Service...

Page 21: ...The above illustration is an example only your version may vary Levitate Maintenance and Service 19 Buckles on the cistern hanging plate Open the buckles on the cistern hanging plate lift the flush v...

Page 22: ...20 Note The above illustration is an example only your version may vary Levitate Flush Adjustment Cleaning Remove the cover washer and rubber seal by rotating the cover counter clockwise through 90o...

Page 23: ...Note The above illustration is an example only your version may vary Levitate Flush Adjustment Cleaning 21...

Page 24: ...Duty Cycle 10 Max 2 min Operate Min 18 min stop Adjustable Lifting Range 200mm Maximum Load 200Kgs Waterproof Rating IPX4 Displacement of Water Tank 3L Half Flush 6L Full Flush Ambient Temperature 3 4...

Page 25: ...gn objects contained in the water system 5 Damage or loss resulting from relocation after instalment improper installation or in a hazardous environment 6 Damage or loss resulting from defect caused b...

Page 26: ...parate collection system for used electronic products in accordance with legislation that requires proper treatment recovery and recycling Only discard discharged batteries They should not be disposed...

Page 27: ...Modern Life Smart Choice...

Reviews: