30
30. Motor
8
Service
Manual
4741
5466
B, C
A
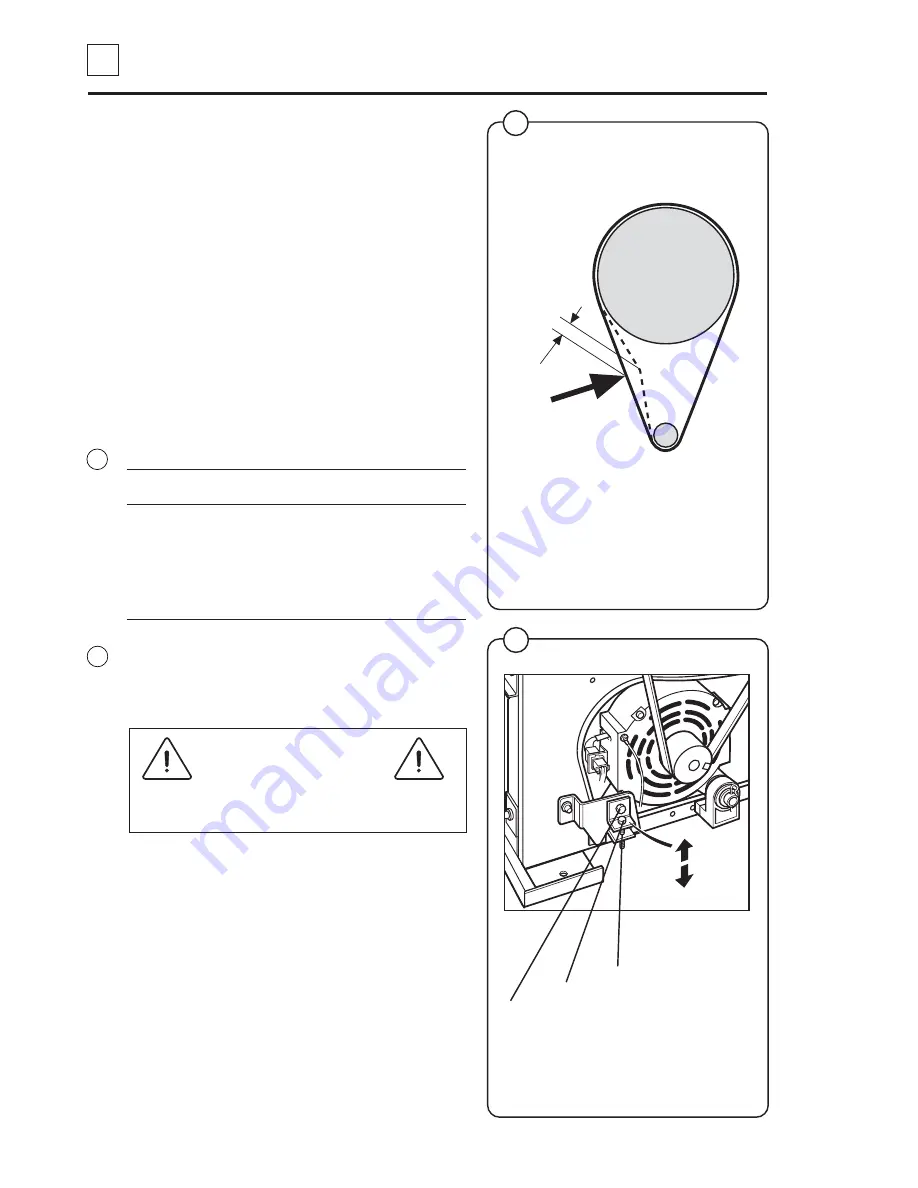
Adjust drive belt tension if values exceed
those shown in the table.
Retaining screw for drive belt tension
Locking nut
Fig.
7
Fig.
8
7
8
3. Connect the new motor to the cable and use
straps to secure the cable.
4. Connect the motor cable to the motor.
5. Fit the lower rear piece and secure the drain
hose connection with screws.
6. Fit the upper rear piece.
7. Connect the voltage supply and verify that the
motor operates normally.
Adjustments
Drive belt tension
The drive belt is pre-tensioned upon delivery
from the factory.
The drive belt tension should be as follows:
Model
Force A
Post tensioning B
New belt C
(N)
(mm)
(mm)
W375N
35
8
6
W385N
35
9
8
W3105N
40
8
7
W3130N
40
8
7
W3180N
60
9
7
W3250N
68
8
7
W3330N
45
8
6
To adjust drive belt tension, first undo the motor
retaining screw a couple of turns, then press
down on the motor to achieve proper tensioning.
Lock the locking nut when the tension is correct.
Then lock the retaining screw.
Inspection of the drive belt tension is an
important part of general maintenance.
Adjusting screw
Summary of Contents for W620 Classic
Page 1: ...DOC NO 438 9205 85 07 EDITION 49 2004 W620 W630 W640 W655 W675 Classic SERVICE MANUAL ...
Page 2: ......
Page 4: ...Intentionally blank ...
Page 6: ...Intentionally blank ...
Page 10: ...Intentionally blank ...
Page 12: ...Intentionally blank ...
Page 13: ...1 1 1 Safety precautions Service Manual Contents Safety precautions 3 ...
Page 14: ...Intentionally blank ...
Page 16: ...Intentionally blank ...
Page 17: ...2 Technical data Contents Technical data 3 Connections 3 ...
Page 18: ...Intentionally blank ...
Page 28: ...Intentionally blank ...
Page 30: ...Intentionally blank ...
Page 37: ...11 Regular maintenance Contents Daily 3 Every third month 3 ...
Page 38: ...Intentionally blank ...
Page 42: ...Intentionally blank ...
Page 58: ...Intentionally blank ...
Page 61: ...27 Thermostat Contents Data 3 Description 3 Repair instructions 4 Replacing the thermostat 4 ...
Page 62: ...Intentionally blank ...
Page 66: ...Intentionally blank ...
Page 76: ...Intentionally blank ...
Page 78: ...Intentionally blank ...
Page 79: ...3 30 30 Motor Service Manual Warnings DANGER Be careful when measuring capacitors and filter ...
Page 85: ...38 Drain valve Contents Description 3 Function 3 Repairs 4 Disassembly 4 Assembling 5 ...
Page 86: ...Intentionally blank ...
Page 90: ...Intentionally blank ...
Page 91: ...39 Detergent compartment Contents Description 3 ...
Page 92: ...Intentionally blank ...
Page 94: ...Intentionally blank ...
Page 96: ...Intentionally blank ...
Page 100: ...Intentionally blank ...
Page 102: ...Intentionally blank ...
Page 108: ...Intentionally blank ...
Page 114: ...Intentionally blank ...
Page 132: ......

