background image

7

STRAIN

RELIEF

MOUNTING

BRACKET

NUT

TIGHTEN
NUT
TO THESE
THREADS

POWER
CORD

RED

WHITE

BLACK

TERMINAL BLOCK

SILVER TERMINAL

GREEN
GROUND
SCREW

GREEN POWER CORD
GROUND WIRE

GREEN
NEUTRAL
GROUND
WIRE

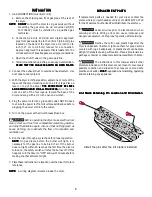
4. Thread a U.L. listed 30 amp power cord, NEMA 14-30

type ST or SRDT through the strain relief.

5. Attach the green power cord ground wire to the cabinet

with the green ground screw.

6. Attach the white (neutral) power cord conductor from the

power cord and the green ground wire from the dryer
harness (removed from the ground screw in step 3) to the
silver-colored center terminal on the terminal block. Tighten
the screw securely.

7. Attach the red and black power cord conductors to the

outer brass-colored terminals on the terminal block.

 Do not make a sharp bend or crimp wiring/

conductor at the connections.

8. Tighten the screws securing the cord restraint firmly against

the power cord.

9. Tighten the strain relief nut securely so the strain relief

does not turn.

10. Reinstall the terminal block access cover.

TYPICAL 4
CONDUCTOR CORD

RED 240V

BLACK 240V

WHITE NEUTRAL

GREEN GROUND

30 AMP NEMA 14-30 TYPE SRDT OR ST

30 AMP NEMA 14-30 TYPE SRDT OR ST

30 AMP NEMA 14-30 TYPE SRDT OR ST

30 AMP NEMA 14-30 TYPE SRDT OR ST

30 AMP NEMA 14-30 TYPE SRDT OR ST

TYPICAL 4
CONDUCTOR
RECEPTACLE

POWER CORD

TIGHTEN NUT
TO THESE
THREADS

STRAIN
RELIEF
MOUNTING
BRACKET

GREEN
GROUND
SCREW

NUT

SILVER TERMINAL

GREEN
NEUTRAL
GROUND
WIRE

ELECTRICAL CONNECTIONS

ELECTRICAL CONNECTIONS

ELECTRICAL CONNECTIONS

ELECTRICAL CONNECTIONS

ELECTRICAL CONNECTIONS

FOR 3-WIRE SYSTEM

FOR 3-WIRE SYSTEM

FOR 3-WIRE SYSTEM

FOR 3-WIRE SYSTEM

FOR 3-WIRE SYSTEM

      ELECTRIC

ELECTRIC

ELECTRIC

ELECTRIC

ELECTRIC Dryer

 Dryer

 Dryer

 Dryer

 Dryer

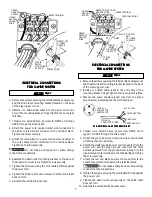
1. Remove the screws securing the terminal block access cover

and the strain relief mounting bracket located on the back
of the dryer upper corner.

2. Install a U.L. listed strain relief into the power cord entry

hole of the mounting bracket. Finger tighten the nut only at
this time.

3. Thread a U.L. listed 30 amp. power cord, NEMA 10-30 Type

SRDT, through the strain relief.

4. Attach the power cord neutral (center wire) conductor to

the silver colored center terminal on the terminal block.
Tighten the screw securely.

5. Attach the remaining two power cord outer conductors to

the outer brass colored terminals on the terminal block.
Tighten both screws securely.

 Do not make a sharp bend or crimp wiring/

conductor at connections.

6. Reattach the strain relief mounting bracket to the back of

the dryer with two screws. Tighten screws securely.

7. Tighten the screws securing the cord restraint firmly against

the power cord.

8. Tighten the strain relief nut securely so that the strain relief

does not turn.

9. Reinstall the terminal block cover.

ELECTRICAL CONNECTIONS

ELECTRICAL CONNECTIONS

ELECTRICAL CONNECTIONS

ELECTRICAL CONNECTIONS

ELECTRICAL CONNECTIONS

FOR 4-WIRE SYSTEM

FOR 4-WIRE SYSTEM

FOR 4-WIRE SYSTEM

FOR 4-WIRE SYSTEM

FOR 4-WIRE SYSTEM

      ELECTRIC

ELECTRIC

ELECTRIC

ELECTRIC

ELECTRIC Dryer

 Dryer

 Dryer

 Dryer

 Dryer

1. Remove the screws securing the terminal block access cover

and the strain relief mounting bracket located on the back
of the dryer upper corner.

2. Install a U.L. listed strain relief in the entry hole of the

mounting bracket. Finger tighten the nut only at this time.

3. Remove the green neutral ground wire from the green

ground screw located above the terminal block.

Summary of Contents for Gas & Electric Gas & Electric Dryer

Page 1: ...hese instructions This will simplify the installation and ensure the dryer is installed cor is installed cor is installed cor is installed cor is installed corr r r r rectly and safely ectly and safely ectly and safely ectly and safely ectly and safely Leave these instr Leave these instr Leave these instr Leave these instr Leave these instructions near the Dr uctions near the Dr uctions near the D...

Page 2: ... exhaust system MUST be exhausted to the outside of dryer exhaust system MUST be exhausted to the outside of dryer exhaust system MUST be exhausted to the outside of the building the building the building the building the building Do not allow combustible materials for example clothing draperies curtains paper to come in contact with exhaust system The dryer MUST NOT MUST NOT MUST NOT MUST NOT MUS...

Page 3: ...l to or less than 1 2 psig 3 45 kPa INSTALL MALE FITTINGS IN CORRECT DIRECTION In installations where the exhaust system is not described in the charts the following method must be used to determine if the exhaust system is acceptable 1 Connect an inclined or digital manometer between the dryer and the point the exhaust connects to the dryer 2 Set the dryer timer and temperature to air fluff cool ...

Page 4: ...OSET DOOR CLOSET DOOR CLOSET DOOR CLOSET DOOR CLOSET DOOR 1 2 54 cm 1 2 54 cm 1 2 54 cm 1 2 54 cm 1 2 54 cm 0 0 cm 0 0 cm 0 0 cm 0 0 cm 0 0 cm 4 A minimum of 120 square inches 774 2 square cm of opening equally divided at the top and bottom of the door is required Air openings are required to be unobstructed when a door is installed A louvered door with equivalent air openings for the full length ...

Page 5: ...y lay the dryer on its left side and remove foam shipping base To prevent damage do not use the control panel or coin meter housing as a means to pick up or move the dryer NOTE NOTE NOTE NOTE NOTE On under counter model clothes dryers the top panel may be removed for installation 2 Return the dryer to an upright position PACKING FOAM SHIPPING REMOVE 4 SCREWS ONE FROM EACH HINGE FIRST ROUGH IN DIME...

Page 6: ...trical shock Do not use an aluminum wired receptacle with a copper wired power cord and plug or vice versa A chemical reaction occurs between copper and aluminum and can cause electrical shorts The proper wiring and receptacle is a copper wired The proper wiring and receptacle is a copper wired The proper wiring and receptacle is a copper wired The proper wiring and receptacle is a copper wired Th...

Page 7: ...OR 3 WIRE SYSTEM FOR 3 WIRE SYSTEM ELECTRIC ELECTRIC ELECTRIC ELECTRIC ELECTRIC Dryer Dryer Dryer Dryer Dryer 1 Remove the screws securing the terminal block access cover and the strain relief mounting bracket located on the back of the dryer upper corner 2 Install a U L listed strain relief into the power cord entry hole of the mounting bracket Finger tighten the nut only at this time 3 Thread a ...

Page 8: ...aker fuse box Before operating the dryer make sure the dryer area is clear and free from combustible materials gasoline and other flammable vapors Also see that nothing such as boxes clothing etc obstructs the flow of combustion and ventilation air 6 Run the dryer through a cycle check for proper operation NOTE NOTE NOTE NOTE NOTE On gas dryers before the burner will light it is necessary for the ...

Reviews: