©2017 Warn Industries, Inc. WARN® and the WARN logo are trademarks of Warn Industries Inc.
8
105714A0
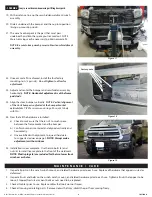
Figure 17
WARNING
Always use assistance when moving or lifting heavy parts.
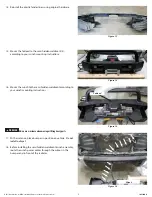
19. With assistance, line up the semi hidden weldment/winch
assembly.
20. Slide it underneath the bumper and then up into position
(lining up mounting studs).
21. The winch control pack is the part that must pass
underneath and into the space you trimmed out. NOTE:
More trimming may be necessary to obtain accurate fit.
NOTE: Be sure to keep winch power cables clear of weldment
assembly.
22. Once accurate fit is achieved, install the four factory
mounting nuts (
4 per side
).
Do not tighten to allow for
adjustment.
23. Adjust and center the bumper and semi hidden assembly
horizontally.
NOTE: Horizontal adjustment is at the frame
pad studs.
23. Align the stock bumper vertically.
NOTE: Vertical alignment
of the stock bumper is adjusted at the bumper bracket
vertical slots.
TIP: We recommend using a floor jack to help
with this.
24. Now that all the hardware is installed:
a) Check to make sure that there isn’t to much space
between the frame brackets and the bumper.
b) Confirm bumper is centered and aligned vertically and
horizontally.
c) Once satisfied with alignment, torque all hardware
to suggested values on page 2.
NOTE: Always make
adjustments with assistance.
25. Installation is now complete. Use the two bolts (5) and
nuts (4) to install license plate to the front of the weldment.
NOTE: Plastic plugs (6) are included for the two lower front
winch access holes.
Factory nuts
Figure 18
M A I N T E N A N C E / C A R E
1. Inspect all parts on the winch, winch mount, and related hardware prior to each use. Replace all hardware that appears rusted or
deformed.
2. Inspect all nuts and bolts on the winch, winch mount,, and related hardware prior to each use. Tighten all nuts that appear to be
loose. Stripped, fractured, or bent bolts or nuts need to be replaced.
3. Check all cables prior to use. Replace cables that look worn or frayed.
4. Check all moving or rotating parts. Remove debris that may inhibit the part from moving freely.
Figure 19


