©2018 Warn Industries, Inc. WARN® and the WARN logo are trademarks of Warn Industries Inc.
4
102851A1
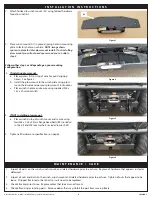
Figure 2
Figure 3
I N S T A L L A T I O N I N S T R U C T I O N S
1. Attach fairlead to winch mount (A1) using fairlead hardware
found in winch kit.
2. Place winch mount (A1) in place, aligning holes in mounting
plate to factory holes on vehicle.
NOTE: Image shows
spacers in place for later plow mount install. If not installing
plow mount you will not need spacers and you can skip to
step 4.
Follow either step 3 or 4 depending on your mounting
configuration.
3.
If installing plow mount:
a: Place spacers (A2) on top of winch mount (aligning
holes). See figure 2.
b. Install the plow mount to the winch plate using plow
mount hardware and per your plow mount instructions..
c. Place winch in place and secure using supplied M8 x
1.25 x 30mm bolts (B1).
4.
If NOT installing plow mount:
a. Place winch on top of winch mount and secure using
four M8 x 1.25 x 25mm flange head bolts (B2)
(included
in this kit)
and M8 lock washers
(included in winch kit)
.
5. Tighten all hardware to specifications on page 2.
Figure 1
Figure 4
M A I N T E N A N C E / C A R E
1. Inspect all parts on the winch, winch mount, and related hardware prior to each use. Replace all hardware that appears rusted or
deformed.
2. Inspect all nuts and bolts on the winch, winch mount and related hardware prior to each use. Tighten all nuts that appear to be
loose. Stripped, fractured, or bent bolts or nuts need to be replaced.
3. Check all cables prior to use. Replace cables that look worn or frayed.
4. Check all moving or rotating parts. Remove debris that may inhibit the part from moving freely.
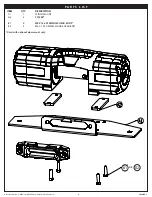
A1


