


4. LED
The LED is placed in
t
he
t
op righ
t
corner above
t
he display
.
LED signal
Indicates
C ons
t
an
t
red ligh
t
Relay is ac
t
ive
Blinks
Sys
t
em
f
ailure
.
(
see error
messages
)
No ligh
t
Relay no
t
ac
t
ive or
t
hermos
t
a
t
t
urned o
ff
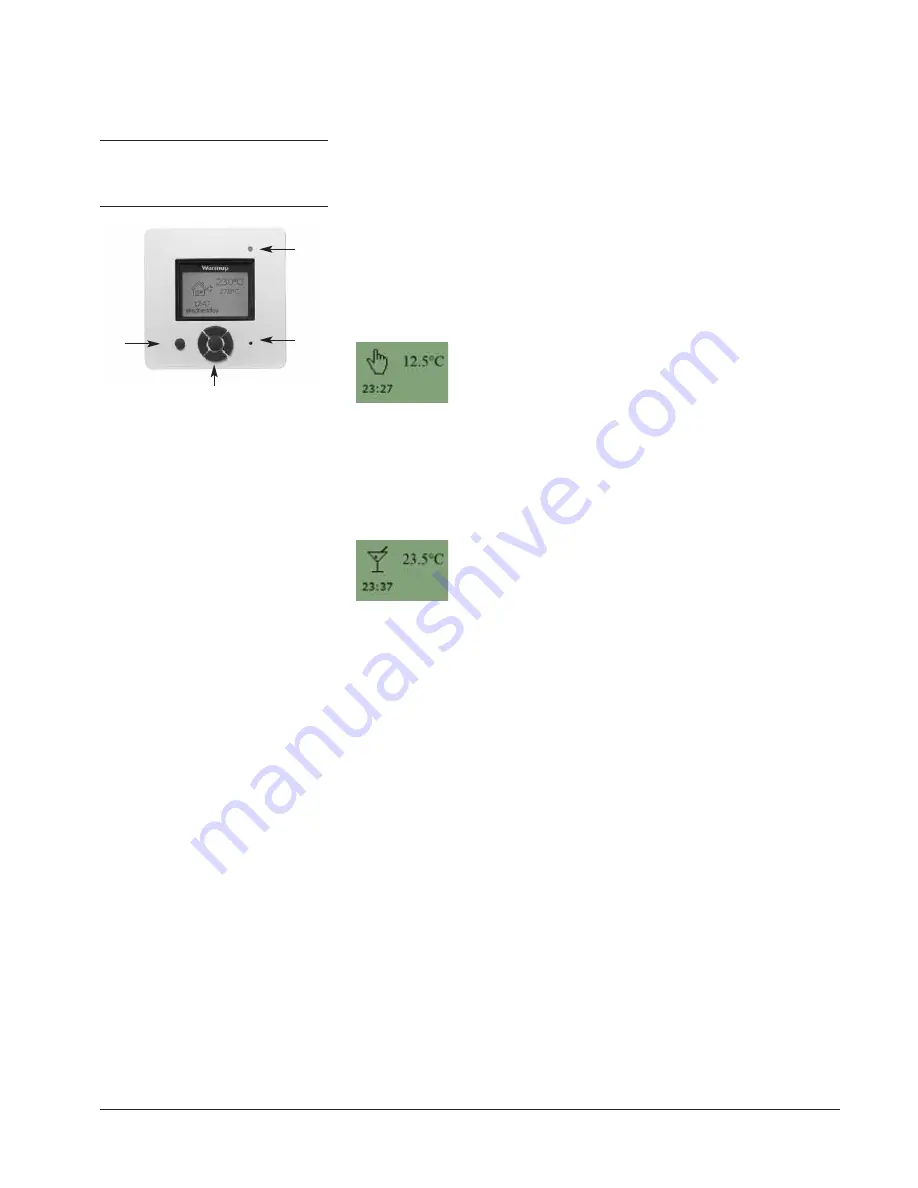
5. Buttons
You can use
t
he s
t
andby bu
tt
on
t
o
t
urn display
and regula
t
ion o
f
t
empera
t
ure on/o
ff
.
When
t
he
t
hermos
t
a
t
is swi
t
ched o
ff
,
t
he relay
disengages
.
The clock will keep going
,
t
hough
.
When you press
t
he Rese
t
bu
tt
on
(
use pen
t
o
ac
t
iva
t
e
)
f
or 3 seconds
,
a " C on
f
irm
f
ac
t
ory
rese
t
"
t
ex
t
will be shown on
t
he display
.
Then
press
t
he Accep
t
bu
tt
on
t
o rese
t
t
he
t
hermos
t
a
t
,
which will
t
hen s
t
ar
t
up wi
t
h de
f
aul
t
values and
display
t
he ins
t
alla
t
ion menu
.
The bu
tt
ons
f
or naviga
t
ing in
t
he menus and
selec
t
ing/changing se
tt
ings are placed in
t
he
middle
.
Back/Cancel
• Go back in
t
he menus
(
i
.
e
.
upwards in
t
he menu
hierarchy
)
.
• C ancel changes o
f
curren
t
value
.
Forward
• Move
f
orward in
t
he menus
(
i
.
e
.
downwards in
t
he
menu hierarchy
)
.
• Quick s
t
eps upwards when
speci
f
ying values
,
e
.
g
.
t
empera
t
ure
.
Up
• Move up in menu
.
• Raise curren
t
value
,
e
.
g
.
t
empera
t
ure
.
Down
• Move down in menu
.
• Lower curren
t
value
,
e
.
g
.
t
empera
t
ure
.
Accept/Change
• Selec
t
i
t
em
f
rom menu
t
o
see/change/se
t
value
.
• Accep
t
new/changed
se
tt
ing
.
6. Menus for Setting Up
the Thermostat
You can program
t
he
t
hermos
t
a
t
and make
various se
tt
ings by using
t
he menu sys
t
em
.
To
open
t
he main menu
,
press
t
he Accep
t
bu
tt
on
.
I
n
t
he sec
t
ions below every i
t
em on
t
he main
menu will be described in more de
t
ail
.
6.1. Operation
Here you can choose be
t
ween
t
hree di
ff
eren
t
ways o
f
se
tt
ing
t
he
t
empera
t
ure
(
s
)
:
6.1.1. Auto
Selec
t
Au
t
o i
f
you wan
t
t
he
t
empera
t
ure
t
o be
con
t
rolled and opera
t
ed au
t
oma
t
ically via
t
he 4-
even
t
sys
t
em
.
6.1.2. Manual
Here you can cancel
t
he scheduled 4-even
t
program
(
e
.
g
.
during holidays
)
and se
t
t
he
wan
t
ed
t
empera
t
ure manually
.
You may wan
t
t
o
adjus
t
t
he
t
empera
t
ure
t
o
f
or example 5
°
C
f
or
f
ros
t
pro
t
ec
t
ion while you are away
.
To se
t
t
he
t
empera
t
ure
,
do
t
he
f
ollowing:
1
.
Selec
t
Manual
.
2
.
Use
t
he up/down bu
tt
on
t
o raise/lower
t
he
t
empera
t
ure
.
3
.
Press
t
he Accep
t
bu
tt
on
t
o
f
inish
.
Please no
t
e: The
t
empera
t
ure
t
ha
t
you se
t
manually will be valid un
t
il you cancel
t
he
manual mode again by selec
t
ing Au
t
o
.
6.1.3. Comfort
Here you can se
t
a
t
emporary
Comfort
t
empera
t
ure
(
so-called par
t
y mode
)
f
or a single
even
t
.
To se
t
t
he
t
empera
t
ure
,
do
t
he
f
ollowing:
1
.
Selec
t
Comfort
.
2
.
Use
t
he up/down bu
tt
on
t
o raise/lower
t
he
t
empera
t
ure
.
3
.
Press
t
he Accep
t
bu
tt
on
t
o
f
inish
.
Please no
t
e: C om
f
or
t
mode is a
t
emporary
,
manual se
tt
ing
t
ha
t
will be au
t
oma
t
ically
cancelled by
t
he nex
t
even
t
in
t
he scheduled 4-
even
t
sys
t
em
.
6.2. Setting 4-event
If
Auto
has been selec
t
ed in
t
he
Operation
menu
,
t
he 4-even
t
sys
t
em can be se
t
t
o
au
t
oma
t
ically con
t
rol
t
he
t
empera
t
ure se
tt
ings
f
or each day in a period o
f
7 days
.
You can selec
t
t
he wan
t
ed
t
empera
t
ure
f
or
Day
and
Night
,
f
or when you are Ou
t
and a
t
Home
,
and
f
or
t
he
Weekend Day
and
Weekend Night
.
Moreover
,
you can de
f
ine when you wan
t
each
t
ime period
(
Day
,
Night
,
Out
,
Home
,
Weekend
Day
,
and
Weekend Night
)
t
o begin
.
Please no
t
e: You need
t
o use
t
he Down bu
tt
on
t
o move
t
o
t
he end o
f
t
he menu
.
Finally you can speci
f
y
t
empera
t
ures and
periods
(
Day
,
Nigh
t
,
Ou
t
,
Home
)
f
or each day o
f
t
he week
(
Monday
,
Tuesday
,
Wednesday
,
Thursday
,
Friday
,
Sa
t
urday
,
and Sunday
)
.
This
requires
,
t
hough
,
t
ha
t
t
he
Mon-Sun
,
4-events
op
t
ion has been selec
t
ed in
t
he
Programming
menu
(
will be shown as
Programming
: 7:0 on
t
he display
)
.
Please re
f
er
t
o sec
t
ion abou
t
Programming on page 8
.
6.2.1. Example of Scheduling 4-event Set-up
If
you in
t
he
Programming
menu have selec
t
ed
Mon-Fri
,
Sat-Sun
(
shown as Programming: 5:2
on
t
he display
)
you can se
t
up
t
he 4 periods
(
called even
t
s
)
in
t
he
f
ollowing way:
1
.
Choose
Day
.
• Speci
f
y when
Day time
begins
.
Use
t
he up/down bu
tt
on
t
o mark
t
he
wan
t
ed
t
ime
.
Press
t
he Accep
t
bu
tt
on
t
o
f
inish
.
• Speci
f
y
t
he wan
t
ed
Day temperature
.
Use
t
he up/down bu
tt
on
t
o raise/lower
t
he
t
empera
t
ure
.
Press
t
he Accep
t
bu
tt
on
t
o
f
inish
.
2
.
Choose
Out
.
• Speci
f
y when Ou
t
t
ime begins
.
• Speci
f
y
t
he wan
t
ed
t
empera
t
ure when you
are ou
t
and away
f
rom home
(
Ou
t
t
emp
)
.
3
.
Choose
Home
.
• Speci
f
y when
Home time
begins
.
• Speci
f
y
t
he wan
t
ed
t
empera
t
ure when you
are a
t
home
(
Home
t
emp
)
.
4
.
Choose
Night
.
• Speci
f
y when
Night time
begins
.
• Speci
f
y
t
he wan
t
ed
Night temperature
.
5
.
Choose
Weekend Day
.
• Speci
f
y when Day
t
ime begins on
weekends
.
• Speci
f
y
t
he wan
t
ed Day
t
empera
t
ure on
weekends
.
6
.
Choose
Weekend Night
.
• Speci
f
y when
Night time
begins on
weekends
.
• Speci
f
y
t
he wan
t
ed
Night temperature
on
weekends
.
6.3. Programming
Here you can choose be
t
ween various
programming op
t
ions
t
ha
t
are used in
connec
t
ion wi
t
h scheduling
t
he 4-even
t
sys
t
em:
•
Mon-Fri, Sat-Sun
Will be shown as 5:2 on
t
he display
.
This
se
tt
ing allows you
t
o have 5 days wi
t
h
t
he
same 4-even
t
s
,
and 2 days wi
t
h
t
he same 2
even
t
s
.
The days 1-5 are con
t
rolled by
t
he
se
tt
ings
f
or
Day, Night, Out, Home
and
day 6-7 is con
t
rolled by
t
he se
tt
ings
f
or
Weekend Day
and
Weekend Night
.
•
Mon-Sat, Sun
Will be shown as 6:1 on
t
he display
.
This
se
tt
ing allows you
t
o have 6 days wi
t
h
t
he
same 4-even
t
s
,
and 1 day wi
t
h 2 even
t
s
.
The days 1-6 are con
t
rolled by
t
he se
tt
ings
f
or
Day, Night, Out, Home
and day 7 is
con
t
rolled by
t
he se
tt
ings
f
or
Weekend Day
and Weekend Nigh
t
.
•
Mon-Sun, 4-events
Will be shown as 7:0 on
t
he display
.
This
se
tt
ing allows you
t
o have 7 days wi
t
h 4
di
ff
eren
t
even
t
s
(
Day, Night, Out, Home)
.
The days 1-7 are con
t
rolled by individual
day se
tt
ings
(
Monday
–
Sunday
)
.
6.4. General Settings
6.4.1. Language
Here you can selec
t
t
he language you wan
t
t
o
be used on
t
he display
.
You can choose
be
t
ween
t
he
f
ollowing languages:
• English
• G erman
(
Deu
t
sch
)
• French
(
Francais
)
• Spanish
(
Espanol
)
• Por
t
uguese
(
Por
t
ogese
)
6.4.2. Time
• Here you can selec
t
whe
t
her 12- or 24-hour
clock should be used
.
• Fur
t
her
,
you can se
t
t
he
t
ime here
.
To se
t
t
he
t
ime
,
selec
t
Set time
.
Then use
t
he
up/down bu
tt
ons
t
o adjus
t
t
he
t
ime
,
and
press
t
he Accep
t
bu
tt
on
t
o
f
inish
.
S
t
andby
Naviga
t
ion
LED
Accep
t
Back/C ancel
Forward
Up
Down
Rese
t


