background image

19

GB

temperatures  above  400  °Celsius.  This  will  happen 
during  the  first  few  times  of  lighting  the  stove  and 
temperatures  rise  to  600  °C. Though  this  may  give  an 
unpleasant smell, it is otherwise harmless. It is advisable 
to keep the stove burning with limited fuel for at least 6 
hours when lighting the stove for the first 4 or 5 times. 

Air the room well when the stove is burning. Make sure 

that any cooking hood is not turned on when the stove 

is burning; a cooking hood extracts the combustion air 

that the stove needs.

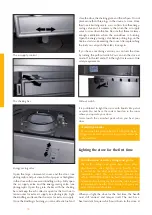
Some deposit may form on the glass panes of the stove 
when you ‘anneal’ your hearth. You can easily remove 
this deposit with a damp cloth after the stove has cooled 
down.  You  can  also  use  some  cleansing  agent  for 
ceramic rings. Please make sure you do not leave any 
finger marks on the clean glass. Finger marks burn into 
the glass and cannot be removed later.

Fuel: wood 

Wood species   


Drying time

Fir, Poplar 


year

Lime, Willow, Spruce, Birch, Ash, Alder  1.5 

years

Fruit trees, Beech 


2  

years

Oak 


2.5  

years

The stove only burns on wood. Do not put more than 3 
to 4 kg of fuel in the stove at the time. Always use clean 
and cut logs, which have sufficiently dried. Please see 
the above list for drying times. Wet wood does not burn 
well and gives heavy smoke emission. It may blacken the 
glass pane of your stove with soot and build up smut in 
the flue pipe. This may increase the risk of chimney fire.

Fresh,  moist  wood  contains  about  50%  moisture. 
Cleaved wood still contains 20% moisture after drying 
it for a year and moisture percentage will be decreased 
to  12  to  15%  after  drying  it  for  two  years.  Dry  wood 
gives  nice  flames  and  little  or  no  smoke,  and  the  fire 
will crackle when burning. Wet wood makes a hissing 
sound, gives much smoke and only small flames which 

will considerably dampen the pleasure of burning your 
stove and the heat output.

Do  not  put  any  paraffin-containing  logs  in  your  stove. 
When  the  door  is  closed,  the  high  heat  will  melt  the 
paraffin  from  the  logs  too  quickly.  The  polluted  flue 
gasses which consequently develop will deposit on and 
burn in the glass of your stove and cannot be removed 
later.   

Do not use any wood that is painted, impregnated, glued 
together or processed in any other way. The flue gases 
are very harmful to the environment and may affect your 
stove.  It  is  also  prohibited  to  burn  plastics  and  other 
waste matter due to poisonous smoke development.

The best way to burn your stove

All WANDERS’ stoves are designed so that they give a 
maximum  output.  A  well-lit  wood-burning  stove  can 
produce a yield of about 75%. This means that you need 

less  wood  for  the  same  amount  of  heat.  Moreover,  a 

well-lit stove produces less smoke pollution. Below are 
a few tips to give you optimum pleasure:

•  For a regular combustion, close the grate shaker when 

the stove is fuelled with wood.

•  If you close the energy-saving valve during operation 

you  will  save  a  considerable  quantity  of  fuel  and 
increase heat output at the same time

•  Always  burn  your  stove  with  its  door  closed;  this 

will improve the output within 8 to 10 times. When 
the door of the stove is open, the chimney will draw 
more air than is needed for proper combustion. The 
relatively cold air will cool the fire. It will also preclude 
fire damage by any sputtering sparks, especially from 
softwood. 

•  Do not put more than 3 logs on the fire at one time. Too 

much  fuel  at  one  time  thwarts  efficient  combustion 
and burdens the environment unnecessarily.

Newly-built house or recently renovated? 

It  is  advisable  to  wait  six  weeks  before  lighting 
the  stove  in  a  newly-built  house  that  has  recently 
been  completed,  or  in  a  space  that  has  recently 
been  renovated  drastically. The  walls  and  ceilings 
still  contain  gases,  softeners  and  moisture  from 
plasterwork  or  paint.  The  warm  air-streams  may 
discolour the dust particles in the space which may 
stick to walls and ceilings. Even the moisture in the 
walls and ceilings will become warm and may cause 
yellow stains.

Wood species and storage

You can use all kinds of woods as fuel as long as it 
is  clean,  split  and  dry.  Hardwood  like  oak,  beech 
and  birch  burn  slowly,  give  off  much  heat  and 
form  charcoal  easily.  Softer  woods  like  spruce,  fir 
and poplar give more flames but less heat and less 
charcoal. 

The best place to store timber is in a windy spot but 
sheltered from the rain. This is how the logs can dry 
in a natural way. Pile the logs on an old pallet or a 
frame to let the wood dry from underneath and to 
prevent the lower logs from being in contact with 
water.

Summary of Contents for Boreal

Page 1: ...installatievoorschriften Boreal 02 GB Users guide and installation manual for the Boreal 14 FR Mode d emploi et instructions d installation le Boreal 27 D Gebrauchsanweisung und Montage Vorschriften B...

Page 2: ...maar ook een mogelijkheid tot een externe luchttoevoer aansluiting In het eerste deel van deze handleiding vindt u tips en aanwijzingen voor een juist en veilig gebruik van uw houtkachel In deel twee...

Page 3: ...lag 4 Installatie 4 Aansteken van de kachel 4 Eerste keer stoken 5 Brandstof 6 De optimale stookwijze 6 Schoorsteen en rookkanaal 7 Onderhoud 7 Veiligheid 8 Garantie 8 Algemene aanwijzingen 9 Installa...

Page 4: ...ar de muur of andere brandbare materialen gericht staan tijdens en tot twee uur na het stoken Installatie Over het algemeen zorgt de dealer waar u de Boreal heeft aangeschaft ook voor de installatie v...

Page 5: ...nen van de deur de spaarklep Hierdoor voorkomt u dat er rook in uw kamer komt Na het inleggen van het hout kan de spaarklep weer dichtgeschoven worden Indien u een draaibare versie heeft kunt u door m...

Page 6: ...ilde rookgassen die hierdoor ontstaan slaan direct neer op het glas van de kacheldeur branden in en zijn dan niet meer te verwijderen Gebruik geen hout dat is geverfd ge mpregneerd verlijmd of andersz...

Page 7: ...Wij adviseren u om een laagje as van twee tot drie centimeter op het rooster te laten liggen Zo beschermt u het gietijzer Maak het schudrooster in de kachel met een zachte borstel schoon Reinig de ka...

Page 8: ...B V te Netterden een garantie van 5 jaar na aankoopdatum mits de houtkachel op de juiste wijze is ge nstalleerd en wordt gebruikt volgens de aanwijzingen in deze handleiding Onder de garantie vallen...

Page 9: ...en regelgeving voor plaatsing en gebruik van houtkachels WANDERS biedt geen garantie wanneer de Boreal onvolledig of onjuist is aangesloten of ge nstalleerd Het is niet toegestaan de kachel te plaatse...

Page 10: ...teriaal dient een temper atuur van 700 graden Celsius te weerstaan en een dichtheid van 80 kg m3 te hebben Zie voor even tueel te gebruiken isolatiematerialen de tabel op pa gina 13 4 Indien de rookga...

Page 11: ...en plafond Indien dit bij een draaibare uitvoering het geval is zal dit het draaien moeilijker maken 8 Sluit eventueel de externe verbrandingluchttoevoer aan Voor de Boreal op een console dient u eers...

Page 12: ...van 7 kW wordt verkregen bij een schoorsteentrek van 0 10 mbar Brandstof houtblokken 30 x 10 cm Max opleg hoeveelheid 3 stuks Primaire luchtklep max Secundaire luchtopening max Brandtijd brandstof on...

Page 13: ...en wat in grijs gebied staat is toegestaan Isolatie Verpakt Warmtegeleiding Bovenste Dichtheid gebruikstemp nr artikel nr vorm nr verpakt nr C nr Kg m3 10 Mineraal wol 01 Banen 01 Matten verstikt 10 1...

Page 14: ...14 User s Guide and Installation Manual Boreal GB...

Page 15: ...en the Netherlands and is for the greater part handmade Only the best materials are used for the construction and comply with current international standards This will guarantee that your woodstove ha...

Page 16: ...ingle glance 17 Installation 17 Lighting the stove 17 Lighting the stove for the first time 18 Fuel wood 19 The best way to burn your stove 19 Chimney and flue 20 Maintenance 20 Safety 20 Guarantee 21...

Page 17: ...here you purchased your stove to also take care of installing it If this is not the case please ensure that the installation is done by a certified installer A certified installer can also give you th...

Page 18: ...e fuel you can push the valve close again If you have a revolving version you can turn the stove by turning the pull out switch You can turn the stove at most 60 to the left and 60 to the right for re...

Page 19: ...od that is painted impregnated glued together or processed in any other way The flue gases are very harmful to the environment and may affect your stove It is also prohibited to burn plastics and othe...

Page 20: ...s with your fingers Finger marks burn into the glass Oil the hinges and the door fastener once in a while Do not use any aggressive cleaning agents or abrasives to maintain your stove When the stove i...

Page 21: ...e instructions in the manual The guarantee includes all defects which can be reduced to flaws in material and construction in which case you will receive the new parts free of charge Labour costs or o...

Page 22: ...rcades and corridors accessible to the public Stairwells except in buildings with no more than 2 dwellings Spaces where highly flammable or explosive materials are used Spaces where an exhaust system...

Page 23: ...00 C and have a density of 80 kg m3 Please see for insulation materials table on page 26 8 Avoid heat transmission when placing the stove Heat transmission of a burning stove can penetrate the wall an...

Page 24: ...rt safety Baffle plate and placing it External air connection in the bottom Removing the front cover of the support Rotating the hearth Repairs Replacing the glass Be careful The glass is sharp Remove...

Page 25: ...nal heat of 7 kW is obtained with a chimney draught of 0 10 mbar Fuel wood logs 30 x 10 cm Maximum supply 3 pieces Primary air valve max Secondary air outlet max Fuel burning period about 1 hour Flue...

Page 26: ...se products given in the grey shaded part Insulation Packed Thermal conduction Maximum Density appl temp no Article no Form no packed no C no Kg m3 10 Mineral wool 01 Bands 01 Stitched mats 10 100 02...

Page 27: ...27 FR Mode d emploi et instructions d installation Boreal FR...

Page 28: ...clients le Boreal est propos en plusieurs options La premi re partie de ce mode d emploi est consacr e aux conseils pour une utilisation correcte de votre po le bois en toute s curit La deuxi me part...

Page 29: ...Allumage du po le 30 Premier chauffage 31 Combustible le bois 32 La fa on optimale de chauffer le po le 33 Chemin e et conduit de chemin e 33 Entretien 33 S curit 34 Garantie 34 Instructions d instal...

Page 30: ...re Boreal qui se charge de l installation du po le Si ce n est pas le cas confiez la un installateur agr C est lui qui vous conseillera aussi sur le conduit de chemin e auquel votre po le devra tre ra...

Page 31: ...e diminuer l allure du po le Pr voyez toujours une ventilation suffisante pendant l utilisation du po le Attention Si vous souhaitez rajouter des b ches n oubliez pas de rouvrir le clapet conomique av...

Page 32: ...nsignifiante Cela r duit le confort et le rendement du chauffage consid rablement Les b ches contenant de la paraffine ne sont pas admises au po le Apr s la fermeture de la porte la paraffine se s par...

Page 33: ...nt et descend tout en causant des nuisances dans votre environnement N teignez pas le feu d un coup l aide de l eau mais laissez le feu s teindre Sinon les mat riaux l int rieur du po le peuvent subir...

Page 34: ...nts et les personnes infirmes loign s d un po le qui br le et ne laissez les pas seuls dans la pi ce Eventuellement vous pouvez mettre en place un pare feu 3 Ne versez ou ne mettez pas des liquides ou...

Page 35: ...ces de s curit anti incendie la rotation maximale est de 120 et elle se fait par tapes par des pas de 15 Pour r aliser une rotation du po le correcte du mod le tournant le tuyau d air ext rieur et le...

Page 36: ...e ferm e S il y a plusieurs appareils de combustion dans une pi ce il faut pr voir des prises d air en nombre suffisant pour que la combustion se fasse en toute s curit Le Boreal est de plus quip d un...

Page 37: ...ge il est recommand de suivre d abord les consignes du chapitre pr c dent intitul Pr paration Attention m nagez votre dos et prot gez le plancher pendant toute la dur e du montage 1 V rifiez l emballa...

Page 38: ...plaque frontale de la console Rotation R parations Enl vement de la vitre du Boreal Attention le verre est tranchant Elevez les 4 vis et les feuilles de ressorts des angles int rieurs de la porte Eca...

Page 39: ...tenue par un tirage de la chemin e de 0 10 mbar Combustible b ches 30 x 10 cm Chargement maximal 3 b ches Clapet d air primaire max Trou d air secondaire max Dur e de consommation combustible 1 heure...

Page 40: ...grise est admis Isolation Emballage Conduction Thermique Temp e de serv Densit la plus lev e no article no forme no emballage no C no Kg m3 10 Laine min rale 01 Bandes 01 Matelats piqu s 10 100 02 20...

Page 41: ...41 D Gebrauchsanweisung und Installationsvor schriften Boreal DE...

Page 42: ...real ist in unserer eigenen Fabrik in Netterden entwickelt hergestellt und gro enteils handgemacht Bei der Produktion wurden nur die besten Materiale die den europ ischen Normen entsprechen eingesetzt...

Page 43: ...ontage 44 Den Ofen anz nden 44 Das erste mal Heizen 46 Heizmaterial Holz 46 Die optimale Art zu Heizen 47 Schornstein und Rauchkanal 47 Wartung 47 Brandschutz 48 Garantie 48 Montagevorschriften Boreal...

Page 44: ...einen k mmert sich der H ndler wo Sie den Ofen gekauft haben auch um die Installation Wenn das nicht der Fall ist beachten Sie dass die Installation von einem anerkannten Installateur gemacht wird Ein...

Page 45: ...Luftzufuhr selbst bestimmen k nnen und wodurch der Ofen nicht so stark brennt Achten Sie darauf dass immer wenn der Holzofen brennt gen gend Luftzirkulation vorhanden ist Wenn wieder Holz zugelegt wer...

Page 46: ...e kein Rauch ab W hrend des Verbrennens kann man das Holz prasseln h ren Feuchtes Holz erzeugt ein zischendes Ger usch viel Rauch und eine kleine Flamme Die Freude am Heizen und die Nutzleistung werde...

Page 47: ...sseln wollen m ssen sie erst die Rauchgasabzugsklappe schlie en und danach dann die Luftzufuhr Nie mit Wasser l schen Schornstein und Rauchkanal Der Schornstein ist der wichtigste Teil Ihres Holzofens...

Page 48: ...6 Der Abstand zwischen dem Boreal und der dahinter liegenden feuerfesten Wand muss in allen gedreht en Positionen immer mindestens 10 Zentimeter be tragen 7 Der Abstand zwischen der Seite des Ofens mi...

Page 49: ...nal hat einen durchmesser von 150 mm Die externe Luftzufuhr hat einen durchmesser von 100 mm Der Ofen darf nur durch einen anerkannten Installateur und gem den unten beschriebenen Installationsvorschr...

Page 50: ...uftzufuhr mit einem Durchmesser von 100 mm darf maximal 1 m lang sein und 1x eine Biegung von 90 Grad haben Wenn die L nge gr er ist muss der Diameter vergr ert werden Brandschutzvorrichtung Im Zusamm...

Page 51: ...2 Ist der Schornstein gefegt und sauber siehe Kapitel Vorbereitung 3 ist der Kanal f r die Luftzufuhr sauber und frei sie he Kapitel Vorbereitung 4 Sind die Vorschriften zur Brandsicherheit erf llt si...

Page 52: ...le Ofen drehen Reparaturen Auswechseln der Glasscheibe Vorsicht das Glas ist scharf Entfernen Sie die 4 Schrauben und die Federpl ttchen in den inneren Winkeln der Ofent r Nehmen Sie vorsichtig die Sc...

Page 53: ...e W rme von 7 KW wird mit einem Schornsteinzug von 0 10 mbar Heizmaterial Holzscheite 30 x 10 cm Max Einlegen 3 St ck Prim re Luftklappe max Sekund re L ftungs ffnung max Brennzeit Heizmaterial ungef...

Page 54: ...Gebiet steht ist erlaubs Isolation Verpackt W rmeleitung H chste Gebr Dichte auchs Temp nr Artikel nr Form nr verpackt nr C nr Kg m3 10 Mineralwolle 01 Bahnen 01 Matten gen ht 10 100 02 20 11 Glaswoll...

Page 55: ...ETEKEND KACHEL OPMERKINGEN BENAMING NUMMER FORMAAT WIJZ AMERIKAANSE PROJECTIE WANDERS Tom Boreal smal 6 10 2008 GBO 1000 1089 33 1047 345 375 565 579 595 1 5 0 R 2 6 3 280 568 359 530 A B C D RUWHEID...

Page 56: ...MERIKAANSE PROJECTIE Wanders R 2 6 3 276 579 595 1315 1047 258 55 359 530 568 408 403 345 565 1 5 0 1 2 3 4 5 6 A B C D RUWHEID VOLGENS NEN 3634 TOLERANTIES 0 TENZIJ ANDERS AANG OPMERKINGEN R 2 6 3 1...

Page 57: ...BO 0535 HBO 0540 HBO 0583 SBO 1010 HBO 0569 HBO 0511 HBO 0568 GIE 0030 GIE 5106 DRA 1577 DRA 1575 GLA 0800 HBO 0530 SBO 1005 GIE 5120 HBO 0564 HBO 0545 HBO 0580 HBO 0558 DRA 1572 DRA 1573 HBO 0581 DRA...

Page 58: ...58 INK 8152 HBO 0570 INK 7041 HBO 0575 SBO 1012 HBO 0574...

Page 59: ...Technische tekeningen Technical drawings Dessins techniques Technische Zeichnungen 59...

Page 60: ......

Reviews: