


The adjusting screw (Item 21) is used to regulate the contour of the spray jet. By tur-
ning the screw to the left (screwing out) the jet becomes flat, by turning it to the right
(screwing in) it becomes round.
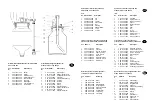
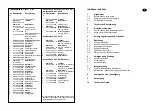
Versions:
PILOT XIII:
Gravity Feed Cup, Syphon Feed Cup, Material Connection for
Pressure Tanks and Pump Systems.
PILOT XIII-D:
Connection for Pressure Tanks and Pump Systems.
PILOT XIII-N:
Gravity Feed Cup, Pressure Feed Cup, Material Connection
for Pressure Tanks and Pump Systems.
PILOT XIII-HD:
Material Connection for Pressure Tanks and Pump Systems.
3
Safety Instructions
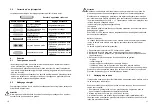
3.1
Safety Warning Symbols
Warning
This pictograph and the accompanying message "Warning" indicate possible risks to
persons, likely to result in serious and less serious injuries.
Caution
This pictograph and the accompanying message "Caution" indicate possible risks to
equipment, likely to result in serious and less serious damage.
Note
This pictograph and the accompanying message "Note" indicate additional informati-
on which will help towards a safe and efficient handling of the spray gun.
3.2
General Safety Instructions
• All applicable accident prevention rules and regulations as well as other recognised
industrial safety and health rules and regulations must be observed at all times.
• Use the spray gun only in well-ventilated rooms. Fire, naked flames and smoking
are strictly prohibited within the working area. WARNING – during the spraying of
flammable materials (e.g. lacquers, adhesives, cleaning agents, etc.), there is an
increased risk to health as well as an increased risk of explosion and fire.
• Measures must be taken to ensure that the spray gun is sufficiently grounded (eart-
hed) by means of a conductive air hose (maximum resistance 10
6
Ω
).
• Before carrying out maintenance or servicing work, always ensure that the air and
material feed to the spray gun have been de-pressurised. Risk of injury!
• When spraying materials, do not place your hands or other parts of the body in front
of the pressurised nozzle or the spray gun. Risk of injury!
• Never point the spray gun at persons or animals. Risk of injury!
• Always observe the spraying and safety instructions given by the manufacturers of
the spraying material and the cleaning agent. Aggressive and corrosive materials in
particular can be harmful to health.
• Exhaust air containing particles (overspray) must be kept away from the working
area and personnel. In spite of these measures, always wear the regulation brea-
thing masks and protective overalls when using the gun. Airborne particles repre-
sent a serious health hazard!
• Always wear hearing protection when using the gun or when in the vicinity of a gun
that is in use. The noise level generated by the spray gun is approx. 85 dB (A).
• After carrying out assembly or maintenance work, always ensure that all nuts,
bolts and screw connections have been fully tightened before the gun is used.
• Use only original replacement parts, since WALTHER can only guarantee safe
and fault-free operation for original parts.
For further information on the safe use of the spray gun and the spraying materi-
als, please contact WALTHER Spritz- und Lackiersysteme GmbH, D-42327 Wup-
pertal, Germany.
4
Assembly
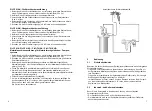
Connection of Input Lines
Note
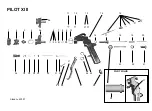
Please refer to the exploded view supplied with this manual when performing the
installation steps described on the following pages.
Warning
The air pressure at the gun must not exceed 8 bar; otherwise safe operation of the
gun cannot be guaranteed.
Warning
Material and air hoses fastened with a hose nozzle should additionally be secured
with a hose clamp.
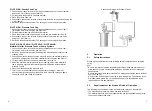
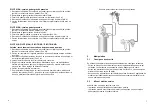
PILOT XIII: Gravity Feed Cup
1. Connect the air hose to the air pipe (clean compressed air) or to an air purifier
and the air inlet of the spray gun (Item 24).
2. Fill the gravity feed cup with screened material.
3. Close the gravity feed cup.
4. Switch on the pneumatic system. The spray gun is now ready for operation.
PILOT XIII: Syphon Feed Cup
1. Connect the air hose to the air pipe (clean compressed air) or to an air purifier
and the air inlet of the spray gun (Item 24).
2. Fill the syphon feed cup with screened material.
3. Close the syphon feed cup and screw it onto the gun attachment (Item 5 b).
4. Switch on the pneumatic system. The spray gun is now ready for operation.
4
5


