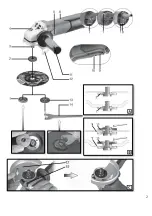
En
ENGLISH
12
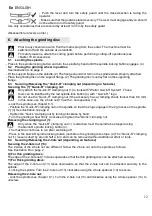
- Push the lever and turn the safety guard until the closed section is facing the
operator.
- Make sure that the guard is placed securely: The lever must engage and you should
not be able to turn the safety guard.
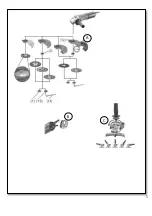
Use only accessories that are covered by at least 3.4 mm by the safety guard.
(Disassemble in reverse order.)
6. Attaching the grinding disc
Prior to any conversion work: Pull the mains plug from the socket. The machine must be
switched off and the spindle at a standstill.
For safety reasons, attach the cutting guard before performing cutting-off operations (see
chapter 10. Accessories).
6.1 Locking the spindle
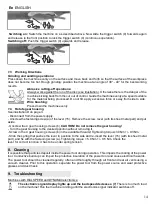
- Press in the spindle locking button and turn the spindle by hand until the spindle locking button engages. (4)
6.2 Placing the grinding wheel in position
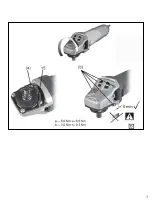
See illustration A on page 2.
- Fit the support flange on the spindle. (2) The flange should not turn on the spindle when properly attached.
- Place the grinding disc on the support flange. (2) The grinding disc must lay flat on the supporting
flange.
6.3 Securing/Releasing the
“Quick-R” clamping nut (depending on features)
Securing the (1)
”Quick-R” clamping nut:
Only attach the "Quick-R" clamping nut (1) to tools with "Walter Quick-R System". These
tools can be identified by the red spindle lock button (4) with " Quick-R " logo.
Do not use the
“Quick-R” clamping nut if the accessory has a clamping shank thicker than 6.8 mm!
In this case, use the 2-hole nut (13) with 2- hole spanner (14).
- Lock the spindle (see chapter 6.1).
- Position the "Quick-R" clamping nut on the spindle so that the 2 lugs engage in the 2 grooves on the spindle.
(1) (3) See illustration on page 2.
- Tighten the "Quick
“clamping nut by turning clockwise by hand.
- Turn the grinding wheel firmly clockwise to tighten the "
Quick “clamping nut.
Releasing the clamping nut (1):
Only when the
“Quick-R” clamping nut (1) is attached must the spindle be stopped using
the Quick-R spindle locking button (4).
- The machine continues to run after switching off.
- Press in the Quick-R spindle locking button just before the grinding disc stops. (4) The
“Quick-R” clamping
nut (1) loosens itself by around half a turn and can be removed without additional effort or tools.
6.4 Securing/Releasing the 2-hole nut (depending on features)
Securing the 2-hole nut (13):
The 2 sides of the 2-hole nut are different. Screw the 2-hole nut onto the spindle as follows:
See illustration B on page 2.
X) For thin grinding discs:
The edge of the 2-hole nut (13) faces upwards so that the thin grinding disc can be attached securely.
Y) For thick grinding discs:
The edge of the 2-hole nut (13) faces downwards so that the 2-hole nut can be attached securely to the
spindle.
- Locking the spindle. Turn the 2-hole nut (13) clockwise using the 2-hole spanner (14) to secure.
Releasing the 2-hole nut:
- Lock the spindle (see chapter 6.1). Turn the 2-hole nut (13) anticlockwise using the 2-hole spanner (14) to
unscrew.


